
AI Rendering
Use Presets for AI rendering
Learn how to apply Curated presets, save your own rendering instructions, reuse them across scenes, and remove or delete presets in the Vibe3D Render panel.
Open Render for a selected scene, find Additional Instructions, and choose Presets. Select Curated or Saved options, review the active presets and any written instructions, then select Render. To create your own preset, enter instructions, give them a name, and select Save.
On this page
What Presets do
Presets let you reuse rendering instructions without typing them for every scene. Use them when several views need a similar treatment, or when you want to keep a useful instruction for another project.
The Presets menu has two groups:
| Group | What you can use |
|---|---|
| Curated | Ready-made options provided by Vibe3D. The choices shown can depend on the selected scene's category. |
| Saved | Instructions you have named and saved for reuse. |
A saved preset contains your written instructions. Choose the render engine, time of day, and lighting separately for each render. Reusing a preset also calls for reviewing the source image: the same instruction can produce different results across views.
Apply a preset in Render
These steps use the desktop editor's Render panel.
- Open your project, select an uploaded scene, and open Render.
- Find Additional Instructions and select Presets.
- Choose an option under Curated or Saved. Hover over a preset to read its description when one is available.
- Check the selected preset names beside the Presets button. You can select more than one, but begin with a small set that supports the same intention.
- Add any scene-specific text in Additional Instructions. Check that it agrees with your selected presets and the visible render settings.
- Review the settings and displayed credit amount, then select Render.
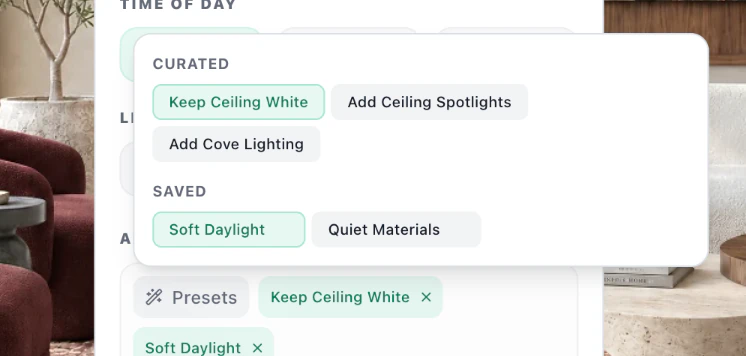
Keep Ceiling White and Soft Daylight are both active in this example. Your Saved list contains your own presets.
Selecting a preset prepares your instructions; generation starts when you select Render. Inspect the resulting image against the source, especially materials, openings, and furniture placement. See rendering interiors and exteriors for the full rendering workflow.
To deselect an option, select it again in the menu or use the × beside its active name. This removes it from the current selection and keeps it available for later use.
Save your own instructions
- Write the reusable instruction in Additional Instructions. The save controls appear once the field contains text other than spaces. The desktop instruction field accepts up to 500 characters.
- Enter a name of up to 50 characters in Save as preset…, such as “Soft interior daylight.”
- Select Save and wait for saving to finish.
- Open Presets → Saved to find and select your new preset when you need it.
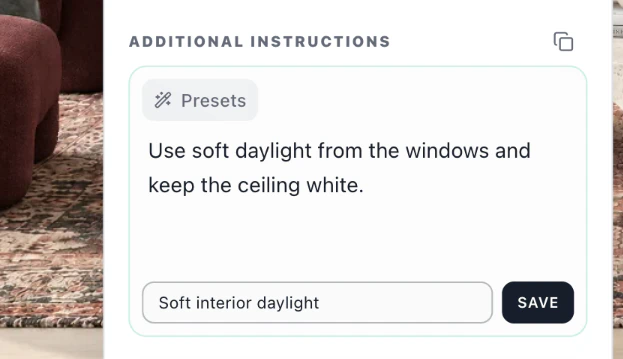
For example, you could save this instruction for a daylight study:
Use soft natural daylight to make materials readable. Keep the existing furniture arrangement, window positions, and camera composition.
This is an example to adapt and review, not a tested recipe for every scene. Choose compatible lighting settings before rendering. The prompting guide explains how to keep instructions specific and avoid conflicting requests.
Save records the text in Additional Instructions. It does not turn your selected Curated presets and render settings into a combined preset. Saving also leaves your text in the field, so review it before selecting a saved copy of the same instruction.
Reuse a selection on another scene
To carry both selected presets and written instructions to another scene:
- Select the presets and enter the instructions you want to reuse.
- Use Copy presets & instructions, the copy icon beside Additional Instructions.
- Select the destination scene and open Render.
- Use Paste presets & instructions, then review the selection and text before rendering.
Use these controls in the same browser. Pasting replaces both the destination’s selection and its written instructions. If a saved preset has since been deleted, pasting skips it. For example, copy a daylight preset to a second interior, then change just the sentence about that room’s windows. Check the engine, time of day, and lighting separately, and remove any instruction that does not suit the new view.
Delete a saved preset
Open Presets → Saved, hover over the preset, and select its trash icon, labeled Delete style. Confirm the deletion only when you no longer need it; the confirmation states that it cannot be undone.
For a temporary change, deselect the preset using its active × control instead. The delete control is for saved presets; Curated options remain available in their own group.
If a control is missing or unavailable
- Additional Instructions is missing: complete the guided first-render flow, then return to the full Render panel.
- Save is unavailable: enter both instruction text and a preset name, and wait for any save already in progress to finish.
- Saved is empty: save an instruction first; selecting a Curated option does not create a saved preset.
- Copy is unavailable: select at least one preset or enter instruction text.
- Paste is missing: use Copy presets & instructions first in the same browser.
- Curated choices differ between scenes: review the selected scene's category and use the options offered for that view.
Start with one useful preset, compare the output with your source, and adjust one requirement at a time. Use the prompt library for more example instructions and the design-preservation guide to review the result.