Interior design 3D renders are more than just digital images; they are a powerful way to bring a vision to life. By creating photorealistic visuals from 3D models, we can step inside an architectural or interior space long before the first wall is ever built. For designers, this isn't a luxury—it's a core part of the toolkit for communicating ideas, perfecting every detail, and getting that all-important client sign-off.
Let's walk through a complete workflow that will help you create truly exceptional visuals.
Why 3D Renders Are a Game-Changer for Modern Designers
The era of relying solely on mood boards and fabric swatches is quickly coming to an end. Clients today have higher expectations. They want to experience their future space and form an emotional connection with it before committing to construction. This is why high-quality interior design 3d renders have become an absolute necessity for any serious design firm. They are the crucial link that turns an abstract concept into something tangible and real.
But this is about more than just making beautiful pictures. It’s about fundamentally improving how we design. Immersive visuals offer a level of clarity that words and 2D floor plans can't hope to match. When a client can virtually tour their future kitchen, they instantly grasp the scale, the flow between rooms, and how the morning light will hit the countertop.
Finding Your Competitive Edge
In a market filled with talented designers, the ability to produce stunning, photorealistic renders sets you apart. It’s a clear signal of your professionalism and dedication to getting the vision right, which is a massive factor in winning projects. From the very first pitch, it builds a foundation of trust and gets clients genuinely excited.
By presenting a photorealistic vision, you shift the conversation from, "I'm having trouble picturing this," to, "I love it, when can we start?" That simple change can slash approval times and give your clients the confidence they need to move forward.
Better Communication, Fewer Revisions
One of the biggest headaches in any design project is miscommunication. Your idea of "cosy and minimalist" might be completely different from your client's. A detailed render cuts through the ambiguity, making sure everyone is on the same page from the beginning.
Taking this visual-first approach helps in a few key ways:
-
Drastically reduce on-site changes: It's infinitely cheaper and faster to swap out a virtual countertop than it is to rip out a newly installed one.
-
Lock in material choices: Clients can see precisely how that specific marble vein, wood grain, or fabric texture will look within their space, under realistic lighting.
-
Speed up decisions: When clients can see the final result, they make choices with confidence, keeping the project on schedule.
To better understand how 3D renders transform the design workflow, let's look at the direct benefits for both the designer and the client.
Core Benefits of Integrating 3D Renders
| Benefit | Impact on Design Process | Client Advantage |
|---|---|---|
| Crystal-Clear Communication | Eliminates ambiguity and ensures the design vision is perfectly aligned with client expectations. | Clients can visualise the final outcome, leading to confident and faster decision-making. |
| Efficient Revisions | Allows for quick, low-cost iterations on materials, lighting, and furniture before construction begins. | Provides the freedom to experiment with different styles and finishes without financial risk. |
| Enhanced Marketing | Creates a compelling portfolio of lifelike images that attract new clients and win competitive bids. | Offers a professional and exciting preview of their investment, building trust and anticipation. |
| Error Prevention | Identifies potential design flaws, spatial conflicts, or material clashes in the digital stage. | Avoids costly and time-consuming changes during the construction phase. |
This table shows just how integral 3D rendering has become. It's not just a presentation tool; it's a project management powerhouse.
The industry is certainly taking notice. The global market for commercial interior design 3D rendering was valued at USD 206.2 million in 2024, with India expected to see the most significant growth. This boom is fuelled by the demand for visualisations that perfectly unite the designer's creativity with the client's dream. You can find more in-depth 3D rendering market statistics on Grand View Research.
Getting comfortable with this technology is no longer optional—it's a cornerstone of modern interior design. For a deeper dive, take a look at our complete guide on the fundamentals of interior rendering.
Building the Foundation for Photorealism
Let's be honest, creating a truly convincing interior design 3d render starts long before you even think about hitting the "render" button. The soul of any photorealistic image is baked into its most basic components: the 3D models you use and the textures you wrap them in. If this foundation is shaky, even the most sophisticated lighting or powerful rendering engine won't save it.
It all begins with clean, efficient geometry. I've seen countless artists fall into the trap of thinking more polygons automatically equals more realism. But in reality, an overly complex model—like a sofa with millions of polygons for stitches you'll never even see—is a workflow killer. It will absolutely cripple your viewport performance and lead to agonisingly long render times.
Optimising Your 3D Models
The real goal here is striking a smart balance between detail and performance. A well-optimised model has just enough geometric detail to look solid from your chosen camera angle, but it's also clean enough to keep your scene from grinding to a halt.
Before you drop any new model into your scene, give it a quick inspection. You're hunting for things like unnecessary subdivisions, hidden geometry, or just plain messy topology. A lot of high-quality models you buy actually come with different levels of detail (LODs), which is a lifesaver. It lets you use a much simpler version for objects way in the background.
Here's a quick workflow I stick to for keeping my scenes running smoothly:
-
Clean Up Imports: Always get rid of hidden or overlapping faces. They're notorious for causing weird rendering glitches.
-
Use Proxies for Heavy Hitters: For seriously complex stuff like dense plants or detailed sculptures, convert them to proxies. This swaps the heavy geometry in your viewport for a simple placeholder, instantly freeing up precious system resources.
-
Focus Detail Where It Counts: Pour your time into refining the geometry of objects right up in the foreground. Anything in the background can be way simpler, and trust me, no one will ever notice.
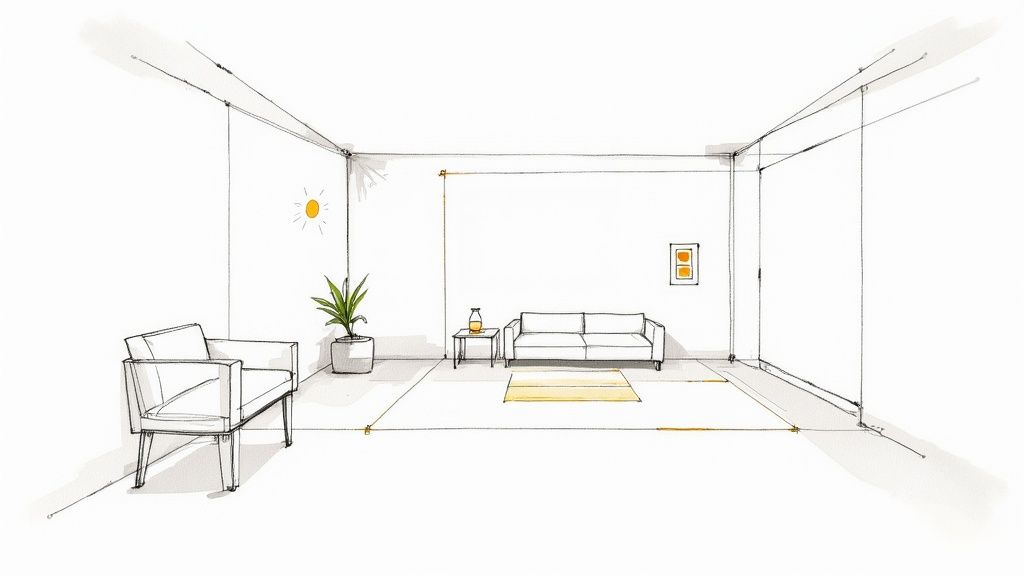
Getting this process down helps you visualise the entire workflow, from communication to final build.
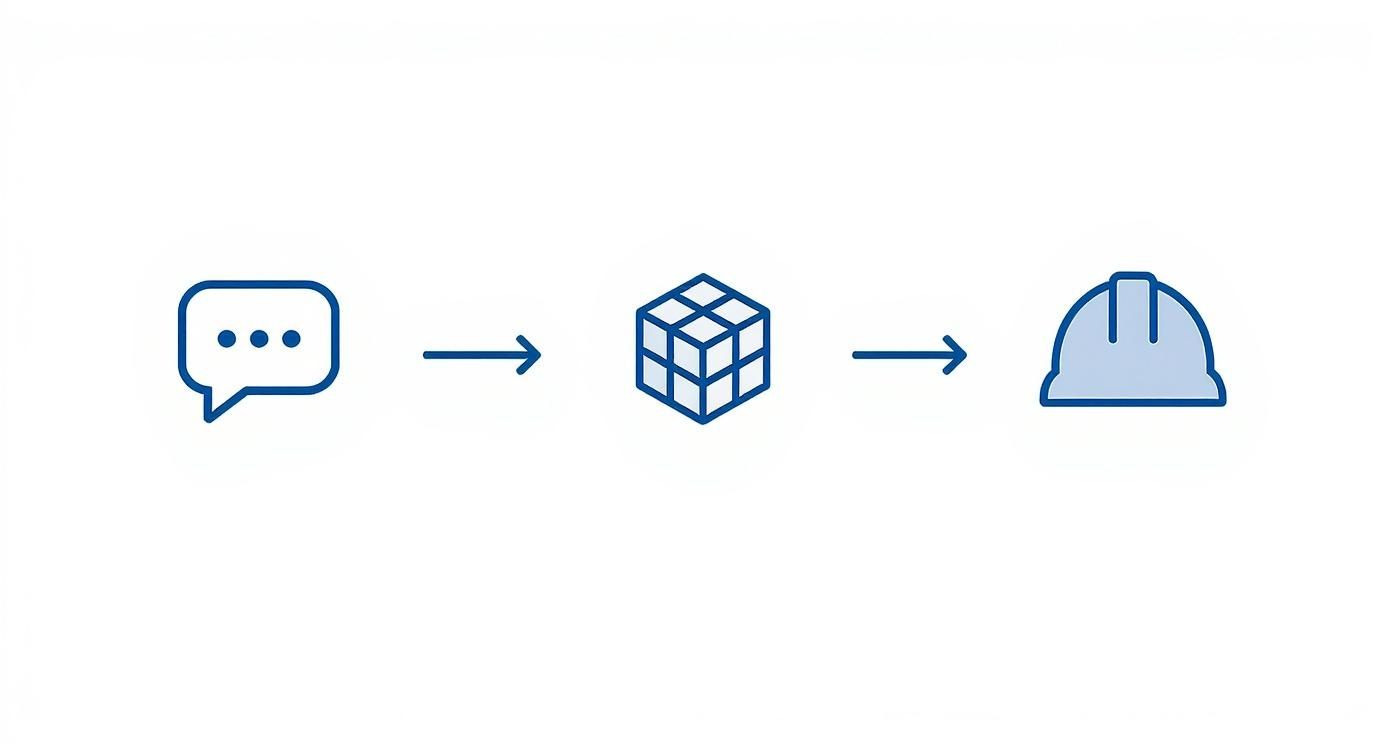
The diagram above really nails the core stages, reminding us that clear visualisation and communication have to happen before we ever get to the final scene construction.
Sourcing and Applying High-Quality Textures
Once your models are in good shape, the next layer of realism comes from the textures. This is where a lot of renders fall flat. Using low-resolution or non-PBR materials is probably the fastest way to make an image look artificial and, well, fake.
Physically Based Rendering (PBR) is the industry standard for a reason. It's a way of creating materials that react to light just like they would in the real world. A PBR material isn't just one flat colour image; it’s a whole set of maps that instructs the render engine on how a surface should behave—things like its roughness, whether it's metallic, and all the little bumps and imperfections.
Think about a polished concrete floor. A proper PBR texture for it would have a base colour map, a low roughness value to get those nice, sharp reflections, and a normal map to simulate the subtle pits and texture on the surface. When light hits it, the render engine knows exactly how to calculate the bounce and reflection, and the result is infinitely more believable.
The secret to photorealism isn't about making things perfect; it's about making them believably imperfect. The best PBR textures always include subtle variations like a bit of dust, faint fingerprints, or tiny scratches that you'd see on real-world materials.
Building a Smart Asset Library
To work fast and stay sane, you absolutely need an organised library of your best models and materials. If you're constantly searching for and prepping the same assets for every single project, you're just throwing time away.
Set up a simple, clear folder structure for your assets. I categorise mine by type—Furniture, Lighting, Fabrics, Woods, and so on. Whenever you buy or create a new high-quality asset, take the extra five minutes to clean it up, give it a sensible name, and save it to your library.
This little bit of upfront effort pays off massively down the road. For anyone working heavily in software like 3ds Max, a solid library is non-negotiable. If you're looking to really dial in this part of your process, our guide on mastering 3ds Max for interior design dives much deeper into asset management and scene organisation.
A tidy library means you can populate new scenes with trusted, render-ready assets in minutes. That frees up your creative energy for what really matters: crafting the perfect composition and lighting. This foundational work is what truly separates good renders from the ones that make people stop and stare.
Mastering Light and Composition in Your Scenes
Now that your models are clean and your textures are on point, we get to the fun part: breathing life and emotion into your interior design 3d renders. This is where lighting and composition come into play. These two elements are what separate a technically correct scene from a jaw-droppingly beautiful image.
Think of it this way: great lighting isn't just about flipping a switch so you can see things. It's about sculpting a mood, drawing attention to the beautiful features of the design, and guiding the viewer's eye. In the same way, strong composition gives your render a sense of purpose and balance, making it feel deliberate and professional, just like a great photograph. Skipping this step is like furnishing a stunning room and then leaving the lights off—all your hard work is there, but no one can truly appreciate it.
Crafting Believable Natural Light
For most interior shots, natural light is the undisputed star. Nailing that soft, realistic daylight that washes over a room is often the biggest hurdle, but it's also where you'll get the most bang for your buck in terms of realism. The most powerful tool in your arsenal for this is a High Dynamic Range Image (HDRI).
An HDRI is essentially a 360-degree photo of an environment that contains an incredible amount of lighting data. When you use it as a light source, it wraps your entire scene in a realistic sky, casting accurate colours, soft shadows, and subtle reflections that are a nightmare to fake with manual lights.
To really make your HDRI shine:
-
Pick the Right Vibe: Your choice of HDRI sets the entire mood. A bright, sunny afternoon sky will give you crisp, defined shadows. An overcast one will produce soft, diffused light that's perfect for creating a cosy, calm atmosphere.
-
Position for Impact: Don't just drop it in and call it a day. Rotate the HDRI to control where the "sun" is positioned. This lets you artfully direct light rays through a window to highlight a specific piece of furniture or create beautiful patterns on the floor.
-
Add a Sun for Punch: To get that sharp, direct sunlight effect, I often supplement the HDRI with a dedicated sun light (like a V-Ray Sun). This gives you pinpoint control over the intensity and crispness of the sunbeams without messing up the soft ambient light from the HDRI.
Designing with Artificial Lighting
Once the sun goes down, or for spaces that need a little extra help, artificial lighting takes centre stage. This is your opportunity to add layers of warmth, drama, and focus. The trick is to think like a real-world lighting designer and use different light types for specific jobs.
-
Ambient Lighting: This is your base layer of general illumination. Think ceiling fixtures, recessed downlights, or cove lighting.
-
Task Lighting: These are functional lights for specific activities, like the under-cabinet strips in a kitchen or a reading lamp next to an armchair.
-
Accent Lighting: Use these to create visual interest and highlight cool features. Spotlights on artwork, uplighting on a textured stone wall—this is where you add the drama.
A rookie mistake I see all the time is making every artificial light the same colour and brightness. Real-world spaces are a mix of warm and cool light. By varying the colour temperature just slightly between different sources, you add a subtle layer of realism that makes the scene feel much more authentic.
Applying Photographic Composition Principles
With your lighting dialed in, the final piece of the puzzle is finding the perfect camera angle. How you frame the shot can completely transform the perception of a space. Borrowing a few basic principles from photography will instantly elevate your renders.
The Rule of Thirds is the perfect place to start. Imagine your view is split by a 3x3 grid. Instead of dead-centring everything, try placing your key focal points—like a statement sofa or a beautiful fireplace—along these lines or at their intersections. It just creates a more dynamic and pleasing image.
Another go-to technique is using leading lines. Look for natural lines in the scene—the edge of a rug, the perspective of a long hallway, or ceiling beams. Position your camera so these lines guide the viewer's eye towards the main subject. This creates an incredible sense of depth and helps tell the story of the space.
Finally, don't be afraid to play with Depth of Field (DoF). A shallow DoF, where your subject is in sharp focus but the background is softly blurred, is a fantastic way to highlight a specific detail or create an intimate, artistic shot. It mimics how a real camera works and adds a polished, photographic quality to your work. This is especially great for close-ups of materials and decor.
If you're just getting started, especially with a tool like SketchUp, understanding all these settings can feel overwhelming. Our guide on how to render in SketchUp is a great resource that breaks down the fundamentals to help you get going.
Using AI and Cloud Rendering to Work Faster
If you've been in the 3D design world for any length of time, you know the feeling. You spend days getting a model and its lighting just right, you hit "render," and then… you wait. For hours. Sometimes overnight. Your machine is completely tied up, and your creative momentum comes to a grinding halt.
This workflow has been a bottleneck for decades, turning a dynamic design process into a slow, tedious grind. But that's finally changing, and changing fast.
The arrival of AI-driven tools and powerful cloud rendering platforms has completely upended the old way of doing things. Instead of waiting hours for a single image, you can now generate a whole batch of high-resolution interior design 3d renders in just a few minutes. This isn't just a small step forward; it's a fundamental shift in how we can work, create, and collaborate with clients.
Think about it. What if that sofa was velvet instead of leather? How would the room feel with a darker floor? In the past, each of these questions meant another long render. Now, you can test dozens of variations in the time it used to take to produce one image, leading to far more refined and confident design choices.
The Power of Rapid Iteration
The real game-changer here is rapid iteration. When you use a platform like Vibe3D, you're offloading all the heavy computational work to powerful servers in the cloud. This frees up your own machine, so you can keep on designing. You can send your scene from SketchUp or 3ds Max, tweak things with simple text prompts, and get stunning visuals back almost instantly.
This completely transforms the client review process. Imagine walking into a meeting and presenting not just one finished concept, but several high-quality variations showing different material palettes or furniture layouts. This level of responsiveness makes clients feel far more involved and helps them make decisions with greater confidence, which can dramatically speed up project approvals.
The biggest win isn't just the time saved on rendering; it's the creative freedom you get back. When you can see new ideas brought to life in seconds, you're much more likely to explore bolder concepts and push your designs further. It ultimately leads to better, more innovative work.
The impact of this technology is already being felt in competitive markets. In India’s premium real estate sector, for example, the adoption of AI-integrated 3D rendering has been a huge factor in driving record sales. Residential sales and new project launches hit a ten-year high in the first half of 2024, with the luxury segment alone seeing a massive 169% year-over-year increase in new properties. This trend is a clear signal of where the industry is heading.
Local vs Cloud Rendering: A Practical Comparison
So, what are the real-world differences between rendering on your own machine versus using a cloud service? For anyone working on interior design projects, the choice has become pretty clear.
Here’s a straightforward breakdown of how they stack up.
| Factor | Local Rendering (Desktop/Workstation) | Cloud/AI Rendering (e.g., Vibe3D) |
|---|---|---|
| Speed | Can take 3-12 hours per high-res render, depending on scene complexity and your hardware. | Delivers multiple renders in under 30 minutes, often in just a few seconds per image. |
| Cost | Requires a huge upfront investment in high-end GPUs and CPUs (₹2,00,000+), plus ongoing maintenance and electricity costs. | Pay-as-you-go or subscription models with no hardware investment needed. Far more cost-effective for most studios. |
| Workflow | Ties up your computer completely, preventing you from working on anything else while it renders. | Your local machine stays free. You can continue modelling, designing, or managing other projects while renders are processed in the cloud. |
| Flexibility | You're limited by your hardware's capacity. Complex scenes with high-res textures can cause crashes or extreme slowdowns. | You have virtually unlimited power on tap. It handles massive scenes, complex lighting, and 4K+ resolutions without breaking a sweat. |
It's clear that for most designers and studios, the cloud offers a much more efficient and scalable solution. You're no longer limited by the machine on your desk.
Getting Started with a Cloud Workflow
Making the switch to a cloud-based workflow is much simpler than you might think. It usually boils down to a few straightforward steps:
-
Prepare Your Model: First, get your 3D scene organised in your favourite software (like SketchUp or 3ds Max). Just make sure your materials are correctly applied as a starting point.
-
Upload to the Platform: Next, export your model and upload it directly to the cloud rendering service. This is usually a quick drag-and-drop process.
-
Refine and Render: This is where the magic happens. Use the platform’s tools—which often include AI-powered text prompts—to adjust lighting, swap out materials, and choose your camera angles.
-
Download and Present: Finally, generate multiple high-resolution images, compare the different variations side-by-side, and download the best options for your client presentation.
This streamlined process not only saves a colossal amount of time but also makes high-end rendering accessible to everyone, without the need for an expensive, in-house render farm.
For a deeper dive into how these powerful new tools are reshaping the industry, check out our guide on the future of AI in interior design.
Presenting Renders to Get Client Buy-In
Creating a photorealistic render is a huge milestone, but it's only half the journey. The real test is presenting it. A stunning visual can fall flat without a compelling story to back it up, and how you unveil your work is just as important as the pixels on the screen. This is your chance to turn a beautiful image into an approved project.
The goal isn't just to show off a pretty picture. It's to guide your client through a narrative, connecting every single design choice back to their original goals. Your presentation should build excitement and confidence, making the "yes" feel like a natural conclusion. This is the skill that elevates you from a 3D artist to a trusted design partner.

Crafting a Narrative for Your Renders
Whatever you do, don't just email a render with the subject line "Here you go." You have to frame the visuals. Start by reminding the client of the initial brief—the problems they wanted to solve and the feelings they wanted the space to evoke. Then, walk them through how your design, brought to life in the interior design 3d renders, directly addresses those points.
For example, instead of just saying, "Here's the kitchen," try this: "You mentioned wanting a bright, welcoming space for family gatherings. That's why we chose this large island for seating and positioned it to catch the morning light from the window, which you can see in this first view."
This approach works wonders because it:
-
Reinforces Value: It shows you listened carefully and that every element has a purpose.
-
Manages Focus: It directs their attention to the most important features first.
-
Builds an Emotional Connection: It links the design to their lifestyle and aspirations.
This level of storytelling is becoming essential. In 2024, the India interior design market was valued at USD 34.00 billion and is projected to more than double to USD 71.00 billion by 2033. This growth is heavily driven by clients who expect detailed, realistic visualisations.
Structuring the Review Process
A structured review meeting is your best friend. It prevents feedback from becoming chaotic and overwhelming. You want to avoid an unstructured free-for-all where the client picks apart random details, so it's your job to guide the conversation from the big picture down to the small details.
Here’s a simple but effective structure I’ve used for years:
-
Overall Impression: Start with a wide shot of the space and ask for their initial gut reaction.
-
Layout and Flow: Discuss the spatial arrangement. Does the flow work for them?
-
Key Features: Now, move on to the main elements—the custom joinery, the fireplace, or the kitchen island.
-
Materials and Finishes: Finally, zoom in on the textures, colours, and specific material choices.
By controlling the flow of the conversation, you can address feedback in logical batches. This prevents you from getting bogged down in discussions about tap finishes before the client has even approved the overall kitchen layout, saving everyone from endless revision cycles.
To set yourself up for success, assemble a simple presentation deck. It doesn’t need to be fancy. A few slides that recap the project goals, show the mood board, and then reveal the renders is all you need. This gives the reveal context and makes it feel far more professional. For more general advice, check out these tips for impactful presentations.
Managing Feedback and Revisions
Receiving feedback is a delicate art. The key is to set clear expectations from the start about the number of revisions included and what kind of feedback is helpful at this stage. I always frame the renders as a tool for decision-making, not a final, unchangeable photo. This encourages the client to use the visuals to make firm choices.
When feedback comes in, listen carefully and then rephrase their concerns to make sure you understand. Sometimes a client says they "don't like" something when what they really mean is that it feels "too formal" or "not as cosy" as they'd hoped. Digging a little deeper helps you solve the actual problem instead of just changing a colour on a whim. Having a clear visual guide, like an interior design concept sheet, from early in the process also helps keep feedback aligned with the original vision.
Common Questions About Interior Design Renders
Diving into the world of interior design 3d renders can bring up a lot of questions, both for designers and their clients. It's a bit like learning a new language. How does it work? What does it cost? What can it really do? Let's clear the air on some of the most common queries.
Getting a handle on the nuts and bolts helps set the right expectations from the start, making the whole creative process smoother for everyone. It turns what seems like a complex technical service into a powerful, collaborative tool.
What’s the Best Software for Interior Design Renders?
This is probably the number one question I hear, and the honest answer is: there isn't one. The "best" software really depends on your workflow, your technical comfort level, and the kind of projects you're tackling. The landscape of tools is huge, and different programs are good at different things.
A classic, tried-and-true combination for many pros is to model in a program like SketchUp or 3ds Max and then use a dedicated rendering engine like V-Ray or Corona to bring it to life. The first tool builds the structure, and the second one handles the magic of light and materials.
-
For Beginners: SketchUp is fantastic. It has a gentle learning curve and lets you build 3D spaces without a huge technical headache.
-
For Professionals: 3ds Max offers a much deeper, more powerful toolset for creating incredibly detailed scenes and custom models from scratch.
That said, the industry is definitely shifting. Cloud-based platforms are exploding in popularity because they take the need for a monster computer out of the equation. They do all the heavy lifting on their own servers, letting you focus purely on the design. For a more detailed look, our guide on the best architectural rendering software breaks down all the leading options out there.
How Long Does a Photorealistic Render Actually Take?
This is a real "how long is a piece of string?" question. The timeline for a photorealistic render can swing wildly depending on the project's scale, the level of detail, and, of course, the technology you're using.
A simple room with pre-made 3D models might only take a few hours to assemble, light, and render. But a large, multi-room project filled with custom furniture and intricate lighting? That could easily take several days of work just to get the scene prepped and ready to go.
Then there’s the rendering time itself. A single high-resolution image can take anywhere from 30 minutes to over 12 hours to process on a decent desktop workstation. This is where you grab a coffee and wait. It's also precisely where cloud platforms have a massive edge, often kicking out multiple high-quality images in under an hour and completely changing the project timeline.
How Can I Make My Renders Look More Realistic?
Getting that last jump to true photorealism is where art meets science. It all boils down to nailing three key areas that work together to fool the eye into seeing a photograph instead of a render.
Realism isn't about perfection; it's about embracing imperfection. Real-world surfaces have subtle flaws—faint scratches, a bit of dust, minor variations in texture. Adding these tiny details is what makes a digital scene feel authentic and lived-in.
If you want to push your renders to the next level, focus on these three things:
-
High-Quality Assets: It all starts here. Use well-made 3D models and, most importantly, PBR (Physically Based Rendering) materials. These textures are built to realistically mimic how light interacts with real-world surfaces like wood, metal, or fabric. It's non-negotiable for realism.
-
Sophisticated Lighting: This is arguably the most critical ingredient. Use an HDRI map for soft, natural daylight, then layer in artificial lights to create mood, depth, and contrast. Pay close attention to how shadows fall and how light bounces.
-
Imperfections and Details: Just like the real world, nothing is perfectly clean or flawlessly smooth. Add subtle scuffs to a floor, wrinkles in a throw blanket, or faint fingerprints on a glass table. These tiny details add up to make a huge difference.
Aren't 3D Renders an Expensive Part of a Project?
While there's an upfront cost to creating high-quality renders, they almost always save you a significant amount of money over the life of the project. Think of that initial expense as insurance against much bigger, costlier mistakes down the road.
Getting a client's sign-off on a precise, photorealistic visual means you avoid expensive changes once construction has already started. The cost of tweaking a virtual design is practically zero compared to the labour and materials needed to tear down a wall or replace a finish that wasn't quite right.
The cost of renders can vary, of course, depending on complexity and the artist's experience. But with efficient cloud platforms and a global pool of talented freelancers, photorealistic rendering has become more accessible and affordable than ever. The return on investment—seen in happier clients, fewer revisions, and faster approvals—is undeniable. For more quick-fire answers, these frequently asked questions about interior design renders are a great resource.
Ready to stop waiting and start creating? Vibe3D uses the power of AI to transform your 3D models into stunning, photorealistic visuals in seconds, not hours. See how you can accelerate your workflow and impress your clients by visiting https://vibe3d.ai.