A modern tiles design for elevation is about more than just a protective layer; it's a chance to give a building a distinct identity. It’s the art of choosing the right materials, patterns, and textures to create a facade that not only looks incredible but is built to last.
Why Tiles Are Transforming Architectural Elevations
For a long time, exterior design in India revolved around paint and traditional plaster. These are serviceable options, but they come with a catch—constant upkeep. Especially in a country with punishing monsoons and relentless sun, these finishes just don't hold up for long.
That’s where tiles come in. They’ve quickly become the go-to alternative, offering a brilliant mix of design freedom and sheer resilience.
This move towards using tiles for building exteriors isn't just a fleeting trend. It's a smart, practical shift in how we approach architecture. Designers and homeowners alike are realising that a thoughtful tile elevation can seriously boost a property's kerb appeal while slashing maintenance costs down the line. Paint fades, and plaster cracks, but modern exterior tiles are engineered to withstand the test of time.
The Modern Appeal of Elevation Tiles
What’s really driving this change? In a word: versatility. Thanks to modern manufacturing, tiles can now convincingly replicate just about any premium material you can think of—natural stone, warm wood, even industrial-chic metal. This opens up a huge creative playground for designers, allowing them to achieve a high-end look without the budget or maintenance headaches of the real thing.
Imagine getting the cosy, inviting feel of a wooden facade but with wood-look porcelain tiles that will never warp, rot, or need resealing. Or picture the monolithic grandeur of granite, achieved with large-format stone-effect tiles that are a fraction of the weight and cost. It makes ambitious designs practical, even for high-rise projects.
The real magic of elevation tiles is how they fuse aesthetics with performance. A great design doesn't just turn heads; it acts as a robust shield, protecting the structure from moisture, heat, and pollution for decades.
Below is a quick breakdown of why tiles are becoming the preferred choice for exterior facades.
Key Advantages of Using Tiles for Building Elevations
| Benefit | Description | Advantage Over Traditional Materials |
|---|---|---|
| Weather Resistance | Tiles possess an extremely low water absorption rate, making them impervious to rain and frost. | Paint can peel and blister with moisture; plaster can develop cracks and damp patches. |
| Colour Permanence | The colour is baked into the tile, ensuring it won't fade or yellow under harsh UV exposure. | Exterior paints noticeably fade over time, requiring frequent and costly repainting to look fresh. |
| Low Maintenance | A simple wash is usually enough to remove dust and grime, keeping the facade looking new. | Paint and plaster require regular cleaning, touch-ups, and complete repainting every few years. |
| Exceptional Durability | Tiles are highly resistant to scratches, impacts, and general wear and tear from the elements. | Plaster can easily chip or crack, and painted surfaces can be scuffed, diminishing the building's look. |
These benefits demonstrate that choosing tiles is not just a design decision but a long-term investment in a building's integrity and appearance.
The Technical Edge
Beyond just looking good, the technical specifications of elevation tiles are what make them a truly game-changing material, especially for India's varied climates.
-
Weather Resistance: We're talking about high-grade porcelain and vitrified tiles with water absorption rates often below 0.5%. This makes them essentially waterproof, so they won’t crack in a cold snap or be damaged by torrential downpours.
-
Colour Permanence: Since the pigment is fired directly into the tile's body, it's there for good. The colour you choose is the colour you'll have years from now, no matter how much sun it gets. For a deeper dive, our guide on elevation colour design has some great insights.
-
Low Maintenance: Elevation tiles are incredibly easy to clean. Their non-porous surface resists stains, dust, and pollution. Forget about expensive annual repainting—a good wash is often all it takes to make them look brand new.
-
Durability: These tiles are built tough. They stand up to scratches, impacts, and abrasion, ensuring the facade stays looking sharp and clean for years on end.
Choosing the Right Materials for Your Elevation Design
This is where the rubber meets the road—where your creative vision has to stand up to the laws of physics and the realities of construction. The material you choose for your tiles design for elevation dictates not just the look but the building's lifespan and how much work it'll take to maintain. In a country like India, with its monsoons, intense sun, and varied climates, getting this right is non-negotiable.
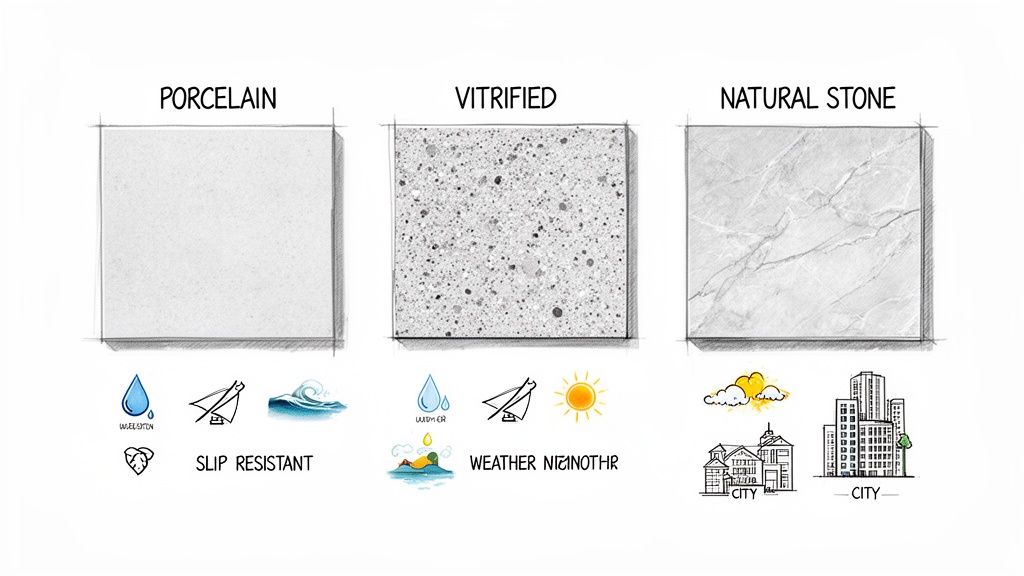
The big three for exterior work are porcelain, vitrified, and natural stone tiles. Each has its own set of pros and cons, but in my experience, one has really pulled ahead for modern facades. To make a smart choice, you need to look past the surface and understand what makes them tick.
Unpacking the Technical Properties
When you're looking at tiles, don't let your eyes glaze over at terms like porosity and water absorption. These aren't just technical jargon; they’re the vital signs of your material's health.
Porosity is all about the tiny, microscopic voids in a tile. A tile with low porosity is dense, meaning it won't drink up water. This is your first line of defence against moisture damage, staining, and frost-related cracking.
This leads directly to the water absorption rate—a simple percentage that tells you everything you need to know about how a tile will handle the rain. For any exterior elevation, especially in monsoon-prone areas, you need a rate below 0.5%. This is the gold standard. It stops water from getting in, which prevents all sorts of headaches down the line, from cracks to ugly algae growth.
We also have to think about slip resistance, which is a big deal for any tiles on ground-level facades, balconies, or accessible areas. It might seem less important for a high wall, but it's a good indicator of the tile's overall surface quality and durability.
A tile's technical sheet is its promise of performance. Always prioritise low water absorption and high durability ratings over aesthetics alone to ensure your elevation design stands the test of time and weather.
Why Porcelain Tiles Dominate the Market
In India's vibrant ceramics market, porcelain tiles are the undisputed king for elevation work, holding a massive 55.34% market share in 2024. Why? It's simple: they are incredibly tough and practically waterproof.
With porosity levels under that magic 0.5% mark, they can slash maintenance costs by an estimated 40% over ten years when compared to more porous options. They’re made from highly refined clay fired at blistering temperatures, creating a dense body that shrugs off everything from harsh UV rays to city pollution.
Plus, they can mimic the look of expensive natural stones like marble or granite beautifully. This gives you the high-end aesthetic without the high-maintenance reality, making them a go-to for India's humid climates.
Selecting Tiles for Specific Scenarios
The perfect tile for a coastal bungalow in Goa is all wrong for a high-rise in Delhi. You have to design for the environment.
-
For Coastal Properties: Salty air and humidity are relentless. You absolutely need porcelain here. Its non-porous surface fights off salt efflorescence (those ugly white powder stains). A glazed finish adds another layer of armour.
-
For Urban High-Rises: The main enemies are pollution and dust. I always recommend tiles with a smooth, easy-to-clean surface. Using large-format porcelain slabs is a great trick to minimise grout lines, which are notorious for trapping grime.
-
For Regions with Extreme Temperatures: If you're working in an area with scorching summers and chilly winters, thermal shock resistance is crucial. Vitrified tiles are excellent performers here. Their low porosity means they are far less likely to crack as they expand and contract with temperature swings.
Beyond the look of the tile, its durability and how it's installed are what truly matter. For a more comprehensive look at material selection, you'll find good information on choosing the right tile materials and styles.
Emerging Innovations in Elevation Materials
While porcelain and vitrified tiles are the reliable workhorses, things are always moving forward. One of the most exciting trends I'm seeing is the rise of 3D textured slabs.
These aren't your standard flat tiles. These large-format slabs have sculpted, three-dimensional patterns that play with light and shadow, adding incredible depth to a facade. They can turn a boring, flat wall into a genuine piece of art, perfect for creating a standout feature or adding a tactile quality to the building's skin.
Mastering Design Principles for Elevation Tiling
Once you’ve got your materials sorted, the real artistry begins. A truly great tiles design for elevation isn't just about covering a surface; it's about composing a visual story using the fundamental tools of design: scale, proportion, colour, texture, and pattern.
This is where deliberate choices make all the difference. It's knowing that a tile's size can make a building feel monumental or fussy, or how a simple laying pattern can create rhythm and guide the eye. Getting a firm grip on these principles is how you create elevations that feel balanced, intentional, and perfectly in tune with the building's soul.
Playing with Scale and Proportion
The relationship between the size of your tiles and the overall mass of the building is probably the most crucial decision you'll make. Get this wrong, and you can throw off the entire visual harmony of the structure.
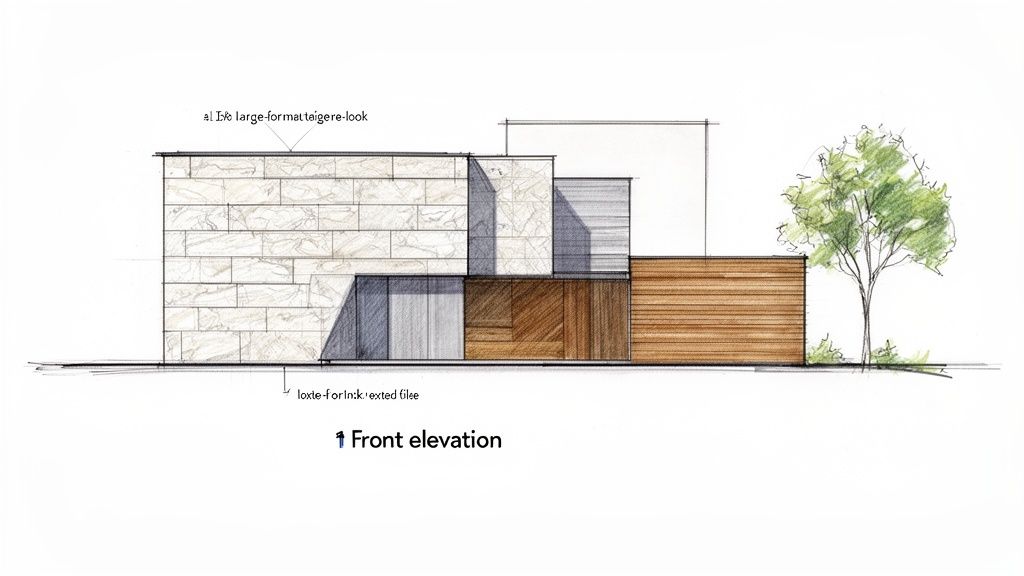
Think about large-format tiles. They're a brilliant fit for modern, minimalist buildings. With fewer grout lines, they create a clean, almost monolithic look that makes a facade feel expansive and seamless. Using a 2x4 foot tile on a sprawling commercial building, for example, enhances its scale and gives it a very sleek, sophisticated presence. Now, imagine using tiny mosaic tiles on that same building—it would just look chaotic and completely diminish its stature.
For smaller residential projects, you need a more considered approach. While large tiles can still work wonders, medium-sized options like 1x2 foot planks often strike a better balance and feel more proportional. The trick is to make sure the tile size complements architectural features like windows, doors, and rooflines, rather than fighting them for attention.
Leveraging Colour and Texture
Colour theory is the backbone of any design work, and tiling an elevation is no different. The colours you select can radically change a building's entire mood and even its perceived size.
-
Light Colours: Shades of white, beige, and light grey are fantastic for making a building feel larger and more airy. They’re also incredibly practical for India’s climate, as they reflect sunlight and help keep the interior spaces cooler.
-
Dark Colours: Charcoal, deep browns, or even a bold black can create a powerful, dramatic statement. These work best on contemporary structures or as accent colours to build contrast and draw attention to specific architectural features.
-
Earthy Tones: Terracotta, ochre, and muted greens are perfect for grounding a building in its natural environment, creating a sense of warmth and permanence.
Texture then adds that next layer of sensory detail. A smooth, glossy tile catches the light and has a distinctly modern feel. On the other hand, a rough, stone-textured tile absorbs light, adding a rustic and tactile quality. A classic technique I often use is combining a smooth, neutral tile for the main walls with a heavily textured tile on a feature wall. It’s a simple way to create depth and visual interest without making the design feel too busy.
The most effective elevation designs I've seen almost always stick to a limited palette of just two or three complementary colours and textures. This discipline results in a cohesive look that feels intentional and sophisticated, not cluttered. For a deeper dive into how these elements interact, exploring fundamental architectural design concepts is a great place to start.
Creating Rhythm with Patterns
Pattern is where you can really inject personality and character into your facade. The way you lay your tiles can create a sense of movement, highlight focal points, and add a beautiful layer of intricate detail.
Some of the most popular patterns I see used effectively on elevations include:
-
Brick Bond: This classic, staggered layout is absolutely timeless. It brings a subtle sense of order and stability to any surface.
-
Herringbone: A much more dynamic pattern that creates a V-shaped visual flow. It's excellent for making a statement on feature walls or around grand entryways.
-
Vertical Stack: Laying rectangular tiles in a straight, vertical grid can be a powerful tool to make a building appear taller and more slender.
The real magic happens when you balance these elements. For instance, you could use a simple brick bond in a neutral colour for the main facade, then introduce a striking herringbone pattern with a textured, wood-look tile to frame the main entrance. This thoughtful combination of scale, colour, texture, and pattern is what transforms a simple tiled wall into a masterful piece of architectural design.
Visualising Your Tile Elevation Design with Vibe3D
Conceptualising a striking tile elevation is one thing, but truly bringing it to life for a client is another challenge altogether. The gap between a 2D drawing and the finished, physical façade can be massive, often leading to uncertainty and a painful cycle of revisions. This is where a robust visualisation workflow becomes your most valuable tool, allowing you to test, tweak, and perfect your design before a single tile is ever laid.
In the past, this meant days of complex setup. Now, modern rendering tools have completely changed the game, cutting that time down to mere minutes. With the right platform, you can take a basic 3D model and turn it into a stunning, client-ready visual that leaves nothing to the imagination. This speed is absolutely crucial for iterating on your tiles design for elevation, giving you the freedom to explore every creative avenue.
From 3D Model to Photorealistic Render
Everything starts with your 3D model. I've found that platforms like Vibe3D are designed to slot right into a professional workflow, letting you import scenes directly from common architectural software like SketchUp or 3ds Max. It's not some clunky export-import process; it actually preserves your geometry, materials, and complex textures, giving you a solid foundation to work from.
Once your model is in the platform, the real creative work can begin. You can start applying different tile materials directly onto the façade, playing with various textures and finishes. This is your chance to see how that large-format porcelain tile actually looks at scale, or how that rugged stone cladding really interacts with the building's form.
The ability to visualise this quickly is no longer a nice-to-have; it's a fundamental part of my design process. It lets you spot potential problems early on—from clashing textures to awkward pattern scaling—and that saves a huge amount of time and money down the line.
The process for a strong elevation design often comes down to balancing three key elements: scale, pattern, and texture. Getting these right creates a cohesive final look.
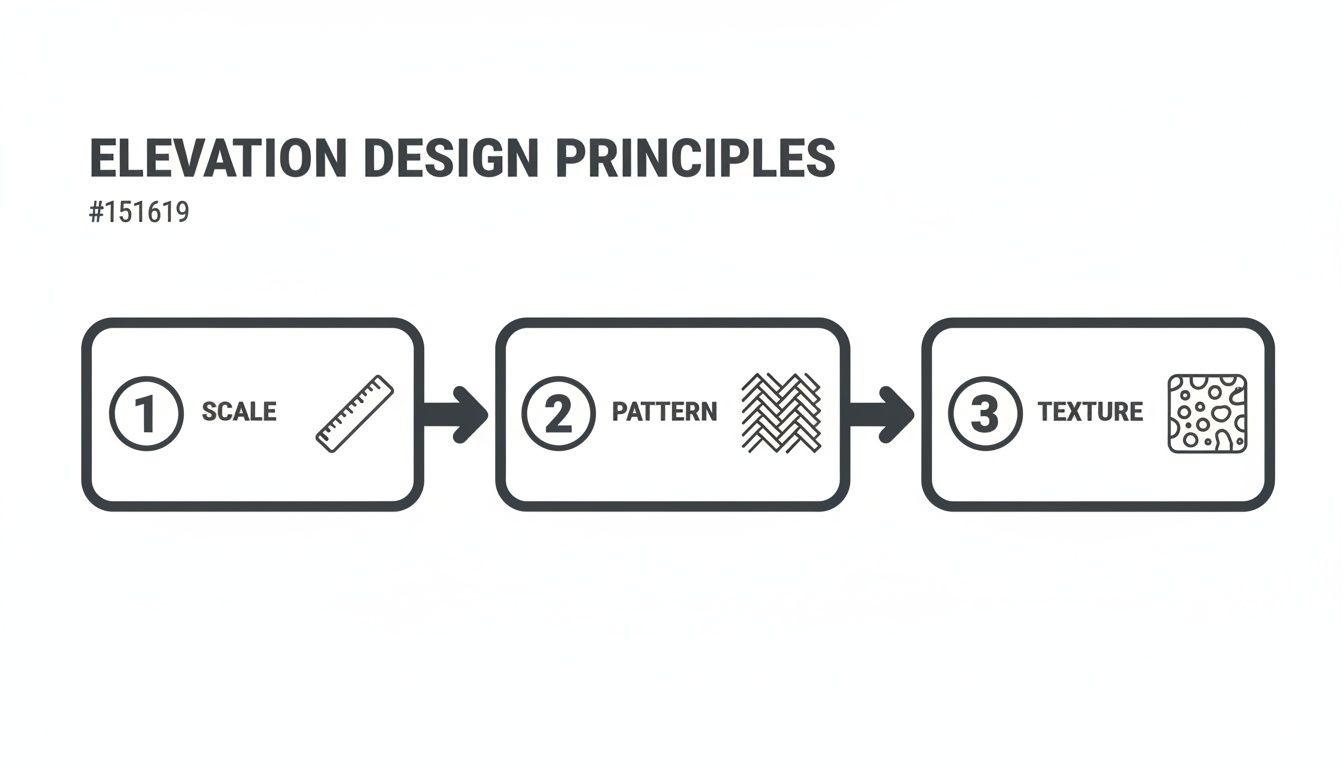
This visual guide shows how these core principles build on each other to create a harmonious and impactful façade design.
Fine-Tuning Your Vision with Smart Tools
One of the most frustrating parts of digital rendering has always been finding the perfect material. You might have a specific idea, like a "rustic terracotta tile with slight weathering," but scrolling through endless libraries to find a matching texture can be a real headache. This is where AI-driven tools have made a huge difference.
Instead of hunting, you can use natural language to describe exactly the tile you're picturing. For instance, Smart Prompt Suggestions can generate material options that fit your description, helping you land on the perfect texture in seconds. This kind of intuitive approach removes the technical roadblocks and lets you stay focused on the purely creative side of your tiles design for elevation.
Lighting is another make-or-break element. A design that looks incredible in bright, midday sun might fall completely flat during the golden hour. A feature I always look for is the ability to adjust lighting to simulate different times of day. This gives both you and your client a complete picture of how the elevation will look and feel, from the sharp shadows of noon to the soft, warm glow of dusk.
Speeding Up Client Approvals and Iterations
Ultimately, visualisation is all about clear communication. When a client can see a photorealistic 4K render of their building, they can give specific, actionable feedback. That clarity alone cuts down dramatically on the endless back-and-forth that can plague design projects.
A powerful workflow lets you take this even further. Rather than just showing a single option, you can quickly generate multiple variations to present side-by-side.
-
Variation A: The façade with a smooth, light grey porcelain tile.
-
Variation B: The same façade but with a textured, dark slate tile.
-
Variation C: A combination, using the grey porcelain on the main walls and the slate as an accent around the windows.
Presenting options this way empowers clients to make confident decisions. They can directly compare different aesthetics and immediately see which one resonates with their vision. This simple change can turn what used to be a week-long review cycle into a single, productive meeting.
Making changes should be just as fast. If a client likes an option but wants a minor tweak—"Can we make that accent tile a bit warmer?"—you need to be able to act on it instantly. With one-click editing and natural language prompts, you can select an area, refine the details, and generate an updated render in moments. This responsiveness shows clients their feedback is heard and can be implemented quickly, building trust and getting you to project approval that much faster.
Getting Technical: Installation and Maintenance
A brilliant tiles design for elevation can look incredible on screen but fail spectacularly in the real world if the technical details are ignored. The leap from a beautiful render to a durable, lasting façade all comes down to what happens on-site. Getting the installation and maintenance right isn't just an afterthought—it's the core of a design that will stand the test of time.
Let’s be honest, overlooking these practical steps is the fastest way to see your vision fall apart. Cracks, water damage, and tiles literally falling off the wall can all happen. This is the unglamorous but essential work that protects the client's investment and keeps the building safe.
A Flawless Finish Starts with the Surface
You can't just stick tiles onto any old wall and hope for the best. The substrate—the wall surface itself—has to be perfectly clean, bone-dry, and structurally solid. Any hint of dust, grease, or flaky plaster will compromise the adhesive’s grip, and that's a problem you'll be dealing with sooner rather than later.
Before a single tile goes up, the wall needs to be checked for any unevenness. It must be perfectly level to achieve that smooth, professional look, especially with large-format tiles where even tiny bumps stick out like a sore thumb. For new builds, this means making sure the plaster is cured and flat. For renovations, it’s about stripping back old paint and meticulously repairing any damage.
A rookie mistake I see all the time is rushing the curing process for new plaster. You absolutely must let it cure for a full 2-3 weeks. This allows all the excess moisture to escape, preventing future headaches like efflorescence—those ugly white, salty deposits—from ruining your beautiful tilework.
Choosing the Right Adhesives and Grout
Using interior-grade materials outside is a recipe for disaster. Elevation tiles are in a constant battle with the elements: relentless rain, harsh UV rays, and wild temperature swings. They need specialised, high-performance adhesives and grouts specifically engineered for these conditions.
When you're working on an exterior, always reach for a polymer-modified tile adhesive. These products don't just offer a stronger bond; they also have a bit of flexibility. This is crucial because it allows them to handle the natural expansion and contraction of the building without the tiles cracking under pressure.
-
Adhesives: Look for products with a C2TE S1 classification. This code tells you it has high bond strength, an extended open time for adjustments, and the flexibility you need for outdoor work.
-
Grout: An epoxy or polymer-modified grout is non-negotiable. Unlike standard cement grout, it’s waterproof, stain-resistant, and won't grow mould, which means the grout lines will stay clean and intact for years.
Meticulous installation is key to making your elevation tiles last. To keep everything on track, it's a good practice to use essential construction quality control checklists during the project.
The Unsung Hero: Expansion Joints
One of the most overlooked parts of any large-scale tiling job is the expansion joint, but it's arguably one of the most important. All building materials expand and contract with temperature changes. Without somewhere for that movement to go, the stress builds up until your tiles either crack or pop right off the wall.
Expansion joints are simply flexible gaps filled with a sealant like silicone, placed strategically throughout the tile grid. They should be included both horizontally and vertically every 3 to 4.5 metres and also around structural elements like corners, columns, and window frames. While it's fun to get creative with tiles, you have to respect the basic physics of a building. You can dive deeper into how buildings work in our guide on elevations in architecture.
A Little TLC: Long-Term Maintenance
Once they’re up, elevation tiles are incredibly low-maintenance, but not zero-maintenance. A bit of proactive care goes a long way in keeping them looking great for decades.
Schedule periodic inspections, maybe twice a year, to look for any cracked grout, chipped tiles, or signs of water staining. Catching these small issues early can save you from a massive repair bill down the line. For cleaning, just use a mild, pH-neutral detergent and a soft brush. Stay away from harsh acids or abrasive cleaners—they'll only damage the tile surface and the grout. Follow these technical pointers, and your tile elevation will remain as impressive as the day it was finished.
Frequently Asked Questions About Elevation Tile Design
When you're deep in the weeds of designing a building's exterior, practical questions always come up. It's one thing to have a vision, but it's another to make it work in the real world. Let's tackle some of the most common questions I hear from architects, designers, and homeowners about getting elevation tiles right.
What's the Best Tile Size for Exterior Elevations?
This is a classic question, and the honest answer is: it really depends on the building's scale and the look you're after.
For big, modern buildings, I almost always lean towards large-format tiles. Think 24x48 inches or even larger. They create a sleek, almost seamless surface because you have far fewer grout lines, giving the facade a clean, monolithic feel that really amplifies its presence.
But on a smaller home, or if you're aiming for a more detailed, textured look, smaller tiles like 12x24 inches can be much more effective. The goal is to get the proportions right. You don't want the tile size to overwhelm a small facade or look too busy on a large one. And remember the practical side—larger tiles need a perfectly flat substrate and specialised installation, so factor that into your planning.
How Do I Pick a Colour Palette for My Elevation Tiles?
Choosing a colour palette is a bit of an art, but it’s guided by some solid principles. You need to think about the architectural style, the natural environment, and the local climate.
In hot climates, like we see across most of India, light-coloured tiles are a brilliant choice. Beiges, creams, and light greys reflect a huge amount of sunlight, which helps keep the building cooler and can even nudge down the energy bills. Lighter shades also give a building a more airy and spacious look.
Darker colours like charcoal, deep brown, or even black can look incredibly sharp and contemporary, but they will soak up heat. A strategy I've found works really well is to use a combination. Stick with a primary neutral colour for the main walls, then bring in a darker or more textured accent tile to make architectural details pop—think columns, window surrounds, or the entrance.
Here’s a pro tip I always share: get physical samples and look at them on-site at different times of the day. A colour in the bright morning sun can look completely different in the soft light of dusk. This simple step can save you from a very expensive surprise.
Can I Mix Different Types of Tiles on One Elevation?
Absolutely! In fact, I'd encourage it. Mixing different tiles is a fantastic way to introduce depth, texture, and real personality to a facade. When you do it with a bit of thought, it can turn a straightforward design into something truly memorable.
A go-to strategy that always looks great is to combine a smooth, neutral tile for the bulk of the surface with something highly textured—like a rugged stone-look or a 3D-patterned tile—for an accent wall or a specific feature. You can also play with materials, pairing classic porcelain with the warmth of wood-look tiles or the coolness of metallic accents.
The key is to keep it cohesive. Make sure the tiles you choose work together in terms of colour tone and overall style. If you want to see how the pros pull this off, have a look through these house elevation design photos for some solid inspiration.
What Are the Most Common Mistakes I Should Avoid?
Over the years, I've seen a few common missteps that can derail a great tiles design for elevation.
One of the biggest is ignoring the technical specs. This means things like using interior tiles outside (a huge no-no), choosing the wrong adhesive for the climate, or forgetting to plan for expansion joints. Any one of these can lead to tiles cracking, popping off, or letting water in.
From a design perspective, a frequent mistake is just doing too much. Throwing too many patterns, colours, and textures at a single facade almost always ends up looking chaotic. Another is getting the scale wrong. Tiny mosaic tiles on a massive wall, for instance, can look dated and fussy.
But perhaps the most critical error is not visualising the final result properly. What looks great on a small sample board can feel completely different when it's scaled up across an entire building.
Ready to bring your elevation designs to life without the guesswork? Vibe3D is an AI-powered rendering platform that transforms your 3D models into photorealistic visuals in seconds. Test materials, compare variations side-by-side, and secure client approval faster. Create your first stunning render today at https://vibe3d.ai.