When you look at a commercial building, what's the first thing you see? Its face, right? That’s exactly what the elevation is—the building's "face" to the world. But it's so much more than just the outer skin; it's the visual handshake that tells you everything about the brand inside. It’s where art and engineering collide, and it has a massive impact on the building's look, its energy bills, and ultimately, its value.
Why Building Elevations Are More Than Just a Facade
Think of a building's elevation as its personality. It sets the tone for every client, customer, or employee who walks through the door. A dull, uninspired exterior might give off the vibe of a company that's stuck in the past. On the other hand, a bold, modern elevation screams innovation and confidence.
But it's not all about looks. The elevation is a hard-working system that has to deal with everything the environment throws at it. It protects the inside from the weather, manages the sun's heat, and lets in just the right amount of natural light. Get this right, and you dramatically cut down on energy costs and make the space a much nicer place to be.
From Afterthought to Centrepiece
It wasn't always this way. For a long time, the facade was just decoration, something tacked on at the end. Now, it’s at the very heart of the design process, especially in today's cut-throat markets. This change in thinking has been supercharged by the recent construction boom, particularly in India’s commercial real estate scene.
Over the last three years, India has gone on a building frenzy, adding an unbelievable 164.3 million square feet of new Grade A office space between 2021 and early 2024. This explosion has completely changed the game, making the facade a critical piece of the puzzle for branding, energy performance, and meeting regulations. For a deeper dive, check out the full report from JLL.
This intense competition means architects and developers are getting more creative than ever. They’re not just putting up walls anymore; they're designing smart, responsive envelopes for their buildings. The big idea is that a great elevation doesn't just look good—it actively works for the building's success.
A building’s facade is the ultimate expression of its purpose and place in the world. It’s where architectural intent meets public perception, and where performance meets aesthetic appeal. Getting it right is non-negotiable in modern commercial design.
Key Roles of a Modern Commercial Elevation
A well-designed elevation juggles several jobs at once, each adding real value to the building and the business it houses. When you understand these roles, it's easy to see why investing in top-notch commercial building elevation designs is a no-brainer.
-
Brand Identity and Marketing: The facade is basically a giant, three-dimensional billboard. Its style, materials, and colours can instantly tell you if you're looking at a trustworthy financial firm or a cutting-edge tech startup.
-
Energy Efficiency and Sustainability: Modern elevations are packed with clever features like solar shading, high-performance glass, and ventilated systems that slash heating and cooling costs. This is great for the bottom line and even better for the planet.
-
Occupant Well-being and Productivity: The design has a direct line to how people feel inside. Plenty of natural light and good views are proven to lift moods, cut down on stress, and make people more productive.
-
Property Value and Marketability: Let's be honest, a stunning building gets noticed. A unique, well-built elevation makes a property far more appealing to tenants and buyers, leading to higher rents and a stronger long-term investment.
Ultimately, the elevation is where different architectural design concepts come together to create something that’s both beautiful and incredibly functional. It’s an investment that pays you back in brand power, performance, and the simple joy of a well-designed space.
The Building Blocks of Modern Elevation Design
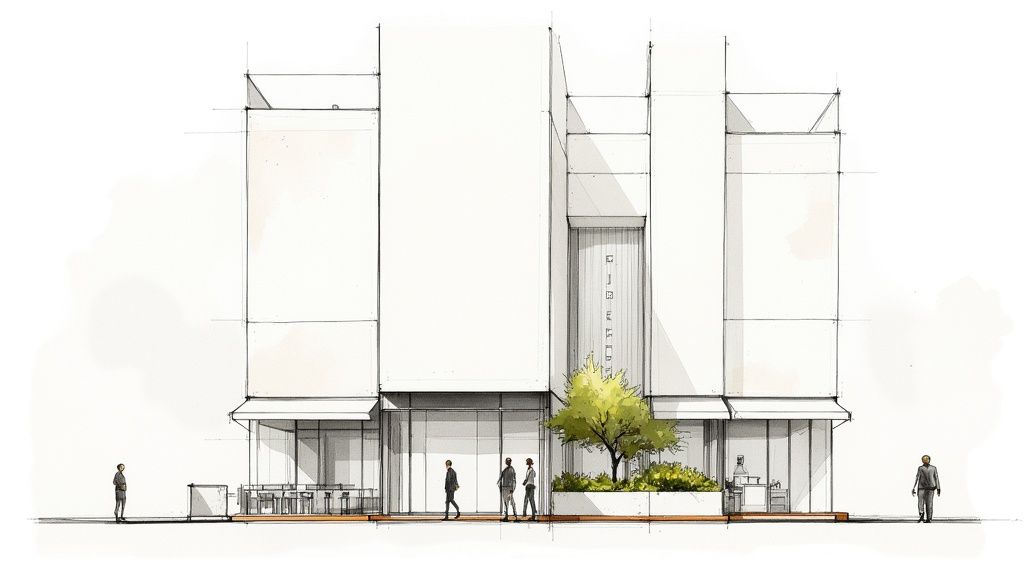
A truly great commercial building elevation is like a well-orchestrated symphony. It’s not just one thing that makes it stand out; it’s how all the individual pieces come together to create a unified, unforgettable look. To really get a grip on how master architects craft these facades, you first need to understand the components they're working with.
Think of these elements as the foundational layers of your building's identity. Each one has its own job to do, but their real power is unlocked when they harmonise. It's a bit like a chef balancing flavour, texture, and aroma—an architect balances form, light, and material to cook up a facade that looks amazing and works brilliantly.
Let's break down the four essential pillars that form the basis of any modern elevation design.
Structural Form: The Building's Skeleton
Before you can even think about what a building will wear, you have to give it a shape. The structural form is the basic mass and geometry of the building—its silhouette against the sky. Is it a tall, slender rectangle? A cluster of interconnected boxes? Or something completely different, with sweeping, organic curves?
This foundational shape sets the stage for everything else. A building with a complex, angular form will have completely different options for windows compared to a simple, flat-faced one. The form itself says a lot about the brand inside. A solid, grounded shape might suggest stability and tradition, while a more fluid, unconventional form could signal creativity and forward-thinking.
But it's not just about looking good. The structural form has a huge impact on how the building performs, especially when it comes to energy. Its shape and orientation dictate how it interacts with the sun and wind, which in turn affects natural light and ventilation.
Fenestration: The Eyes of the Building
Fenestration might sound like a technical term, but it’s just the fancy way of talking about the windows, doors, and any other openings on a building's facade. If the structural form is the skeleton, then the fenestration is the eyes, connecting the interior with the world outside.
The size, shape, and rhythm of the windows create a visual pattern that really defines the building’s character.
-
Ribbon Windows: Think long, horizontal bands of glass. They give a building a sleek, modern feel.
-
Punched Windows: These are individual, separate windows set into a solid wall, creating a more traditional and orderly appearance.
-
Curtain Walls: When an entire facade is made of glass, it creates a transparent, open aesthetic that blurs the line between inside and out.
The placement of windows is a strategic art. It's about framing the best views for the people inside while managing heat from the sun and creating a balanced, visually pleasing exterior.
Cladding Systems: The Protective Skin
Cladding is the material layer you see on the outside of a building. It's the building's "skin," protecting it from rain, wind, and sun while also being the most visible part of its design. The choice of cladding has a massive influence on the building's texture, colour, and overall feel.
Popular choices these days range from sleek Aluminium Composite Panels (ACP) and modern glass to timeless stone and warm terracotta. Each material brings its own unique character, maintenance needs, and visual appeal. But the cladding is also a workhorse; it’s where crucial things like insulation and weather barriers are integrated, making it a critical functional component. For a deeper dive into all the elements that make up a facade, check out our guide to architecture elevation design.
Integrated Lighting: The Night-time Identity
A building's personality shouldn't just vanish when the sun goes down. A smart lighting design can transform a static structure into a dynamic landmark that looks incredible 24/7. This isn't about just blasting the building with floodlights; it's a carefully planned strategy to highlight its best features.
Modern lighting techniques include:
-
Grazing: Placing lights close to a textured surface (like brick or stone) to bring out its depth and shadows.
-
Uplighting: Shining lights up from the base of the building to create a sense of drama and make it feel taller.
-
Backlighting: Using translucent materials and lighting them from behind to create a soft, internal glow.
Thoughtful lighting does more than just look cool. It can guide visitors, improve security, and reinforce a brand's identity long after closing time, ensuring the building makes a powerful statement day and night.
Choosing the Right Materials for Your Facade
Think of your building's facade as its outfit. It’s the first thing people see, defining its personality, texture, and how it fits into the neighbourhood. Picking the right materials is a delicate dance between looks, performance, and budget, especially when you're building in India’s wildly diverse climate. This choice is massive—it shapes the entire feel of your commercial building elevation designs.
But it’s about so much more than just looking good. Your material choices have a direct line to long-term maintenance costs, how much you'll spend on air conditioning, and even critical safety measures like fire resistance. From the sleek, reflective sheen of glass to the rugged, earthy appeal of stone, every material tells a unique story and has a specific job to do.
This decision tree gives you a clear picture of how the key pieces—form, windows, skin (your materials), and lighting—all have to work together in a modern elevation design.
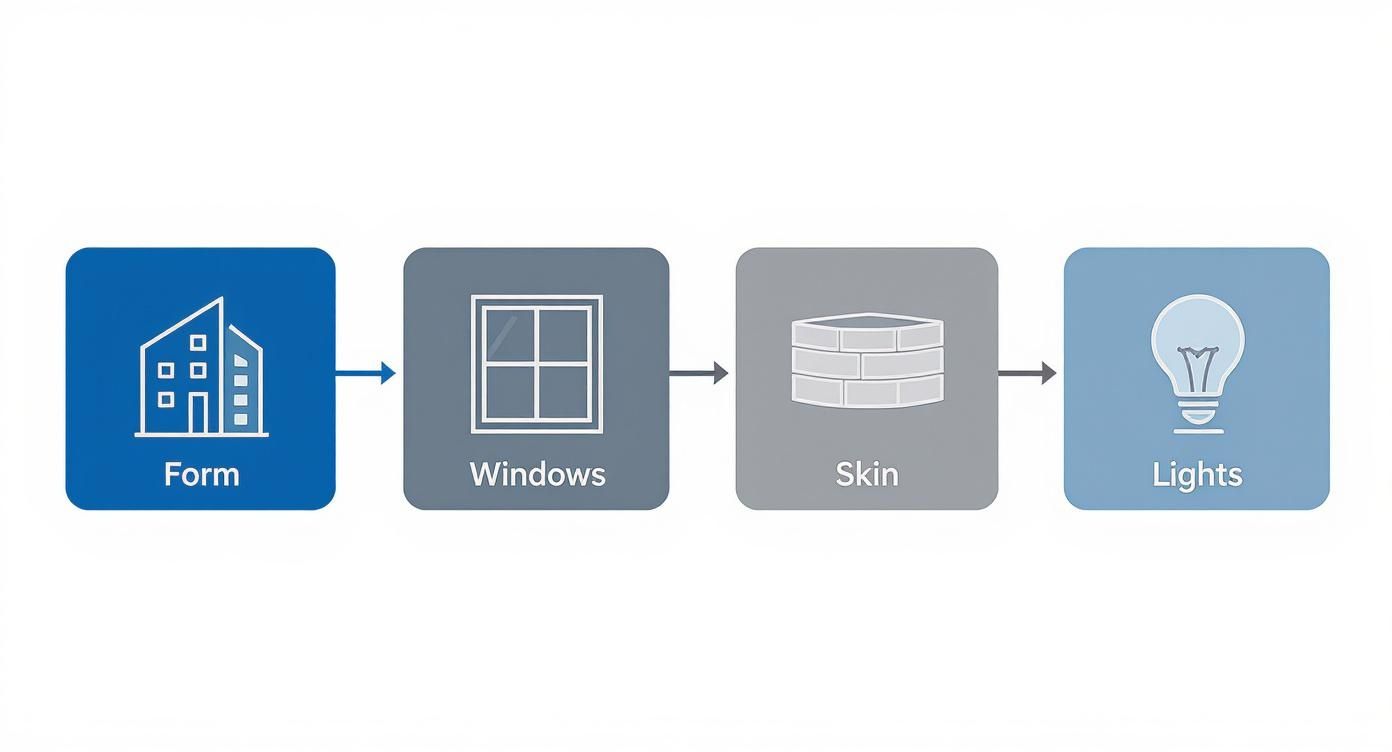
As you can see, choosing the building's "skin" is a pivotal step. It’s influenced by the structure's overall shape and, in turn, dictates your strategy for windows and lighting.
The Rise of Aluminium Composite Panels (ACP)
If you've looked at any new commercial building in India lately, you've almost certainly seen Aluminium Composite Panels (ACP). These lightweight, incredibly flexible panels have become the go-to for architects wanting a clean, modern finish. They come in a staggering range of colours and textures, from slick metallics and subtle mattes to finishes that convincingly mimic natural wood or stone.
This sheer versatility makes ACP a brilliant canvas for creating memorable, branded exteriors. Imagine a tech startup’s headquarters wrapped in a futuristic metallic silver, or a retail store using eye-popping colours to pull customers in off the street. The creative freedom is huge, which explains why you see ACP all over India's cityscapes.
In fact, the widespread use of ACP for commercial building elevations has become a defining trend in modern Indian architecture. Local manufacturers have stepped up in a big way—Viva ACP, for example, has been a major player since 2003. With their own in-house coating plant, they now offer over 500 unique shades, giving architects the power to nail precise brand colours. Crucially, as safety standards have tightened, Viva has also pioneered FR Class A1-rated honeycomb panels, ensuring their products meet global fire-safety benchmarks.
Classic Choices and Modern Alternatives
While ACP often steals the spotlight, plenty of other materials bring their own unique character to commercial building elevation designs. The real trick is finding the perfect match for your project's identity, budget, and local environment.
-
Glass Curtain Walls: Nothing says "sophisticated and modern" quite like a glass facade. It floods interiors with natural light, creating a feeling of openness. The catch? You need a solid plan to manage heat gain, which is a major factor in most Indian climates.
-
Stone Cladding: Materials like granite, marble, and sandstone give a building a feeling of permanence and undeniable luxury. Stone is built to last and never goes out of style, but it’s heavy and often comes with a higher price tag for materials and installation.
-
Terracotta Panels: This classic, clay-based material brings a wonderful warmth and texture to a facade. Often used in ventilated systems, terracotta is a fantastic insulator and offers a unique, natural look that really stands out from the crowd.
-
High-Pressure Laminates (HPL): A great alternative to ACP, HPL panels are made from compressed paper and resin. They are tough, weather-resistant, and come in a massive variety of colours and patterns, offering similar design flexibility.
Comparing Popular Commercial Facade Materials in India
Making an informed decision means weighing the pros and cons. This table breaks down some of the most popular facade materials used in India, helping you see how they stack up against each other based on what matters most for your project.
| Material | Key Advantages | Best For | Climate Suitability (India) |
|---|---|---|---|
| ACP | Lightweight, versatile colours & finishes, cost-effective | Modern corporate offices, retail showrooms, brand-centric buildings | Good, but darker shades can absorb heat. Proper installation is key for monsoon-proofing. |
| Glass | Maximises natural light, sleek & transparent aesthetic, premium feel | High-rise offices, luxury hotels, showrooms in cooler climates | Challenging in hot climates; requires high-performance (DGU/TGU) glass to manage heat gain. |
| Stone | Extremely durable, timeless & luxurious look, low maintenance | Banks, government buildings, luxury commercial projects | Excellent. Naturally cool and withstands heavy rain and sun exceptionally well. |
| Terracotta | Excellent thermal insulation, natural & earthy aesthetic, sustainable | Cultural centres, educational institutions, buildings seeking a unique character | Excellent. The ventilated system helps keep buildings cool and handles moisture well. |
| HPL | Durable, scratch-resistant, wide range of designs (including wood grain) | Hospitals, mixed-use developments, high-traffic areas | Very good. Highly resistant to UV fading and moisture, making it suitable across India. |
Ultimately, the best material depends entirely on your specific goals—whether that's achieving a certain look, meeting a budget, or prioritising long-term durability in a tough climate.
Making the Right Decision for the Indian Context
Choosing a facade material isn't just about picking what looks best in a 3D rendering. Here in India, the practical stuff matters—a lot. Can it stand up to a heavy monsoon without springing a leak? Will it help keep the building cool during a blistering summer?
Your facade material must be a champion performer, not just a pretty face. It needs to fight back against harsh sun, relentless rain, and the test of time, all while looking effortlessly good.
This is where you have to get into the technical specifications. Look for materials with high UV resistance to stop colours from fading under the intense sun and check their waterproofing credentials. And fire safety is completely non-negotiable; always ensure your chosen materials comply with the latest National Building Code of India and have the right fire-resistance ratings.
Sometimes, seeing these materials in action on a smaller scale can provide real clarity. For a look at how different materials come together in a specific commercial setting, check out our guide on restaurant exterior design. In the end, the perfect material is one that brings your design vision to life, works with your budget, and is truly engineered to thrive in its environment.
Exploring Key Commercial Elevation Design Styles
Picking an architectural style for a commercial building is a bit like choosing its personality. It’s the visual handshake that tells your brand's story before anyone even walks through the door. The right style can make a building feel sophisticated and sleek, creatively bold, or deeply connected to nature. It's a massive decision that defines how your building sits and speaks within its surroundings.
The world of commercial building elevation designs is packed with different approaches, and each one brings its own unique vibe and philosophy to the table. Getting a handle on these key styles is the first step toward creating a facade that really clicks with your vision. Let’s jump into four of the most popular styles you’ll see shaping our cities today.
Modern and Minimalist Designs
Think clean lines, simple shapes, and a firm "less is more" philosophy. Modernism isn't about fussy details or decoration; it's all about letting the purity of form and material shine. This style typically relies on a straightforward palette—materials like steel, glass, and concrete are front and centre, allowing the building's structure to do all the talking. Minimalism takes this idea even further, stripping away anything that isn’t absolutely essential to create an effect of pure, elegant simplicity.
Imagine a corporate headquarters with a powerful geometric shape, massive panes of glass that blur the line between inside and out, and a clean, monochromatic colour scheme. The real beauty is in its precision and uncluttered feel, projecting an image of efficiency, clarity, and cool sophistication.
Contemporary Creative Expressions
Here's where things get interesting. While "modern" points to a specific design era (think early-to-mid 20th century), "contemporary" is all about what’s happening right now. This style is much more fluid and free, often borrowing from modernism but adding a playful, experimental spin. Contemporary commercial building elevation designs are famous for their bold, often asymmetrical shapes and an inventive mix of materials.
You might see a building with a dramatic cantilevered section that seems to float in mid-air, or a facade that pairs rustic wood cladding with polished metal panels. It’s all about grabbing attention and making a statement. This style is a perfect fit for brands that want to come across as forward-thinking, dynamic, and maybe just a little bit daring.
The key takeaway? Modernism sticks to a strict rulebook of simplicity. Contemporary design, on the other hand, loves to break the rules, mixing textures, forms, and materials to create something totally new and of the moment.
Industrial Raw Aesthetics
The industrial style finds its beauty in a building's raw, functional guts. It’s about being honest with materials and construction, leaving elements like exposed brickwork, hefty steel beams, and visible ductwork out in the open. Drawing inspiration from old factories and warehouses, this approach gives commercial spaces a gritty, authentic, and hardworking vibe.
-
Exposed Structures: Steel frames, trusses, and concrete columns aren't hidden—they're the main event.
-
Utilitarian Materials: Brick, concrete, and weathered metal are the undisputed heroes here.
-
Large Openings: Big, factory-style windows with metal frames are a signature feature, letting light flood in.
Think of an old mill transformed into a hip co-working space, or a new restaurant designed with exposed brick and steel pipes. That's the industrial aesthetic in a nutshell. This style really connects with brands that value authenticity, craftsmanship, and a no-fuss attitude. To see more stylistic takes, check out our post on the latest front elevation designs that are turning heads.
Biophilic Connection to Nature
One of the most exciting movements in architecture today is Biophilic design. At its core, it’s all about weaving nature into our buildings. And we're talking about more than just a few potted plants in the lobby. This is about integrating natural elements directly into the building's facade to boost well-being and create a healthier, more serene environment.
Picture a hotel with a living green wall climbing its entire exterior, or an office building with terraces and balconies overflowing with local plants. Biophilic design uses natural materials, patterns inspired by nature, and plenty of natural light to forge a stronger connection to the world outside. This approach doesn't just look incredible; it's been shown to reduce stress and increase productivity, making it a seriously smart choice for any commercial space.
The Future of Smart and Sustainable Facades
https://www.youtube.com/embed/fuKNaGhZE2Y
The face of commercial buildings is changing—literally. Facades are no longer just static, passive shells designed to keep the weather out. They're becoming intelligent, living systems that actively respond to the world around them. This is a massive turning point for commercial building elevation design, where looks, tech, and sustainability are all starting to blend together.
Think of it like this: a traditional facade is a fixed pair of sunglasses. A "smart facade" is more like a pair of high-tech transition lenses that darken or lighten automatically based on the sun. These advanced systems use built-in technology to tweak their performance in real-time.
Enter the Intelligent Facade
Smart facades are the brainy new kids on the architectural block. They're dynamic systems built to slash a building's energy use while making life more comfortable for everyone inside. They pull this off with a few key features that work in harmony.
-
Automated Sunshades: These aren’t your everyday blinds. We're talking about louvres and shades that can actually track the sun's path, extending to block harsh glare and heat during peak hours, then retracting to let in natural warmth and light when it’s welcome.
-
Dynamic Glazing: This is essentially glass that can change its tint on command. Electrochromic glass, for example, can go from clear to dark with a tiny electrical charge, cutting down on the need for physical blinds without sacrificing the view.
-
Ventilated Facades: This is a game-changer, especially in hot climates like India's. The idea is to create an air gap between the outer cladding and the main wall. This pocket of air allows heat to be carried away by natural circulation before it ever gets a chance to seep into the building itself.
This shift towards performance-driven exteriors is clearly reflected in project budgets, too. Nowadays, commercial building elevation design in India is heavily focused on performance and branding. It's fascinating to see that the building exterior now eats up 15–25% of the total project budget—a huge jump from just 5–10% a decade ago.
Weaving Sustainability into the Structure
Alongside all this new tech, there's a parallel movement to bring nature right into the building’s elevation. This isn't just about adding a splash of green for aesthetic points; it's about turning buildings into active players in creating a healthier city.
A sustainable facade does more than just save energy; it gives back to its environment. By integrating green technologies, buildings can become active producers of clean energy and hubs of urban biodiversity.
This kind of integration shows up in a few exciting ways, each adding its own functional and visual appeal.
-
Vertical Gardens: Also known as living walls, these innovations transform stark, concrete surfaces into lush, green landscapes. They're brilliant for improving air quality, providing natural insulation, and helping to cool down our cities by reducing the urban heat island effect.
-
Building-Integrated Photovoltaics (BIPV): This is where solar panels stop being clunky afterthoughts bolted onto the roof. Instead, they are designed right into the facade, seamlessly replacing traditional materials like glass or cladding to generate clean energy on-site.
For projects aiming for the absolute peak of energy performance, diving into Passive House principles can provide a fantastic roadmap for creating ultra-efficient building envelopes. All these innovations are completely changing what we expect from our buildings, pushing them to be smarter, greener, and more in tune with their surroundings than ever before.
How Vibe3D Brings Your Elevation Design to Life
Let's be honest: how do you make sure the incredible design you've pictured in your mind is what actually gets built? It's one of the oldest challenges in our field. Closing that gap between a great idea and a physical structure can feel like a huge leap of faith.
It's one thing to imagine how morning light might catch a textured facade, but it's something else entirely to see it before a single brick has been laid.
This is where photorealistic visualisation completely changes the game. Of course, blueprints and sketches are indispensable, but they just can't convey the real-world feel of materials, the subtlety of a colour palette, or the mood of a lighting plan. When you leave too much to imagination, you open the door to expensive mix-ups and last-minute changes that can throw schedules and budgets into chaos.
From a Flat Blueprint to a Stunning Reality
This is exactly the problem Vibe3D was created to solve. Instead of just hoping different elements will work together, you can see and feel the final result with incredible clarity. It’s a tool that gives architects, developers, and especially clients, the power to turn abstract plans into something they can truly understand.
With photorealistic rendering, you’re not just hoping for the best anymore. You can see, tweak, and perfect your commercial building elevation designs down to the smallest detail. It’s all about making sure the finished building is a perfect match for the original vision.
This kind of clarity makes a world of difference when it comes to making decisions. You can confidently sign off on everything from material selections and colour schemes to how the building will sit in its environment. When you can see precisely how a glass curtain wall will reflect the afternoon sun, or how integrated lighting will look at dusk, your choices are backed by solid visual proof.
Making Confident Choices and Skipping the Rework
Using a tool like Vibe3D is more than just making pretty pictures; it's a smart way to save a ton of time and avoid expensive fixes down the road. When everyone involved—from the client to the contractor—can see and agree on a detailed, realistic preview, the chance of a major miscommunication plummets.
By catching potential issues early on, you can refine the design long before anyone starts digging. Realising a material doesn't look quite right is a simple click-and-drag fix in a 3D model. On a construction site? That's a major headache and a big expense.
Why not see for yourself? Start exploring how you can bring your architectural visions to life by checking out the powerful tools available at Vibe3D.
Frequently Asked Questions
Getting into the nitty-gritty of commercial building elevation designs always brings up some practical questions. People want to know about costs, materials, and how the whole design process actually works. Getting solid, straight-up answers is the first step to making smart decisions for your project.
We've put together some of the most common questions we get from architects, developers, and clients alike. Think of this as your go-to guide for the real-world side of crafting a commercial facade that truly stands out.
How Much Does a Modern Commercial Elevation Cost in India?
That’s the million-dollar question, isn't it? The honest answer is: it depends. The cost can swing wildly based on the materials you pick, how complex the design is, and, of course, the sheer scale of the building. For example, a facade using standard Aluminium Composite Panels (ACP) will be much lighter on the wallet than one with custom-made glass curtain walls or a high-tech smart facade system.
One thing we're seeing more and more is a real investment in a building's exterior. These days, the facade can eat up anywhere from 15-25% of the total project budget for new commercial builds in India's big cities. That’s a massive increase from a decade ago, which just goes to show how critical a well-designed, high-performance exterior has become for branding and value.
What Is the Most Durable Facade Material for a Harsh Climate?
In a country like India, with everything from scorching sun to torrential monsoons, durability isn't just a nice-to-have—it's essential. You need materials that can take a beating from the weather and still look good.
High-quality, certified ACPs are a go-to choice for a reason. They're specifically made to stand up to UV rays without fading, resist corrosion from the humidity, and handle heavy downpours.
For projects where you need something that will last a lifetime, you can't go wrong with timeless materials like terracotta and stone cladding. They are incredibly tough and can last for decades, though they do come with their own set of structural needs and upkeep routines. The real secret is to pick a material with a proven track record and make sure it's installed by a team that knows what they're doing.
How Does 3D Visualisation Improve the Design Process?
Honestly, 3D visualisation tools have completely changed the game for elevation design. With platforms like Vibe3D, everyone on the project—from the client and architect to the builder on the ground—can see an incredibly realistic preview of the building’s exterior way before any construction starts.
It takes all the guesswork out of the equation. You can confidently lock in decisions about materials, colours, and even how the lighting will look at different times of the day, because you've already seen it. This simple step helps sidestep costly changes down the line and gets everyone aligned with a single, clear vision, making the whole project run a lot smoother.
Ready to see how your commercial elevation design will look before breaking ground? Bring your vision to life with Vibe3D and create stunning, photorealistic visuals in seconds. Start rendering today at Vibe3D.