Not long ago, creating a photorealistic 3D rendering house exterior was a serious grind. It was a slow, highly technical job that you’d have to leave to the specialists. But that’s all changing. AI platforms are completely flipping the script, letting architects and designers pump out incredible visuals in a fraction of the time, without the massive learning curve.
So, How Is AI Shaking Up Exterior Rendering?
Let's be real—traditional 3D rendering can be a nightmare. The whole process is usually bogged down by complicated settings, marathon-level render times, and the need to be a guru in some pretty dense software. This guide is your way around all that. We're going to jump into a workflow powered by AI that helps architects, designers, and real estate pros create visuals that don't just look good, but actually sell the dream.
You can forget about the confusing tech-speak and the endless cycle of tweaking settings. We’ll get practical and walk through how to take a basic 3D model and turn it into a photo-quality image that will wow your clients.
Key facts at a glance: AI exterior rendering reduces render time from 12–24 hours to under 1 hour for a single image. Clean geometry and proper scaling are prerequisites for good AI output. Effective prompts for exterior rendering include three elements: materials/textures, lighting/atmosphere, and environment/context. Common export formats are .FBX and .OBJ. India’s 3D architectural rendering market is projected to grow from USD 171.1M (2024) to USD 1,025.8M by 2033.
This new way of working has some massive upsides:
- Sheer Speed: A job that used to eat up days of manual labour and rendering can now be knocked out in a matter of minutes. This lets you iterate at lightning speed, trying out dozens of design variations without breaking a sweat.
- Anyone Can Do It: You no longer need a PhD in rendering to get professional-looking results. The new, smarter platforms do the heavy lifting for you, from applying believable materials to figuring out the perfect lighting.
- Creative Freedom: By taking the technical headaches off your plate, AI lets you get back to what you do best: being creative. Want to see what the house looks like in a different style, mood, or setting? Just describe it.
The big change here is that you're no longer building every single detail by hand. You're guiding an intelligent system. Instead of messing with a hundred sliders to get the sunlight just right, you can just tell the AI you want "warm afternoon sun casting long shadows," and it gets it.
This shift makes everything so much smoother, bringing high-end rendering to a much wider audience. As AI continues to change how we create and see visual content, getting a handle on it is key. If you're curious about the bigger picture, you can learn more about AI-driven augmented reality and its impact on XR technologies. It’s also worth exploring the different types of architectural rendering software out there to see just how far these tools have come.
Getting Your 3D Model Ready for AI Rendering
Before you can even think about getting a photorealistic 3D rendering house exterior, you have to start with a solid 3D model. I always tell people to think of it this way: the AI is like a world-class photographer, but it can only shoot what you put in front of the camera. If you give it a messy, disorganised model, you're going to get confusing and unpredictable results, no matter how smart the AI is.
Your top priority has to be clean geometry. That means getting rid of any overlapping faces, random stray edges, or hidden bits and pieces that can trip up the rendering engine. It's also absolutely crucial to work with correct, real-world scaling. If a door in your model is 10 metres tall, the AI will have a hard time applying realistic textures and lighting because the proportions are all wrong.
Organise Your Scene Like a Pro
A well-organised model makes all the difference when it comes to AI rendering. Instead of working with one massive, jumbled object, get into the habit of grouping your model into logical components. It’s a simple trick that makes the AI's job a whole lot easier.
- Core Structure: Keep your walls, floors, and roof in separate groups.
- Architectural Elements: Put windows, doors, and railings into their own distinct groups.
- Landscaping: Organise things like trees, plants, and pathways together.
Structuring your model this way helps the AI understand the different parts of the scene, which leads to much more accurate material application and lighting. It's a small bit of upfront effort that pays off big time in the final image quality.
This infographic lays out the simple flow from your initial model to the final AI-generated image.

As you can see, the quality of the 3D model you feed the AI directly impacts the final render. That’s why this prep stage is so important.
Simplify Your Geometry and Pick Your Shots
Here’s a tip I’ve learned over the years: not every single detail needs to be perfectly modelled. If a part of the house isn't even visible from your chosen camera angle, don't waste time on it. Simplify complex geometry that’s far away or completely out of frame. This simple act reduces the processing load and speeds up your entire workflow. For those of you working in SketchUp, there are tons of ways to optimise your models. You might find our guide on how to render in SketchUp helpful for more specific tricks.
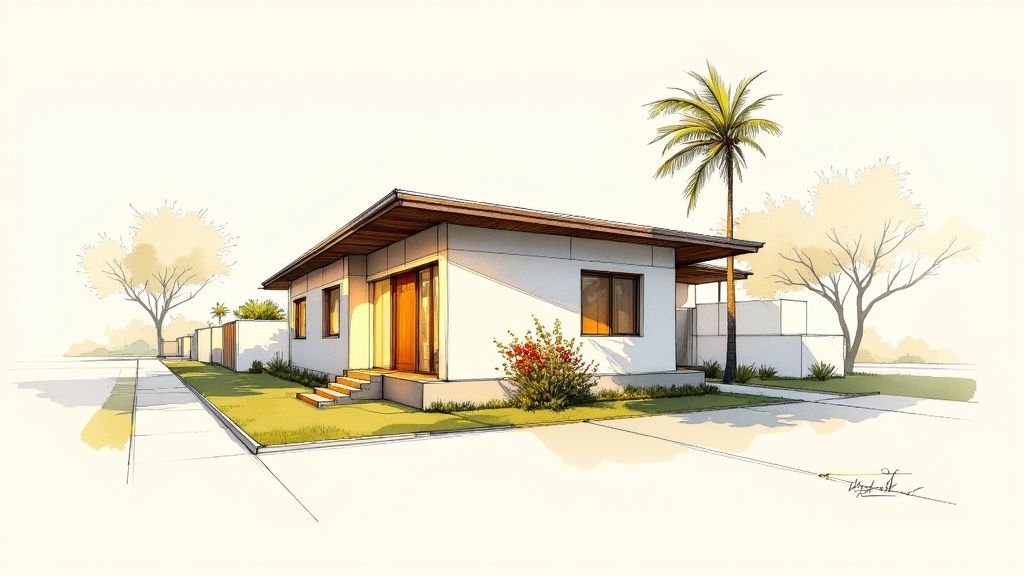
Remember, you're not just building a model; you're setting a stage. Think like a real photographer and find compelling angles that highlight the home's best features. A great perspective is just as important as the model itself.
The appetite for these tools is exploding, especially in fast-growing markets. To give you an idea, India's 3D architectural rendering market was worth about USD 171.1 million and is projected to reach USD 1,025.8 million by 2033. A staggering 87.32% of that revenue comes directly from rendering software, which just goes to show how vital these tools have become. Putting in the time to prep your model properly is the best way to get your money's worth from these powerful platforms.
Alright, this is where the magic really happens. With your 3D model locked and loaded, your main job is to steer the AI with carefully crafted text prompts. Think of it like this: you're the director, and the AI is your production crew, ready to build whatever you describe. Your words are the blueprint.
You've got to get specific. Vague instructions like "modern house" will get you a bland, cookie-cutter result. To get something that looks real enough to touch, you need to be descriptive. Paint a picture with your words. Don't just say "house"; describe the style, the materials, the time of day, even the mood you're going for.
This is a perfect example of an AI rendering platform's interface. It's all about feeding the machine the right kind of descriptive language to get the image you have in your head.
As you can see, the best tools guide you, breaking down concepts like style and mood to help you build a much stronger, more effective prompt.
Breaking Down a Killer Prompt
From my experience, the most powerful prompts for exterior shots boil down to three key ingredients. Nail these, and you're giving the AI a solid brief to work with, which makes a world of difference to the final render.
- Materials and Textures: Get granular here. "Wood siding" is okay, but "charred cedar cladding with a matte finish" is way better. Or instead of "stone walls," try "rough-hewn limestone with deep grout lines." The tiny details sell the realism.
- Lighting and Atmosphere: This is all about mood. Don't just say "daytime." What kind of daytime? Is it the "crisp morning light casting long, soft shadows"? Or maybe that "dramatic golden hour glow just before sunset"? Be a cinematographer.
- Environment and Context: Where does this house live? Giving it a sense of place is crucial. Something like "nestled in a dense pine forest with a gravel driveway" or "perched on a rocky coastal cliff overlooking a choppy sea" instantly adds a layer of believability.
If you ever find yourself stuck trying to find the right words for a complex scene, tools like AI Image Prompt Generators can be a lifesaver. They're great for finding new descriptive terms and helping you structure your thoughts into a prompt the AI will actually understand.
Examples: From Blah to Breathtaking
Seeing the difference a good prompt makes is the best way to understand its power. The table below shows just how much impact a few extra details can have on the AI's output for different architectural styles.
| Crafting Prompts for Different Exterior Styles |
| :--- | :--- | :--- |
| Desired Style | Basic Prompt (Less Effective) | Detailed Prompt (More Effective) | | Scandinavian Barn House | Barn house in the woods. | A minimalist Scandinavian barn house, vertical black timber cladding, large A-frame window, metal roof, surrounded by a dense birch forest in autumn, soft overcast lighting. | | Mediterranean Villa | Mediterranean house with a pool. | Photorealistic render of a classic Mediterranean villa, whitewashed stucco walls, terracotta roof tiles, arched doorways, poolside terrace with olive trees, bright midday sun, deep blue sky. | | Japanese Zen Home | Modern Japanese house. | A single-storey Japanese-inspired home with shou sugi ban (charred wood) siding, sliding glass walls, and a minimalist rock garden. Diffused morning light through a light fog. |
The prompts in the "Detailed" column don't just describe a building; they tell a story. They provide the context, materials, and lighting that the AI needs to create something truly convincing instead of a generic, soulless image.
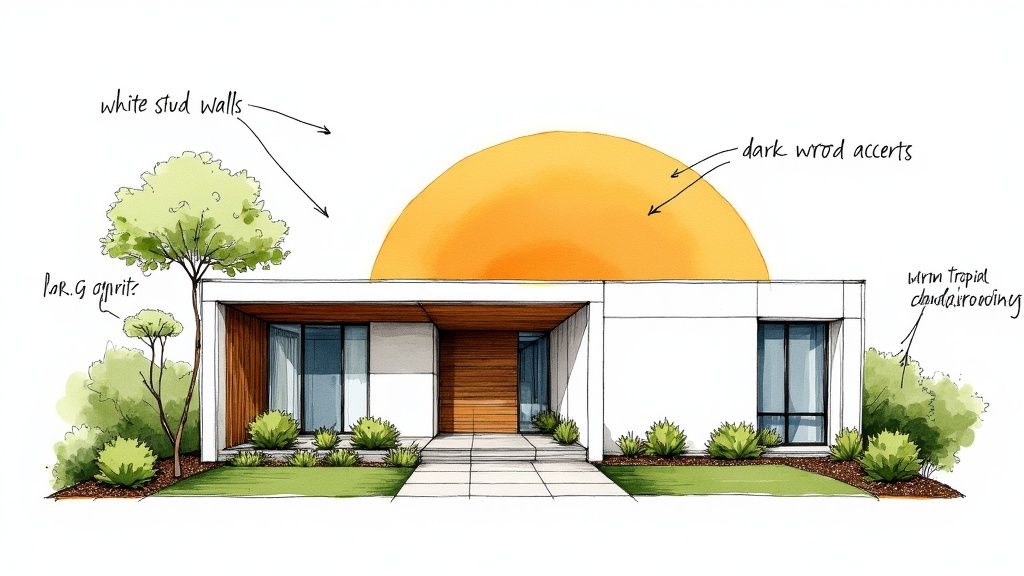
Let's walk through one more. You have a model of a simple, modern bungalow.
A basic prompt would be something like: Modern house with a garden. The AI will spit out something... fine. It'll be a modern house. It'll have a garden. But it won't have any soul.
Now, let's dial it up with a powerful prompt: Photorealistic render of a single-storey modern minimalist home, white stucco facade with vertical dark wood slat accents, large floor-to-ceiling windows, flat roof. Set in a manicured garden with gravel pathways and native grasses. Warm afternoon sun casting long shadows from the left, clear blue sky.
See the difference? It's night and day. The second prompt gets into the nitty-gritty of the architecture, the landscaping, and even the precise lighting. That's how you guide the AI from making a simple picture to rendering a believable world.
Remember, getting it right on the first try is rare. Think of your first prompt as a conversation starter. If the shadows look too harsh, tweak your next prompt to include "soft, diffused light." If the garden feels a bit empty, add "dense, layered foliage." This back-and-forth is what makes this process so fast and powerful. You can refine your vision in minutes, not days.
Nailing the Lighting and Environment for True Realism
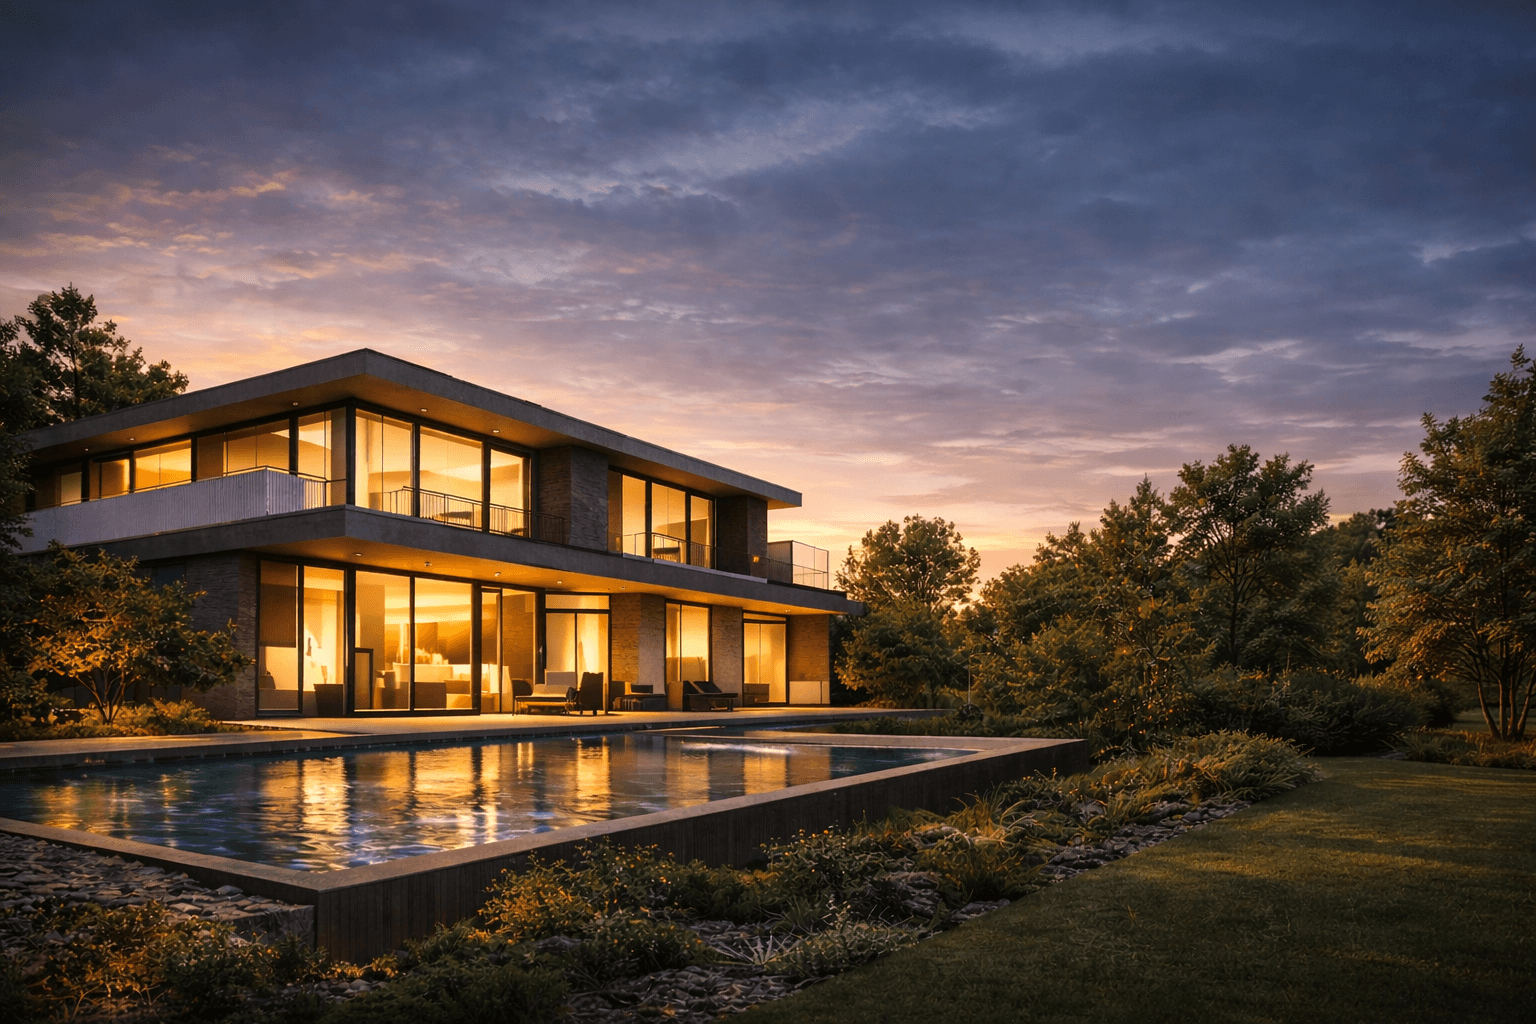
You can have a technically flawless 3D model, but if the lighting and environment feel artificial, the whole thing falls flat. A truly stunning 3d rendering house exterior is all about creating believable light and a convincing setting. Get these right, and you're not just showing a building; you're creating a mood and telling a story. This is where playing with the AI settings can take your scene from a sterile computer image to something that feels real.
Think of yourself as the director of photography for your project. With a few simple text prompts, you can conjure up any time of day. Want to show off the clean, sharp lines of a modern design? Try the "crisp, cool light of early morning." Looking to create a warm, welcoming vibe for a family home? Go for the "dramatic orange glow of a late sunset." Every choice you make shapes the narrative of the home.
Building a Believable World Around the House
A house never just floats in space. To make your render feel grounded and real, you have to build a world around it. This means thinking carefully about the surroundings and adding details that feel authentic to the location.
If you're working on a project in India, for example, this goes way beyond just dropping in a few generic trees. You need to think about plants that actually grow there.
- Bougainvillea: A fantastic way to add vibrant pops of colour against pale walls.
- Neem or Mango Trees: These add a sense of established, natural shade that feels right.
- Jasmine Vines: Perfect for adding a bit of delicate, elegant detail.
And it's not just about the landscaping. Look at the bigger picture. Are there neighbouring homes? Is the property on a paved road or a simple gravel path? Adding these small contextual clues builds layers of realism. For a deeper dive into showing the entire property, our guide on site plan rendering has some great tips.
Finding Beauty in Imperfection
Here’s a little secret from the pros: the key to photorealism is often found in the tiny imperfections that break up digital perfection. The real world isn't flawless, and your renders shouldn't be either. The goal is to introduce subtle flaws that the eye picks up on subconsciously, making the whole scene feel more genuine.
Think about the subtle reflections in window glass, a bit of light weathering on a wooden deck, or the faint atmospheric haze you'd see on a humid day. These are the tiny details that most people won't consciously notice, but they make a massive difference in how believable the final image feels.
The aim is to create an image that feels lived-in and real. This isn't just about making pretty pictures; it has a real impact on business. In India, for example, about 78% of property developers rely on 3D rendering as a key communication tool. When you create high-quality visuals that accurately show a project in its environment, it helps local authorities make faster decisions on permits, sometimes shortening approval delays by up to 30%. Mastering these environmental details will absolutely set your work apart from the competition.
Adding Final Touches for a Polished Render

Getting a fantastic image straight from the AI platform is a huge win, but the real magic often happens in that final five percent. I like to think of the raw AI render as a perfectly prepped canvas. A little bit of post-processing is what takes it from a great 3d rendering house exterior to a breathtaking, photorealistic image that genuinely tells a story.
This last stage is all about refinement. You don’t need to be a Photoshop wizard, either. Even free tools have everything you need to make your image truly pop. Simple tweaks to the colour and contrast can completely transform the mood and guide the viewer's eye exactly where you want it.
Fine-Tuning Colour and Contrast
I always start with the basics: colour correction. The goal here is to enhance the existing tones, not completely change them. You might want to boost the warmth of the sunlight for a more inviting feel, or maybe slightly desaturate the colours for a more dramatic, moody look. It's all about reinforcing the atmosphere you were aiming for with your prompts.
Next up, I'll play with the contrast. A common issue with raw renders is that they can look a bit flat. Gently bumping up the contrast deepens the shadows and brightens the highlights, which adds a powerful sense of depth and dimension to the scene. This simple step makes the architectural details stand out and gives the whole image a much punchier, more professional finish.
A great rule of thumb I've learned over the years is to make changes in small, careful increments. It’s so easy to overdo it with saturation or contrast, which can quickly make the image look fake. The goal is subtle enhancement, not a complete overhaul.
Adding Life and Photographic Elements
Once the core lighting and colour feel right, it's time for the final touches that really bring the scene to life. This is where I'll add what we call "scale figures"—things like silhouettes of people walking or a car parked in the driveway. These elements are crucial because they give the viewer an immediate sense of the building's scale and help them imagine themselves right there in the space. For more tips on getting this just right, check out our guide on creating a realistic 3-d drawing.
You can also sprinkle in some subtle photographic effects to really sell the image.
- Lens Flare: Adding a soft, subtle lens flare where the sun hits the edge of the frame can create a beautiful, cinematic quality.
- Vignetting: A very slight darkening of the image corners helps to draw the viewer's focus towards the centre of the frame—right on the house itself.
- Sharpening: A final, gentle sharpening pass makes all the fine details, like wood grain or stone textures, incredibly crisp and clear.
This post-production work isn't just a "nice-to-have"; it's a standard part of the workflow for professional visualisers all over the world. Interestingly, India has become a global hub for outsourcing 3D rendering services, with skilled artists delivering top-quality projects at competitive prices. Many firms there can reduce project costs by 40-60% compared to Western countries, and they often use these exact post-processing techniques to deliver those polished final images. You can find more insights about these outsourcing trends on mrrendering.com.
Ultimately, taking the time for these final tweaks is what will make your work stand out.
Got Questions About AI Exterior Rendering? We've Got Answers
Once you start using AI in your rendering workflow, you're bound to run into a few questions. It’s a totally different way of working, after all. Let’s go over some of the most common things that come up when architects and designers first dive into creating a 3d rendering house exterior with these new tools.
How Long Does This Whole Thing Actually Take?
This is where you'll feel the biggest shift. A traditional render can lock up your high-end machine for hours—sometimes even days—just for one high-res image. An AI-powered workflow completely flips that script.
Sure, getting your 3D model prepped and cleaned up might still take a couple of hours. But the actual AI generation part? It’s lightning-fast. You can spit out a whole gallery of high-resolution options in a few minutes.
From start to finish, you can easily go from a base model to a polished final image, including post-production, well within a single day.
What’s the Best 3D Modelling Software to Use?
The great news here is that the specific program you use isn't nearly as important as the quality of the model itself. Most professional 3D software will do the job just fine.
From what I've seen, people have great success with:
- SketchUp: It's super intuitive and perfect for getting ideas down quickly.
- Autodesk Revit or 3ds Max: These are the heavy hitters for when you need that deep, complex architectural detail.
The real trick is to export your model in a common format like .FBX or .OBJ that the AI platform can understand. As long as your geometry is clean and organised, you're good to go. If you're just starting out, we've got a great guide on the best free 3-d modeling software that can help you find your footing.
How Much Detail Do I Really Need in My 3D Model?
This is a fantastic question, and the answer will save you a ton of modelling time. Your 3D model needs solid, accurate core shapes, but you can absolutely skip the tiny, painstaking details. That’s what the AI is for.
Focus your time on the big stuff: the main walls, the roofline, and the exact placement of windows and doors. Don't waste hours modelling every roof tile, wood grain, or blade of grass. The AI is brilliant at adding those photorealistic textures and fine details based on your text prompts.
Can AI Really Whip Up Different Design Options on the Fly?
Oh, absolutely. This is probably one of its biggest superpowers, especially for client presentations. Once your base 3D model is ready, you can generate a nearly infinite number of variations just by tweaking your text prompts.
This opens the door for creative exploration at a speed we've never seen before. In minutes, you can show a client what their home looks like with a 'classic red brick facade' versus a 'sleek modern stone cladding'. You can even compare lighting, like an 'overcast British afternoon' versus a 'warm California golden hour'. This kind of rapid iteration is a game-changer for exploring ideas and getting clients to sign off faster.
How Do I Prepare a 3D Model for AI Exterior Rendering?
Clean geometry is the top priority: remove overlapping faces, stray edges, and hidden objects. Ensure correct real-world scaling — a 10-meter door rendered at the wrong scale produces unrealistic textures and lighting. Organise the model into logical groups (structure, architectural elements, landscaping) so the AI applies materials accurately. Simplify or omit geometry not visible from your camera angle.
What File Formats Does AI Exterior Rendering Support?
Common export formats for AI rendering platforms include .FBX (Autodesk), .OBJ (Wavefront), and .GLTF/.GLB (GL Transmission Format). SketchUp models can be exported directly to .FBX or .SKP. 3ds Max and Revit models typically export to .FBX or .OBJ.
Can AI Replace Traditional Rendering Software for Exteriors?
No — AI rendering tools like Vibe3D supplement rather than replace traditional software. They take a completed 3D model and generate photorealistic renders based on text prompts. The AI handles lighting, materials, and atmosphere, but it cannot fix a poorly constructed model. The workflow is: model in SketchUp/3ds Max/Revit → export → AI render → post-production.
Ready to turn your models into incredible visuals? With Vibe3D, you can create photorealistic exterior renderings in seconds, not days. Cut your review cycles, impress your clients, and bring your architectural vision to life effortlessly. Explore Vibe3D today.