The right 3D warehouse model can make or break your SketchUp project. Your first stop is almost always the official 3D Warehouse – it’s a massive, free library baked right into the software, and it’s packed with everything from simple empty shells to sprawling, fully detailed logistics centres.
But finding a gem in that mountain of assets is a skill in itself. It’s all about knowing what to look for and how to search efficiently to grab a model that’s both high-quality and easy on your system’s performance.
Sourcing Your SketchUp Warehouse Model
A great visualisation starts with a solid foundation, and in this case, that’s your core 3D model. If you begin with a poorly built, messy asset, you’re just setting yourself up for a world of pain later on. Think performance lags, frustrating rendering errors, and hours spent on tedious cleanup that you could have avoided.
So, the first real step is to source a clean, well-optimised warehouse model that gives you a reliable base to build upon. This means you need to look past the shiny thumbnail and dig into the model's stats before you even think about hitting 'download'.
Navigating the 3D Warehouse
The 3D Warehouse is the go-to for most of us. It's an incredible resource, but the sheer volume means quality is all over the place. To save yourself a headache, you need to be strategic with your search.
Instead of just typing "warehouse" into the search bar, get more specific. Try queries that better match your project's needs, like "modern logistics warehouse," "industrial steel frame building," or "self-storage facility." This immediately weeds out a lot of the irrelevant, low-quality clutter. For instance, if your design needs to incorporate specific key features of modern self-storage facility design, including those terms can help you find models that are already on the right track.
Once you’ve got a list of results, the filters are your best friend:
-
Sort by Popularity: This is my first move. Models with thousands of downloads are usually popular for a good reason. They tend to be better constructed, more reliable, and less likely to be full of geometry errors.
-
Check File Size and Polygons: Before you download, always check the model's details. A huge file size or an absurdly high polygon count (we’re talking millions for a basic structure) is a major red flag. It’s a sure sign of a bloated, unoptimised model that will bring SketchUp to its knees.
You're always looking for that sweet spot between visual detail and smooth performance. The goal is to find an asset that looks great on screen but doesn't slow your workflow to a crawl. A reasonable polygon count and clean geometry should always be your priority.
Beyond the Official Warehouse
The 3D Warehouse is fantastic, but it’s not the only place to look. Sometimes it pays to explore other platforms that offer curated, premium 3D models, even if they come with a price tag. Websites that specialise in architectural assets often sell models that are already cleaned up and optimised for rendering, which can save you a massive amount of prep time.
Finding the right asset is a universal challenge, but it’s especially relevant in growing markets. In India, for example, SketchUp is a powerhouse, with approximately 40% of BIM users relying on it for critical design tasks. With the Indian 3D software market projected to more than double by 2033, the demand for high-quality, project-ready assets for warehouse design is only going to get bigger. For a deeper dive into this, you can learn more about finding the perfect warehouse for sketchup right here: /blog/sketchup-warehouse.
Comparing Sources for SketchUp Warehouse Models
When you're on the hunt for the perfect warehouse model, knowing where to look can save you a lot of time and effort. Each source has its pros and cons, depending on what you need for your specific project.
Here’s a quick breakdown to help you decide where to focus your search:
| Source | Best For | Typical Model Quality | Cost |
|---|---|---|---|
| SketchUp 3D Warehouse | Quick access, vast selection, and project-specific components. | Varies wildly from excellent to unusable. | Free |
| CGTrader / TurboSquid | High-fidelity, render-ready models for professional visualisations. | Generally high to professional-grade. | Paid (per model) |
| 3DSky | Detailed architectural models with a focus on realism. | High quality, often optimised for specific render engines. | Subscription or Paid |
| Manufacturer Websites | Accurate, real-world models of specific building systems or products. | Excellent for technical accuracy, but may be overly detailed. | Usually Free |
Ultimately, a blended approach often works best. You might grab a basic structural model from the 3D Warehouse, purchase a high-quality loading bay asset from a premium site, and download specific racking systems directly from a manufacturer. It’s all about using the right tool for the job.
Getting Your Model Ready for Prime Time
So, you've found a great-looking warehouse model on the 3D Warehouse. The job's done, right? Not quite. Bringing a model straight into your project without giving it a thorough clean-up is asking for trouble. It's a classic mistake that can lead to a world of performance headaches.
Even the most well-crafted models are often packed with hidden bloat that can bring your system to a grinding halt. A heavy, complicated model doesn’t just make moving around your scene a choppy experience; it balloons your rendering times and dramatically increases the risk of a crash. Our goal here is to get rid of all that unnecessary data while keeping the warehouse looking sharp. This ensures you have a smooth, responsive workflow from beginning to end.
This visual guide shows the basic process for locating a model, a critical first step before optimization can even begin.
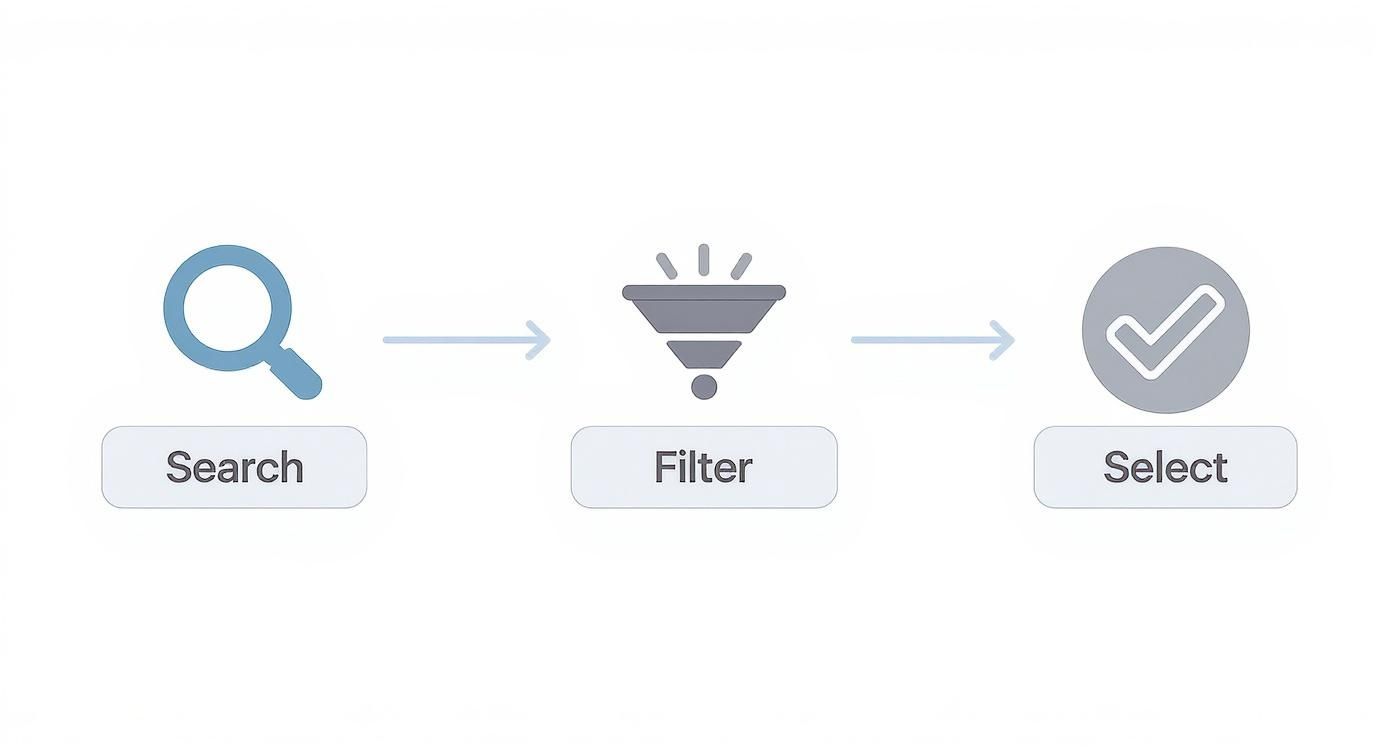
This workflow really just boils down to a methodical approach. You search with specific terms, filter by metrics like file size or polygon count, and then select the best possible starting point. The better the model you start with, the less cleanup you'll have to do.
Kicking Off the Cleanup Process
The very first thing I do after importing a model is purge all the unused junk. Head over to Window > Model Info > Statistics and hit the Purge Unused button. With one click, SketchUp gets rid of materials, components, and layers that aren’t actually being used. You'd be surprised how much this can shrink your file size right away. It's a simple habit that pays off.
Next up is the geometry. This is where models really get heavy. Intricate details, especially on things like furniture or machinery, are often the biggest performance killers. You need to hunt for elements with too many curves or tiny details that won’t even show up in your final render.
-
Simplify Complex Components: Does that forklift in the corner really need to have 500,000 polygons? Probably not. Swap it out for a simpler, low-poly version if it's just a background element.
-
Fix Your Face Orientation: Keep an eye out for reversed faces, which often show up in a default blue or grey colour. When faces are pointing the wrong way, it can create a mess with materials and lighting when it's time to render. Just right-click on them and select Reverse Faces.
-
Delete Hidden Geometry: Some models have lines or entire objects hidden inside other geometry. Flick on X-ray mode (View > Face Style > X-ray) to see what's lurking inside your model and delete anything that isn't contributing to the final look.
Let Extensions Do the Heavy Lifting
Manually cleaning a massive warehouse model can be mind-numbingly tedious. Thankfully, the SketchUp Extension Warehouse is full of tools designed to automate a lot of this work, saving you a ton of time.
One of my absolute go-to extensions is CleanUp³. This thing is a powerhouse. It can automatically perform dozens of optimisations, like merging identical materials, zapping hidden geometry, and simplifying complex shapes. Running CleanUp³ should become a standard step in your import process. Another lifesaver is Material Replacer, which lets you swap out heavy, high-resolution textures for more efficient ones across the entire model in just a couple of clicks.
A clean, optimised model is the bedrock of any successful visualisation. Investing time in this stage not only improves SketchUp's performance but also streamlines the entire rendering process, especially when using advanced tools. You can explore our guide on the best rendering software for SketchUp to see how a well-prepared model makes a difference.
By getting a handle on these optimisation techniques, you can ensure your warehouse project stays lean and responsive. A clean file frees you up to focus on the fun stuff—like staging, lighting, and creating stunning renders—without getting bogged down by technical glitches.
Staging Your Scene with Realistic Warehouse Assets
An empty warehouse is just a shell. The real story, the part that makes your design believable, is told by what you put inside it. Moving beyond the basic structure is where your model transforms from a simple digital box into a functional, living space. Populating your scene isn't just about filling empty floor space—it's about thinking through the logistics and placing every element with purpose.
You almost have to put on an operations manager's hat. Where do the racking systems really go? Is there enough clearance for a forklift to turn without hitting anything? How are pallets staged for loading and unloading? Every single asset you place should serve a function and build the narrative of a working facility.

Curating Your Warehouse Inventory
First things first, you need to gather your assets. While the 3D Warehouse is a fantastic starting point for common items, you have to be selective. I’ve seen too many scenes get bogged down by overly complex models. The trick is to find assets that strike a perfect balance between visual detail and performance.
Here's what I typically look for:
-
Racking and Shelving: Search for modular racking systems. The best ones are easy to duplicate and snap together, letting you build out long aisles quickly. They're the backbone of any storage facility.
-
Machinery and Vehicles: Forklifts, pallet jacks, and conveyor belts breathe life into a static scene. You want models that are recognisable but not so high-poly that they grind your viewport to a halt.
-
Pallets and Goods: A warehouse without inventory is just a big garage. I like to use a mix of empty pallets, stacked boxes, and shrink-wrapped goods to create visual variety. Just make sure these components are lightweight.
To ground your designs in reality, it helps to understand the different types of warehouse steel building structures. Knowing this helps you choose and place assets in a way that aligns with how these buildings are actually constructed and used.
Arranging Assets for Realism
Once you have your library of assets, placement is everything. Don't just scatter objects randomly—that immediately looks cluttered and unprofessional. Instead, think about creating logical zones within your warehouse that mirror a real-world workflow.
For instance, you'd designate specific areas for receiving, long-term storage, picking, and shipping. Pallets of incoming goods should be near the loading docks. The aisles between racking systems need to be wide and clear. The goal is to build a scene that a logistics professional would look at and say, "Yep, that makes sense." We cover how to manage these assets in more detail in our guide on the 3D Warehouse for SketchUp.
A well-staged scene tells a story without words. The way you arrange assets can communicate efficiency, chaos, or a specific operational process. Think of yourself as a set designer, using objects to guide the viewer's eye and explain the purpose of the space.
Adding Authentic Materials and Textures
With everything in place, the final layer is applying high-quality materials to tie it all together. This is where you can really sell the realism. An untextured concrete floor looks flat and fake, but add a slightly worn, polished concrete texture with subtle scuff marks, and it instantly becomes believable.
I always pay close attention to these details:
-
Floors: Use textures that show a bit of wear and tear, like tyre marks from forklifts or faint oil stains.
-
Walls: Apply appropriate textures for corrugated metal, painted cinder blocks, or precast concrete panels.
-
Objects: Make sure metals have the right reflective properties, plastics have a subtle sheen, and cardboard boxes look like, well, cardboard.
This level of operational realism isn't just for looks; it reflects a major industry trend. In India, for example, the warehouse automation market is projected to hit USD 2.58 billion by 2033, and this growth is powered by precise 3D simulations built in tools just like SketchUp. It all comes back to the need for accurate, efficient operational planning.
Mastering Lighting and Cameras for Impactful Visuals
You can have a perfectly staged warehouse model, but it will fall flat without the right lighting and camera work. This is the moment where a good model becomes a powerful, photorealistic render. The goal here is to get away from SketchUp’s default, flat lighting and build a scene that has real mood, depth, and realism—the kind that truly sells your design.
Lighting a huge space like a warehouse is a bit of a balancing act. You're trying to blend the harsh, direct light you'd get from industrial fixtures with the soft, diffused light pouring in from skylights or massive roller doors. Getting that interplay right is what creates a convincing and dynamic image.

Balancing Natural and Artificial Light
First things first, establish your main source of natural light. This is almost always the sun, which you can set up using SketchUp's Shadows panel. I like to play around with the time of day and year to get those dramatic sunbeams cutting across the floor from the skylights. This one move does more than anything else to set the overall mood.
With the natural light in place, it’s time to layer in the artificial lights. Warehouses are full of high-bay fixtures that cast wide, powerful pools of light. Don't just pop one or two in there; think about how a real facility would space them out to get even coverage over the entire floor.
Here are a few light types I almost always use in a warehouse scene:
-
High-Bay Lights: I place these high up, aiming their broad cones of light downward to wash over the main floor areas.
-
Task Lighting: Over specific workstations or busy loading docks, I'll add smaller, more focused lights. They create nice little points of interest and guide the viewer's eye.
-
Emergency Lighting: For an extra touch of realism, a few subtle, low-intensity emergency lights can make a big difference.
Configuring Shadows and Camera Angles
Shadows aren't just a byproduct of light; they are absolutely essential for creating depth and making a space feel real. In the Shadows panel, make sure "Display: On Surfaces" and "On Ground" are both ticked. Fiddling with the Light and Dark sliders can completely change the feel of the scene, letting you create anything from crisp, modern shadows to a softer, more atmospheric look.
Once your lighting feels right, it's time to find your shot. Please, avoid the generic, straight-on views. They’re boring. Experiment with different camera angles to build a much more compelling composition.
The right camera angle can transform a scene from a simple documentation of space into an evocative architectural photograph. I always use the "Position Camera" tool to get myself down to eye level, then use the "Look Around" tool to frame the shot just like a real photographer would.
A low camera angle, for instance, can make the warehouse feel absolutely immense and imposing. On the other hand, a higher, bird's-eye view can give a fantastic operational overview. I recommend creating multiple Scenes inside SketchUp to save all your favourite camera positions. This is a lifesaver for client presentations, letting you jump between different perspectives instantly.
For a deeper dive into finalising your visuals, check out our complete guide on how to render in SketchUp. When you master these techniques, your warehouse model will stop being just a model and start telling a story.
Getting Your Warehouse Ready for Vibe3D
With your lighting dialed in and every asset in its place, it's time for the final, crucial step: moving your static SketchUp design into a living, breathing simulation. Getting the export right is the bridge between all your hard design work and the powerful operational testing you can do in a platform like Vibe3D.
The idea here isn't to just dump the file out of SketchUp. We need to do it in a way that preserves every detail you’ve painstakingly crafted. That means keeping the geometry, scale, materials, and object groupings intact so the simulation software understands them perfectly. A clean export is your ticket to a smooth import, saving you from a world of compatibility headaches later on.
Final Checks for a Flawless Export
Before you even think about hitting that "Export" button, a few final checks can make all the difference. Think of it as a final quality inspection before your model goes out the door. Taking a couple of minutes here can honestly save you hours of fixing things on the other side.
First off, run the Purge Unused command one last time. This final sweep gets rid of any leftover baggage in the file, making it as lean as possible. A lighter file almost always exports faster and more reliably.
Next, double-check that your key objects—racking, forklifts, conveyors, you name it—are properly made into groups or components. This is non-negotiable for a platform like Vibe3D, as it needs to see these as individual elements that can be moved or animated within the simulation.
A clean, organised model is the foundation for a successful simulation. If your SketchUp file is just a jumble of loose lines and faces, the simulation software will have no idea what to do with it. Grouping isn't just for keeping your model tidy; it defines the individual 'actors' that will come to life in your simulation.
Picking the Right Export Format and Settings
The file format you choose is a critical decision. SketchUp gives you a few options, but some are much better than others at preserving the detailed data needed for simulation and high-quality visuals.
For most modern platforms, including Vibe3D, these are your safest bets:
-
.FBX (Filmbox): This is usually the best choice, the gold standard. It’s fantastic at holding onto material properties, texture maps, and the model's structure (all your groups and components).
-
.DAE (Collada): Another solid option. It strikes a great balance between compatibility across different programs and keeping your data intact. It's a widely supported workhorse.
-
.OBJ (Object): It’s an older format, but .OBJ is a universal language for 3D models. It reliably transfers geometry and basic material info, making it a good fallback if you hit a snag with the others.
Once the export dialogue box pops up, look closely at the Options. You’ll almost always want to make sure "Export Texture Maps" is ticked. This simple checkbox bundles all your material images with the model file, so you don't end up with missing textures after importing. Also, confirm the export scale is set correctly to maintain those crucial real-world dimensions.
Mastering this workflow is becoming more important every day, especially in booming logistics markets. In India, for instance, the warehouse simulation market is expected to grow at a massive 15.5% CAGR between 2025 and 2035, as companies in hubs like Mumbai and Bangalore race for greater efficiency. Nailing this export process puts you in a prime position to meet that growing demand. To learn about other powerful visualisation tools, have a look at our roundup of top-tier architectural rendering software.
Common Hiccups with SketchUp Warehouse Models
Working with a big warehouse for SketchUp can be a real test of patience. One minute you're zipping around your model, the next, it’s grinding to a halt. It happens to everyone, even pros. Let's walk through some of the usual suspects and how to fix them so you can get back to designing.
Performance is almost always the biggest headache. That model that was running smoothly suddenly feels like it’s wading through treacle. Nine times out of ten, the problem is either too much geometry or textures that are way too big.
So, Why Is My SketchUp File Crawling?
If your warehouse model is lagging, the first thing I always check is the polygon count. It's so easy to grab a great-looking forklift or some detailed machinery from the 3D Warehouse, but you might not realise it’s adding hundreds of thousands of polygons to your file. That's often enough to bring even a powerful machine to its knees.
Another sneaky performance killer is texture size. Those beautiful high-resolution textures, especially if they're 4K or larger, eat up your computer's memory (VRAM) like crazy. When you've got dozens of these plastered all over a massive warehouse space, your graphics card just can't keep up, and you end up with that frustratingly choppy viewport.
Here’s a quick diagnostic checklist:
-
Check Your Stats: Head over to
Window > Model Info > Statistics. This is your model's dashboard. If the polygon count is creeping into the millions for a scene that should be relatively simple, it’s time for some spring cleaning. -
Downsize Your Textures: An extension like Material Replacer is your best friend here. You can quickly swap out those heavy textures for something more manageable. Honestly, a 1K or 2K texture is perfectly fine for most surfaces in a large scene.
-
Use Proxies: For anything you have a lot of, like racking systems or stacks of inventory, see if your rendering engine supports proxies. They replace all that dense geometry with simple, lightweight boxes in your viewport, which makes a world of difference.
What’s Going on With These Weird Textures?
We’ve all been there. You import a model, and the materials look completely wrong—stretched, blotchy, or just plain weird. This usually boils down to two things: reversed faces or messed-up UV mapping. In SketchUp, every face has a front and a back, and textures will only show up properly on the front side.
The easiest way to spot reversed faces is to switch your view. Go to
View > Face Style > Monochrome. Everything should look white. If you see any blue-grey faces, they're inside-out. Just right-click on them and hit "Reverse Faces" to flip them the right way.
If the textures look stretched or warped, it's a mapping issue. This means the 2D image isn't being projected onto the 3D surface correctly. To fix this, you can take manual control. Right-click the problem face, navigate to Texture > Position, and you'll get handles to adjust the texture's scale, position, and orientation directly on the model. It’s a quick fix that solves most common mapping headaches.
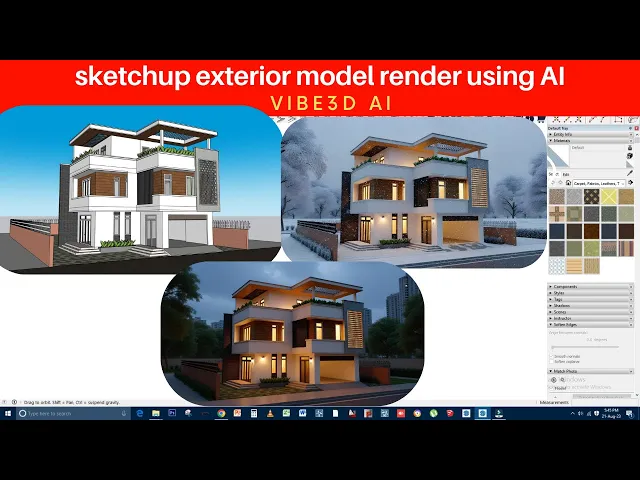
Ready to turn that clean, optimised warehouse model into a photorealistic image in just a few seconds? Vibe3D uses AI to create incredible visuals without the steep learning curve. Just bring your SketchUp scene over and let our platform handle the rest. Experience the future of rendering with Vibe3D today!