If you've ever felt the frustration of watching a Blender render crawl along, you know it can be a serious bottleneck. For anyone in architectural visualisation, where clients expect stunning quality and quick turnarounds, waiting hours—or even days—for a single image just isn't sustainable.
This is where a smarter workflow comes in. Instead of getting bogged down in the technical weeds of Cycles settings and light paths, you can export your scenes from Blender and let a dedicated AI rendering platform like Vibe3D AI do the heavy lifting. It's a method that lets you bypass hardware limitations and get back to the creative side of things.
Escape the Endless Wait of Blender Renders
The traditional rendering process often feels like a battle. You spend more time tweaking settings and optimising performance than you do on the actual design and composition. It’s a common story: a project’s momentum grinds to a halt while you wrestle with render times.
But what if you could change that? This guide will walk you through a more modern, AI-driven approach. We'll focus on handing off your finished Blender models to Vibe3D AI, which can generate photorealistic images in a tiny fraction of the time. This shift in workflow puts you in the driver's seat as a creative director, letting you focus on aesthetics, not algorithms.
A Modern Approach to Rendering
The core idea is simple: separate your modelling from your rendering. You'll set up and export each camera view from your Blender project, then upload those scenes to Vibe3D AI. From there, it's all about creative exploration.
This process is a game-changer for a few key reasons:
-
Lightning-fast client revisions: Need to change the mood or a material? You can generate dozens of variations based on feedback in minutes.
-
Effortless design exploration: Test out different lighting, materials, or even times of day without having to re-render the entire scene from scratch.
-
No more hardware bottlenecks: The intense number-crunching happens on a powerful cloud-based AI, not your local machine.
This kind of workflow is becoming increasingly relevant as Blender's popularity soars. It's a global tool now. In India, for example, a growing tech and creative industry has led to 7% of all Blender users being based there, taking full advantage of its powerful, open-source nature.
By decoupling the modelling and rendering stages, you free yourself up to iterate at an incredible pace. You no longer have to sacrifice quality for speed—AI handles the intensive rendering, so you can achieve both.
Ultimately, this isn't just about saving time. It's about unlocking creative possibilities that were previously held back by technical constraints. For professionals who need to push their efficiency even further, checking out the best cloud rendering platforms can reveal more advanced solutions.
Getting Your Blender Model Ready for AI Rendering
Before you can get those incredible results from an AI rendering platform like Vibe3D AI, you need to get your Blender project in order. Think of it as setting the stage. A well-organised model with the right export settings gives the AI a clean slate to work from, ensuring it can properly understand and execute your creative vision. The whole point is to step away from Blender's built-in render engines and set yourself up for a much faster, more creative workflow.
A great place to start is by setting up multiple camera views in your scene. Don't just think about that one "hero" shot. Instead, frame several different compelling angles that showcase the best parts of your design. For an interior scene, this might mean a wide shot to establish the space, a medium shot focused on the kitchen island, and a close-up that really captures the texture of a specific material.
Prepping Your Scenes for Export
With your cameras in place, the next step is getting each view ready for export. The most effective way to handle this, especially for a platform like Vibe3D AI, is to export each camera's view as a separate file. This simple organisational habit is the secret to a smooth batch-rendering process down the line. It lets you upload all your project's views at once and tweak settings for each one individually.
For example, you could take a single living room model and export:
-
A "Morning" view from your main camera.
-
A "Sunset" view from a camera on the balcony.
-
An "Evening" view from the perspective of a cosy armchair.
Each of these exported files packages the geometry, materials, and textures for that specific angle, perfectly prepared for the AI to do its magic.
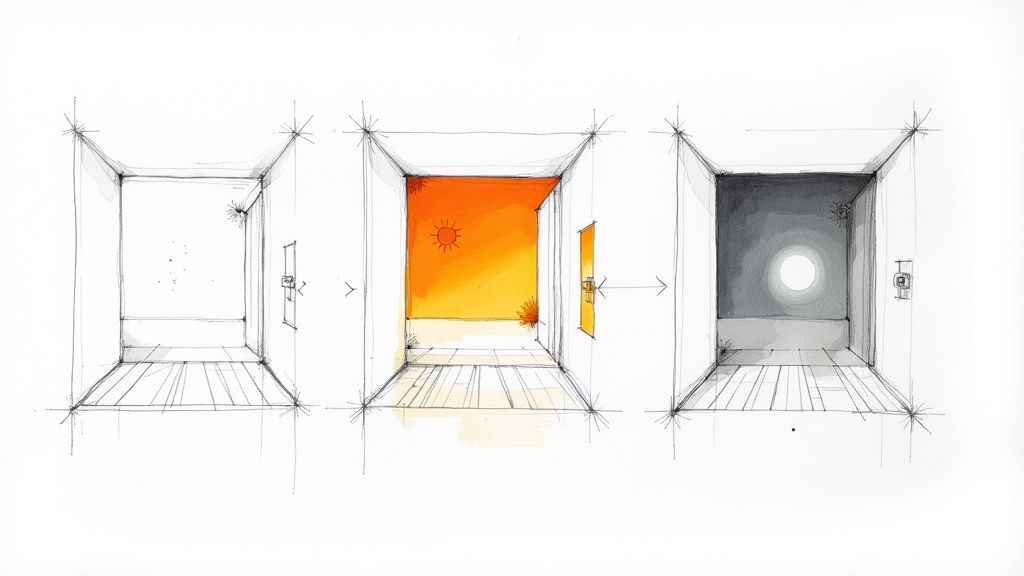
This diagram breaks down the simple, three-step journey from your Blender model to a stunning, photorealistic image with Vibe3D AI.
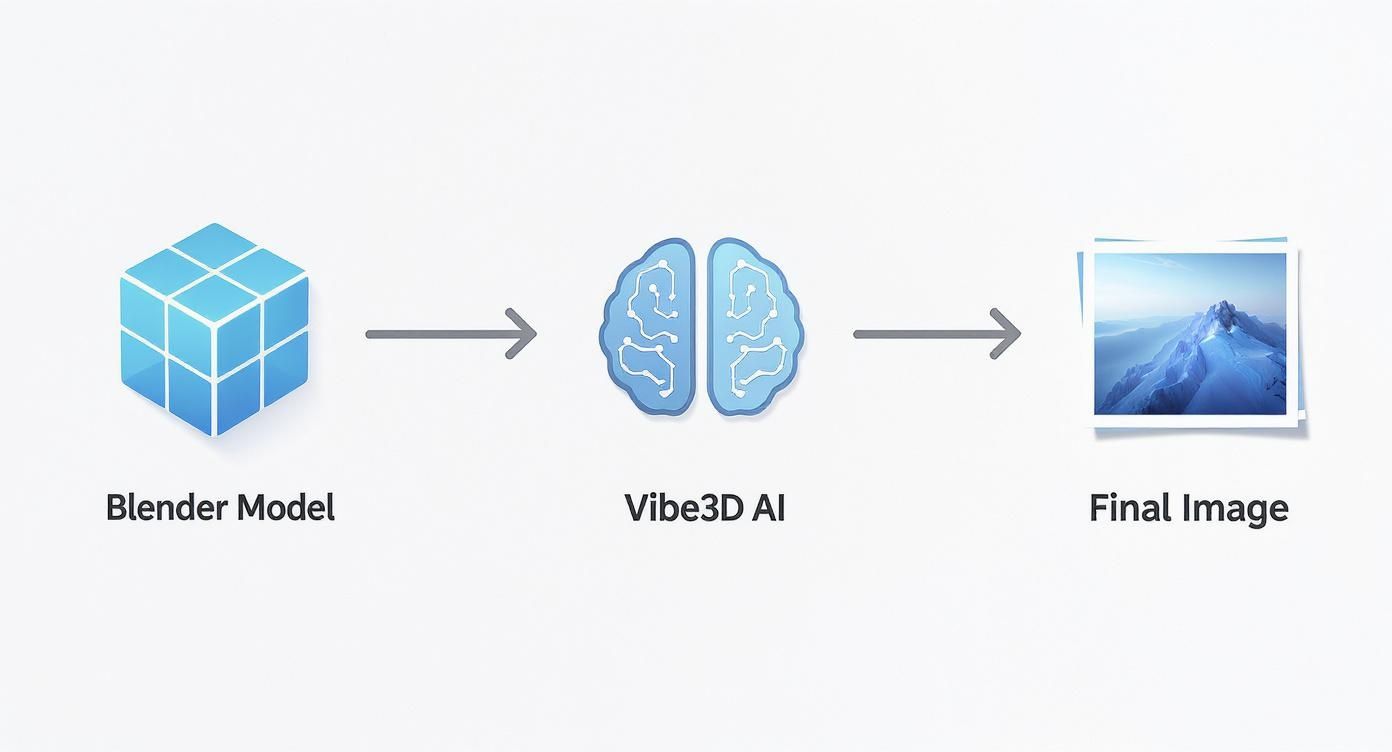
As you can see, the process flows directly from your 3D model, through the AI engine, and out to the final, high-quality image.
The Final Blender Export
When it's time to export, your main goal is to make sure all the necessary data is bundled up correctly. I usually stick with standard formats like **.fbx** or **.obj**, as they do a great job of preserving all the critical information from your model. The key is to dive into your export settings and make sure you're including materials and embedding textures whenever possible. This small step can save you a huge headache with missing assets when you upload your files.
To make things crystal clear, here’s a quick-reference table to get your Blender models perfectly optimised for Vibe3D AI.
Optimal Blender Export Settings for Vibe3D AI
| Setting | Recommended Value | Reason |
|---|---|---|
| File Format | .fbx |
The best all-rounder for preserving materials, textures, and geometry data. |
| Path Mode | Copy | This option bundles textures with your file, preventing missing links. |
| Embed Textures | Enable (tick the box) | Ensures all image textures are included directly within the exported file. |
| Apply Modifiers | Enable | Bakes modifiers into the mesh, guaranteeing the geometry looks exactly as it does in your viewport. |
| Scale | 1.00 | Maintains the correct object scale, which is crucial for realistic lighting and physics. |
Following these settings will ensure your models are fully compatible and ready for the best possible results.
The quality of your prep work has a direct impact on the final render. A clean model with well-defined materials gives the AI the best possible information to work with, leading to more realistic and accurate results without the tedious setup of traditional rendering.
Taking a few extra minutes to carefully set up and export your scenes creates a seamless transition from modelling into the fun, creative rendering phase. While Blender is an incredible tool for building your worlds, knowing how to prepare your assets for external AI tools is an essential skill. For those still exploring their options, it's also worth checking out the best free 3D modeling software that work well alongside Blender. This thoughtful preparation is your first major step toward mastering how to render in Blender efficiently with AI.
Bringing Your Blender Scenes to Life with Vibe3D AI
Once you’ve exported your scenes from Blender, the truly creative part begins. This is where you move from the technical world of 3D modelling into the fast, intuitive playground of Vibe3D AI. The goal is to explore different looks and feels for your design without ever getting bogged down in traditional render settings.
First, log in to Vibe3D AI and create a new project. Think of this as a dedicated workspace for your interior or exterior design. Next, upload all the scenes you exported from Blender. This batch upload keeps everything for your project organised in one place. Each scene is now a blank canvas, ready for you to generate stunning renders.
Instantly Applying Different Looks
With your scenes loaded, you can start applying a whole library of rendering presets and styles. This is a complete game-changer compared to fiddling with individual lights and render passes in Cycles or Eevee. Here, you can transform the entire mood of a shot with just a few clicks.
Let's say you have an interior living room scene. Without ever going back into Blender, you can instantly see how it would look in completely different scenarios:
-
Time of Day: Jump from a bright, sun-drenched midday to the warm, cosy glow of a sunset.
-
Lighting Style: Compare a clean, modern ambient setup against something more dramatic and full of contrast.
-
Material Finishes: Instantly swap out that oak flooring for polished concrete or cycle through different wall colours to test out a new palette.
This kind of speed is a massive advantage for client presentations. You can generate a dozen high-quality options in minutes, showing various aesthetic directions and getting immediate feedback. It’s a similar principle to other innovations in generative AI for design accessibility that are making complex design tasks more intuitive.
The real win here is that you're separating the creative choices from the technical slog. You're no longer staring at a progress bar; your only limitation is how many ideas you want to try. This unlocks a much more fluid and responsive design process.
Refining and Downloading the Final Renders
After you've generated a bunch of variations, it's time to zero in on the best ones. Vibe3D AI has an "Edit Render" feature that lets you make small, targeted adjustments. You can pick your favourite version of a scene and start tweaking materials or colours. Maybe that sunset lighting is absolutely perfect, but the client is curious about a different texture on the main wall. That’s a change you can make in seconds, not hours.
This back-and-forth of generating, editing, and comparing is where this workflow really proves its worth. Once you’ve explored all the options and nailed down the perfect look for each scene, you can download the final images in ultra-realistic quality. This AI-powered approach lets you skip the traditional Blender render queue entirely, delivering better results in a fraction of the time.
Fine-Tuning Your Renders with AI Editing Tools
Once you have your initial AI-generated renders, the creative refinement begins. Think of these first images as a high-quality foundation. Now, using the 'Edit Render' functionality in Vibe3D AI, you can polish them to perfection without ever reopening your Blender file.
This process is built for speed and iteration. Instead of heading back to Blender for a time-consuming re-render every time a client requests a change, you can make targeted tweaks directly on the generated image. It’s an interactive way of working that saves hours and keeps your projects moving forward.
Interactive Editing for Rapid Revisions
Here’s a common scenario: your client loves the lighting in a kitchen render but isn't sold on the countertop material. The old way meant going back to your Blender file, swapping materials, and starting another long render. With Vibe3D AI, the workflow is much more direct.
You simply select the render and use the editing tools to change colors or materials instantly. For example, you can:
-
Swap the paint colour on a feature wall in seconds.
-
Change a kitchen worktop from granite to marble.
-
Switch the flooring from hardwood to polished concrete.
Every adjustment provides immediate visual feedback, allowing you to compare options side-by-side. This completely transforms the rendering process from a technical task into a creative conversation.
The ability to make material and colour changes instantly is a massive advantage. It allows for a more collaborative and responsive design process, turning client revision rounds from a bottleneck into a productive, creative conversation.
Zeroing In on the Perfect Final Image
This workflow is just as effective for exteriors as it is for interiors. You might test different cladding materials on a building facade or experiment with window frame colours. Inside, you could try out various fabric textures on furniture or different metal finishes on light fixtures. The point is, you’re building on an already great-looking render, just polishing the details until every element is exactly right.
The immediate feedback loop is incredibly satisfying. This is especially true in product design, where visual appeal is everything. The demand for top-tier product visuals is exploding across industries. Take the portable blenders market in India, for example—it's projected to hit USD 11.5 million by 2027. That growth highlights just how critical advanced rendering is for showcasing designs.
To get a better sense of what AI can do for your projects, check out our guide on what an AI render can really achieve.
After you've explored the variations and nailed down all the feedback, you can download the best versions of each scene. The result is an ultra-realistic, high-quality image, created in a fraction of the time a traditional Blender-only workflow would take.
Finalizing and Exporting Your High-Resolution Images
You’ve explored creative directions, fine-tuned every detail, and are now ready to finalise your project. This last stage is about selecting your best work and exporting a polished set of renders that are ready to impress any client.
The first step is to review all the generated versions for each scene side-by-side within Vibe3D AI. This is a crucial step for quality control. It’s where you’ll notice the subtle differences—how one lighting setup makes a material pop or how a particular color scheme perfectly captures the desired mood.
Choosing Your Best Renders
With a clear overview, you can start selecting the "hero" shots. For an interior project, you might choose a bright daytime render and a cozy evening version to showcase the space's versatility. Curation is key; a well-chosen set of images tells a much more compelling and cohesive story than a random assortment.
This final review isn't just about picking the 'prettiest' image. It’s about choosing the render that best communicates the design intent and tells the story of the space. It’s the last creative decision before you export.
Once you’ve selected the best versions of each scene, you are ready to download them in ultra-realistic quality. Vibe3D AI offers high-resolution export options, ensuring your final images look sharp and professional. You can learn more about how different tools handle these outputs in our comparison of top architectural rendering software.
Preparing for Final Delivery
Before you hit the download button, consider the final use of the images. This will help you choose the right settings for your export.
Here are a few common scenarios:
-
Web Portfolios: A high-quality JPEG at a resolution like 1920x1080 provides the perfect balance of quality and fast loading times.
-
Client Presentations: Export at a higher resolution, such as 4K, to allow clients to zoom in on details without any loss of quality.
-
Print Media: For brochures or magazines, always download the maximum resolution available in a lossless format to ensure print-ready quality.
By following this simple workflow, you’ve taken a basic Blender model and turned it into a full suite of stunning, photorealistic visuals—all without the marathon render times you might be used to.
Answering Your Questions About Blender and AI Rendering
So, you're a Blender artist and you're hearing about AI rendering tools like Vibe3D AI. It's only natural to wonder how something like this actually fits into the familiar Blender workflow. It's a fair question—this approach definitely changes the game. Let's tackle some of the most common questions about how it all works together.
Will My Blender Models Work?
Yes, absolutely. Vibe3D AI is built to handle the models you're already creating in Blender. It really shines with architectural and interior design scenes, where you need to quickly test out different moods, materials, or lighting setups.
The key to getting great results is a little prep work on your end. Before you export, make sure your models have clean, solid geometry and that you’ve assigned some basic materials. This gives the AI a clear and accurate blueprint of your scene to work from.
How Does This Compare to Rendering in Cycles or Eevee?
The biggest differences are speed and how you explore creative ideas. We all know the traditional process: setting up everything inside Blender for Cycles or Eevee is a technical deep-dive. You’re tweaking lights, wrestling with render passes, and getting lost in node trees. It takes time, a lot of processing power, and a high-quality final render can easily take hours.
The Vibe3D AI workflow flips that script by taking all the heavy lifting off your machine. Instead of fiddling with dozens of technical settings, you guide the final image using intuitive presets and straightforward edits. This shift means you can generate a whole collection of high-quality design options in the time it might take to get just one final render out of Cycles.
Vibe3D AI isn't here to replace your artistic skill; it's designed to amplify it. You get to spend less time on the technical grind and more time focusing on creative direction, exploring more possibilities than ever before.
Does This Mean I Don't Need Blender Anymore?
Not a chance. Think of Vibe3D AI as a powerful finishing tool—an incredibly fast and flexible external render engine that slots right into your existing process. Blender is still your home base for what it does best: detailed 3D modelling, scene composition, and applying your initial textures.
You still build your world in Blender; you just get to see it come to life much, much faster with AI.
Ready to transform your Blender workflow and say goodbye to those painfully long render times? See what Vibe3D can do for your projects and start creating stunning, photorealistic visuals in a fraction of the time. Visit us at Vibe3D.ai to learn more.