An AI render is a photorealistic image generated by artificial intelligence from a 3D model, sketch, or text description. The specialised AI tools, also known as render AI, lets architects and designers create presentation-ready visuals in under 60 seconds — replacing hours of manual lighting, material, and camera setup. In this guide, we explain what AI render is, how it works, and how tools like Vibe3D make it practical for real architectural workflows.
What Is AI Render and How Does It Work?
We're stepping into a whole new age of digital creativity. AI rendering is completely reshaping how architects, designers, and 3D artists visualise their ideas. This tech takes a simple concept and turns it into a stunning, lifelike image with incredible speed, cutting down creation time from days to mere minutes.
Think of an AI rendering tool as your personal creative assistant. It's an assistant who instantly gets what you're trying to achieve, whether you explain it with a few words or show it a rough drawing. It then quickly whips up several visual options for you to look over and tweak. It’s a dynamic, back-and-forth process that puts creative exploration on fast-forward.
The Core Concept Behind AI Rendering
Under the hood, AI rendering is powered by complex algorithms called neural networks. These networks have been "trained" by studying millions upon millions of images. They've learned to connect text descriptions with visual concepts—things like the texture of wood, the softness of morning light, or the principles of architectural composition.
When you give the AI an instruction, it draws on this massive bank of knowledge to create a brand-new image that fits your request.
This is a world away from traditional 3D rendering. The old-school method involves painstakingly building a digital scene from scratch and then letting a computer calculate how light should behave on every single surface. While that approach gives you total control, it demands a huge investment in time, technical skill, and expensive hardware. For a closer look at the tools that have defined the industry for years, check out our guide to top-tier architectural visualisation software. You can also browse AI render examples from real architectural projects to see the difference in quality.
Here's the key difference: Traditional rendering calculates a scene you’ve painstakingly built. AI rendering generates a scene from a concept you’ve described.
A Quick Comparison
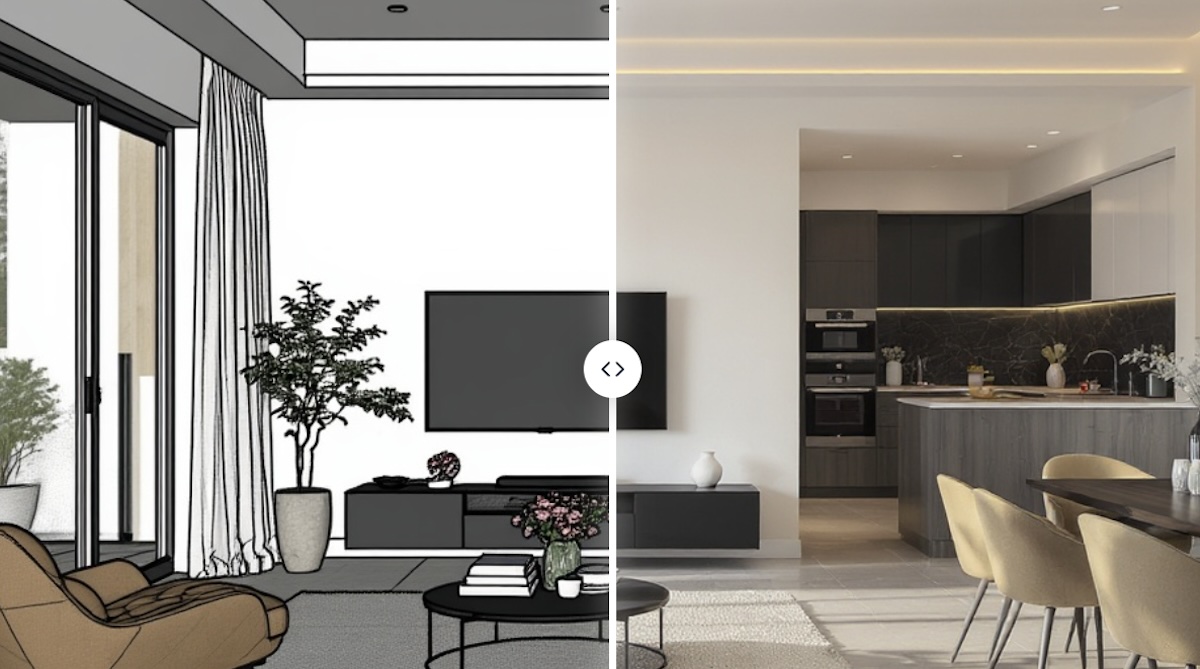
To see what this means in practice, just look at the workflow. In a traditional setup, you have to model, apply textures, set up lights, and then sit back and wait for the final image to cook. An AI workflow collapses all those steps, letting you leap straight from an idea to a polished visual. Browse our AI render gallery to see before & after comparisons from real architectural projects.
To really spell out the differences, let's put them side-by-side.
Traditional Rendering vs AI Rendering at a Glance
This table gives a quick snapshot of how the two approaches stack up against each other.
| Aspect | Traditional Rendering | AI Rendering |
|---|---|---|
| Input | Detailed 3D model with textures, lighting, and camera settings. | Simple 3D model, sketch, or even just a text prompt. |
| Speed | Can take hours or even days for a single high-quality image. | Generates multiple options in seconds or minutes. |
| Flexibility | Changes require manually adjusting the model and re-rendering. | Easily iterate by changing the prompt or input image. |
| Skill Level | Requires deep technical expertise in 3D software and rendering engines. | Much more accessible, focusing on creative direction over technical skill. |
As you can see, the main trade-off is between hands-on control and outright speed and accessibility. AI rendering opens the door for rapid experimentation, making it a powerful tool for early-stage design and creative exploration.
The Technology Behind AI Render
Ever wonder what’s actually going on when you feed a simple idea into an AI and get a stunning image back? It might feel like magic, but it's really just some incredibly clever tech at work. The whole process is powered by algorithms known as generative models—think of them as the creative brains of the operation.
I like to compare it to training an apprentice painter. You wouldn't just hand them a brush and hope for the best. You'd show them thousands upon thousands of examples. You might make them study countless photos of "minimalist Scandinavian living rooms" until they intuitively understand the core elements: the light wood floors, the muted colour palettes, and those clean, uncluttered lines.
After a while, they get so good that you can simply say, "Paint me a cosy Scandinavian living room with some nice afternoon light," and they'll produce something completely new and original that fits the brief perfectly. That's exactly how these AI models learn, just on a massively bigger and faster scale.
The Two Main Engines of Creation
While there’s a lot happening under the bonnet, two main types of models are behind the recent boom in AI image generation. Getting a basic grasp of them helps you appreciate what's happening when you hit that "generate" button.
-
Generative Adversarial Networks (GANs): These are pretty cool because they work in a duo. You have a 'Generator' network that creates images from scratch, and a 'Discriminator' network that's been trained on real photos. The Generator's one job is to create an image so convincing that it fools the Discriminator. This constant back-and-forth competition forces both networks to get incredibly good, which is how we end up with such photorealistic results.
-
Diffusion Models: This is a newer and seriously powerful technique. A diffusion model essentially starts with a canvas full of random noise—think of it like television static. Then, guided by your text prompt, it slowly and methodically chips away at that noise, step by step, until a clear image emerges from the chaos. It’s a bit like a sculptor who starts with a rough block of marble and carefully carves away everything that doesn't look like the final statue.
These models are the powerhouse engines driving the whole process, turning your abstract thoughts into actual pixels. It takes a ton of computing muscle, which is why powerful Graphics Processing Units (GPUs) are the unsung heroes here.
From Your Idea to a Final Image
So, what does this all look like from your end? Thankfully, the process is designed to be straightforward, hiding all that complexity behind a simple interface.
-
The Input: You start with a creative seed. This could be a text prompt like, "a luxurious hotel lobby with marble floors and a grand chandelier," a quick sketch, or even a basic 3D model you've blocked out. For designers already working in 3D, this first step feels right at home. If you want to dive deeper into that workflow, our guide on using 3ds Max for interior design is a great place to start.
-
AI Interpretation: The AI takes your input and starts to break it down. It deconstructs your text into concepts it understands—"marble," "chandelier," "luxurious"—and pulls from its vast training data to figure out how those things relate to each other. If you give it a 3D model, it analyses the shapes, composition, and overall layout.
-
The Generation Process: This is where the magic happens. Using a technique like diffusion, the AI begins to build the image from that initial noise. It will often spit out several different versions, or 'candidates,' usually at a lower resolution to keep things moving quickly. This is the stage where the AI flexes its creative muscles, making choices about lighting, camera angles, and textures that it thinks best match your prompt.
-
Refinement and Output: Finally, the AI takes the best-looking candidates and scales them up into a high-resolution final image. This is the AI render you see on your screen—a brand-new piece of visual art born from your idea and the model's learned expertise.
The entire journey, from a simple idea to a photorealistic result, can happen in just a few seconds or minutes. This incredible speed is what makes AI rendering such a game-changer for exploring design variations without the long waits of traditional methods.
How AI Render Speeds Up Your Design Process
The real magic of an AI render isn't just the tech itself—it's how it completely flips your creative workflow on its head. For architects and interior designers, this isn't some gimmick. It's a genuine game-changer that speeds up the entire design journey, right from that first flicker of an idea to the final client presentation.
Think about the traditional conceptual phase. It's often a slow, painstaking process. Every new idea demands hours of modelling and tweaking just to see if it works. An AI render workflow simply shatters that bottleneck, letting you blast through dozens of design variations in the time it once took to create a single one.
Accelerate Your Conceptual Exploration
The biggest win with AI rendering has to be the sheer speed of iteration. Forget spending hours nudging a 3D model around to test a new material or lighting setup. Now, you can just tweak your text prompt and get a fresh, high-quality visual back in minutes.
This kind of rapid-fire feedback makes the whole creative process feel more fluid and natural. You can get bold with your ideas, test out wild colour palettes, and play with different layouts without that nagging fear of wasting an entire day's work on something that doesn't pan out.
This shift transforms the design process from a linear, step-by-step march into a dynamic, parallel exploration. You can chase multiple creative paths at once, ultimately leading to more refined and innovative final designs.
Being able to iterate so quickly also means you can bring your client into the loop far earlier and more often. When you can show them several high-quality options right from the start, they feel more involved and you can be sure the project is on the right track from day one. If you're using specific modelling software, knowing how to link these tools is crucial. Our guide on how to render in SketchUp gives you the practical steps for a smooth workflow. You can also explore AI render editing to iterate on your results without re-rendering.
Democratise High-Quality Visualisation
Not too long ago, creating photorealistic renders was a seriously expensive and technical job. It demanded ridiculously powerful hardware (think massive render farms) and highly specialised artists. This put top-tier visuals out of reach for smaller firms, freelancers, and students.
AI rendering completely changes the game. By shifting the heavy lifting to the cloud, platforms like Vibe3D let anyone with a standard computer produce stunning, professional-grade images. This levelling of the playing field has some massive benefits for the design industry:
-
Levels the Playing Field: Smaller studios can now go toe-to-toe with large firms, producing equally slick pitch decks and client presentations.
-
Reduces Overhead Costs: There's no need to invest in or maintain pricey in-house rendering rigs, which slashes your operational costs.
-
Empowers Individuals: Freelancers and design students can build incredible portfolios and show off their ideas with a realism that was once impossible.
Tangible Returns and Enhanced Communication
Beyond the speed and accessibility, the practical benefits of weaving an AI render workflow into your process deliver a clear return on your investment. All those hours you save on rendering can be poured back into what really matters—design development, client relationships, and growing your business.
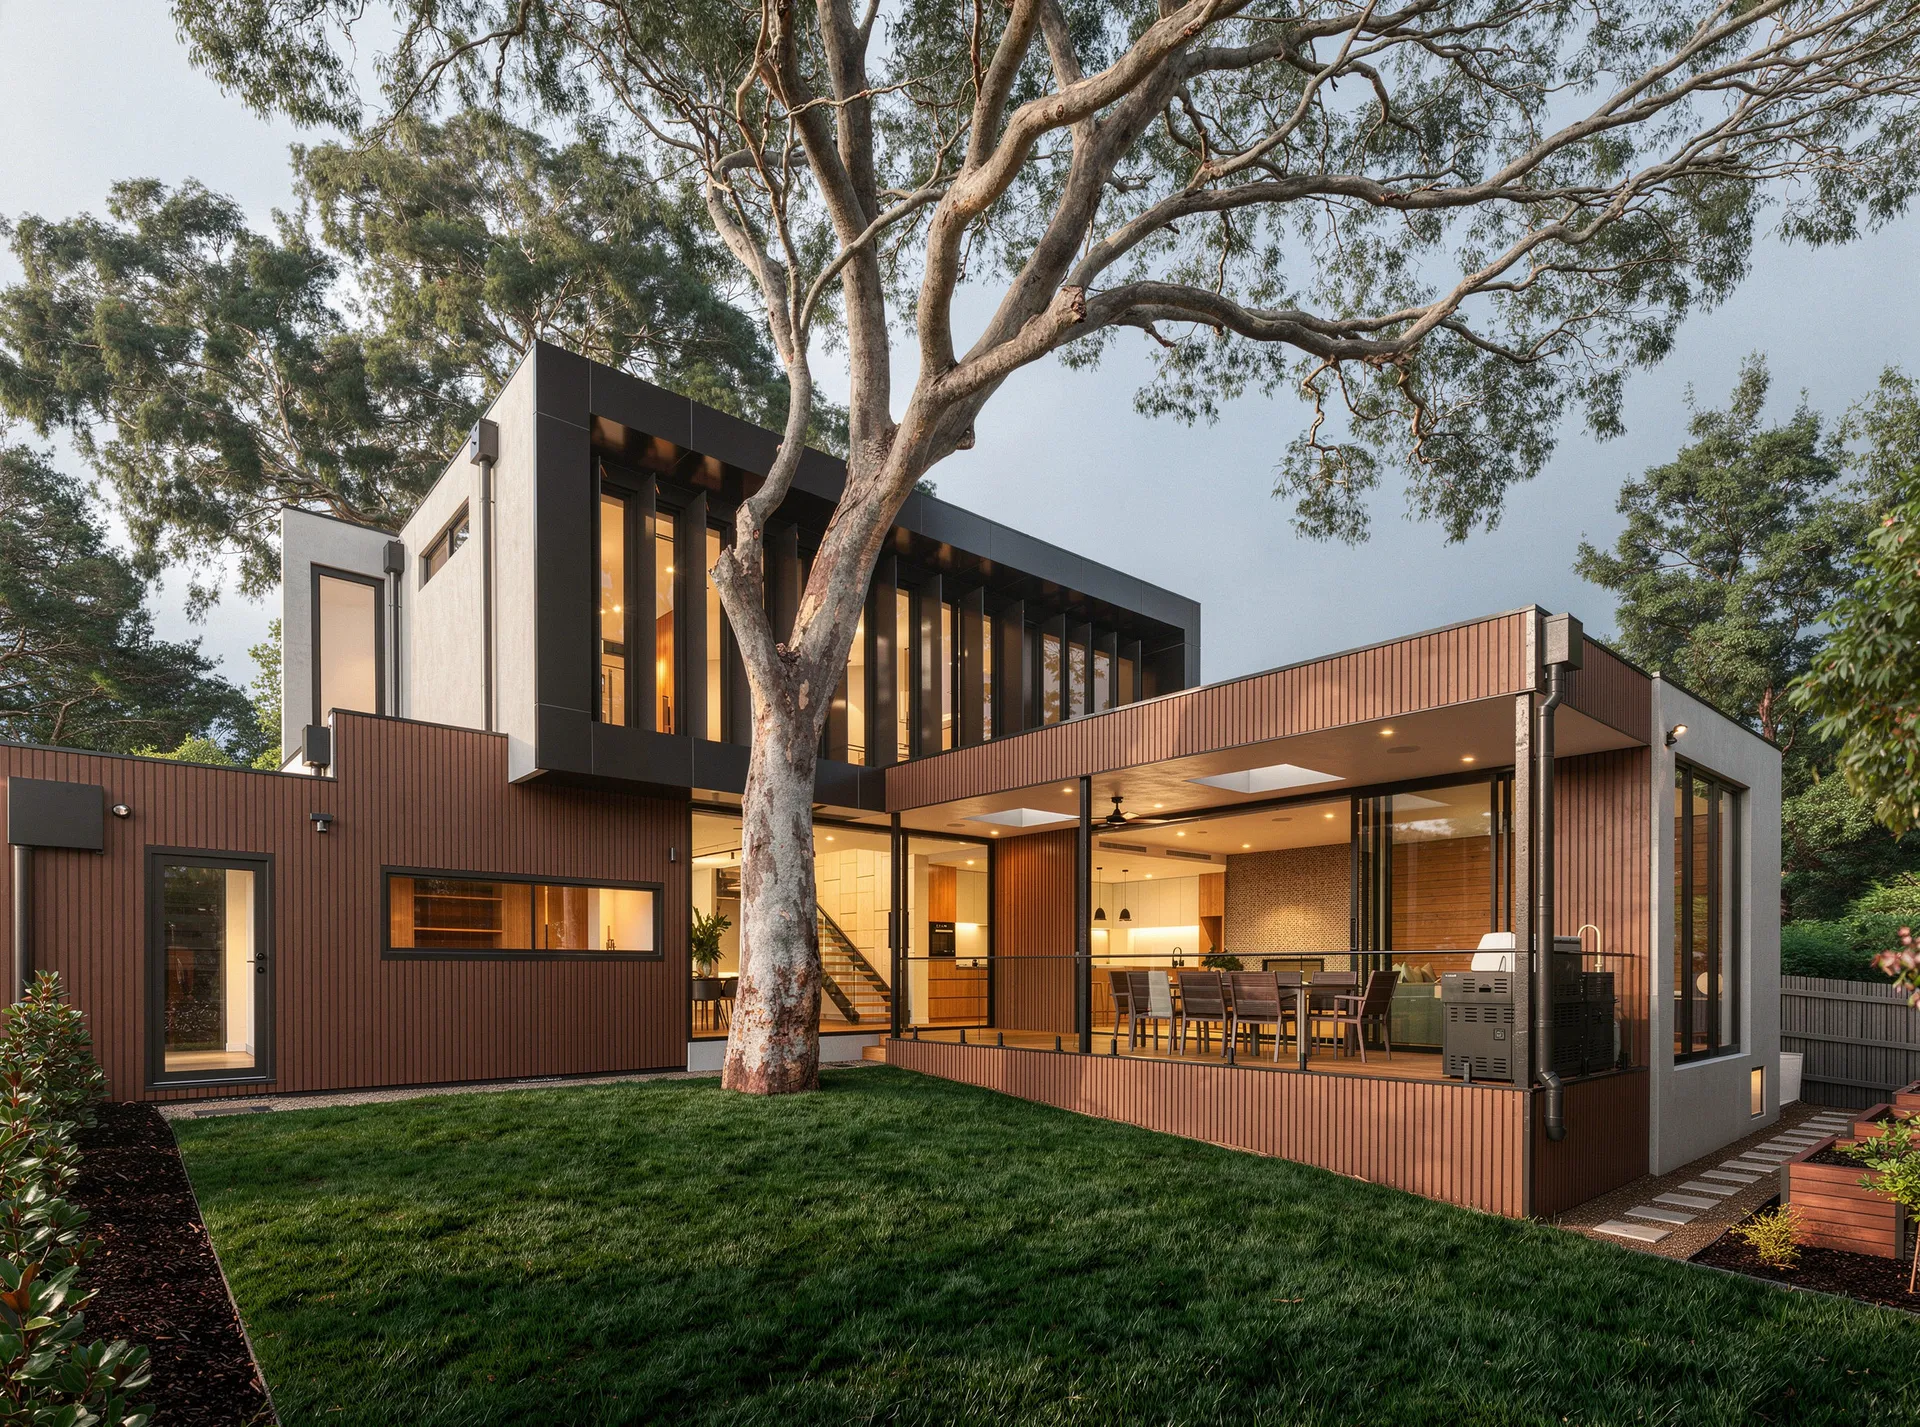
And let's be honest, a picture is worth a thousand words, especially in our line of work. AI renders are powerful communication tools that bridge the gap between your technical plans and a client's imagination. When a client can see a photorealistic vision of their future space, misunderstandings melt away and approvals happen much faster. To see how AI render tools handle different project types, explore AI interior rendering and AI exterior rendering workflows.
Ultimately, this efficiency helps you win more pitches and deliver projects that blow your clients' expectations out of the water, cementing your reputation in a competitive market.
What Hardware Do You Need for AI Render?
An AI model is only as good as the hardware it runs on. Behind every incredible AI render is a massive amount of number-crunching, and the speed of that process comes down to one special piece of kit: the Graphics Processing Unit, or GPU.
Let's use an analogy. Imagine you need to paint a huge mural. You could hire a single, incredibly talented artist with one brush. They'd do a fantastic job, but it would take forever. This is basically how a traditional Central Processing Unit (CPU) works—it’s brilliant at handling complex tasks one after the other.
Now, what if you hired an army of a hundred painters? You could give each one a small section of the mural to work on at the same time. The whole thing would be finished in a tiny fraction of the time. That’s a GPU. It's an army of smaller processors all working at once, a concept known as parallel computing.
Why GPUs Are a Must-Have for AI Rendering
This knack for handling thousands of jobs simultaneously is exactly why GPUs are the heart of the AI boom. When you're training an AI, you're essentially showing it millions of images and asking it to tweak its internal "brain" over and over again. This requires an astronomical number of calculations that would grind a CPU to a halt.
It's the same story when you ask the AI to generate a render. The model is tearing through countless calculations to understand what you want and build the final image, pixel by pixel. A beefy GPU can chew through this work in seconds, whereas a weaker system would just crawl along.
The main takeaway here is simple: GPUs aren't just a nice-to-have for AI; they're the foundation it’s built on. Their entire design is a perfect match for the heavy-duty, parallel maths that AI models need to learn and create.
Modern AI chips are pushing the envelope even further. Companies are building specialised hardware with things like Tensor Cores, which are purpose-built to accelerate the specific maths used in AI. As you start exploring your options, you'll quickly realise that the GPU is the single biggest factor in performance, a crucial point to remember when choosing from the best 3D rendering software on the market.
AI Hardware Isn't Just for Big Tech Anymore
Just a few years back, this sort of processing power was locked away in the server rooms of big tech companies and university labs. That’s all changed. Powerful consumer-grade GPUs and cloud computing services have put these sophisticated tools into the hands of smaller studios and even solo freelancers.
This shift is fuelling a huge wave of creativity and adoption around the world. The growth is especially staggering in places like India, where the AI chip market is on the verge of exploding. Valued at around USD 21.73 billion in 2023, the Indian AI chip sector is forecast to grow at a compound annual growth rate of roughly 37.5% between 2024 and 2030. You can get more insights into India's AI strategy and its market growth on digitalstrategy-ai.com.
What this means for you is that the serious horsepower needed for AI rendering is becoming more accessible and affordable every day, cementing its place as a standard tool in the professional design pipeline.
How to Create an AI Render with Vibe3D
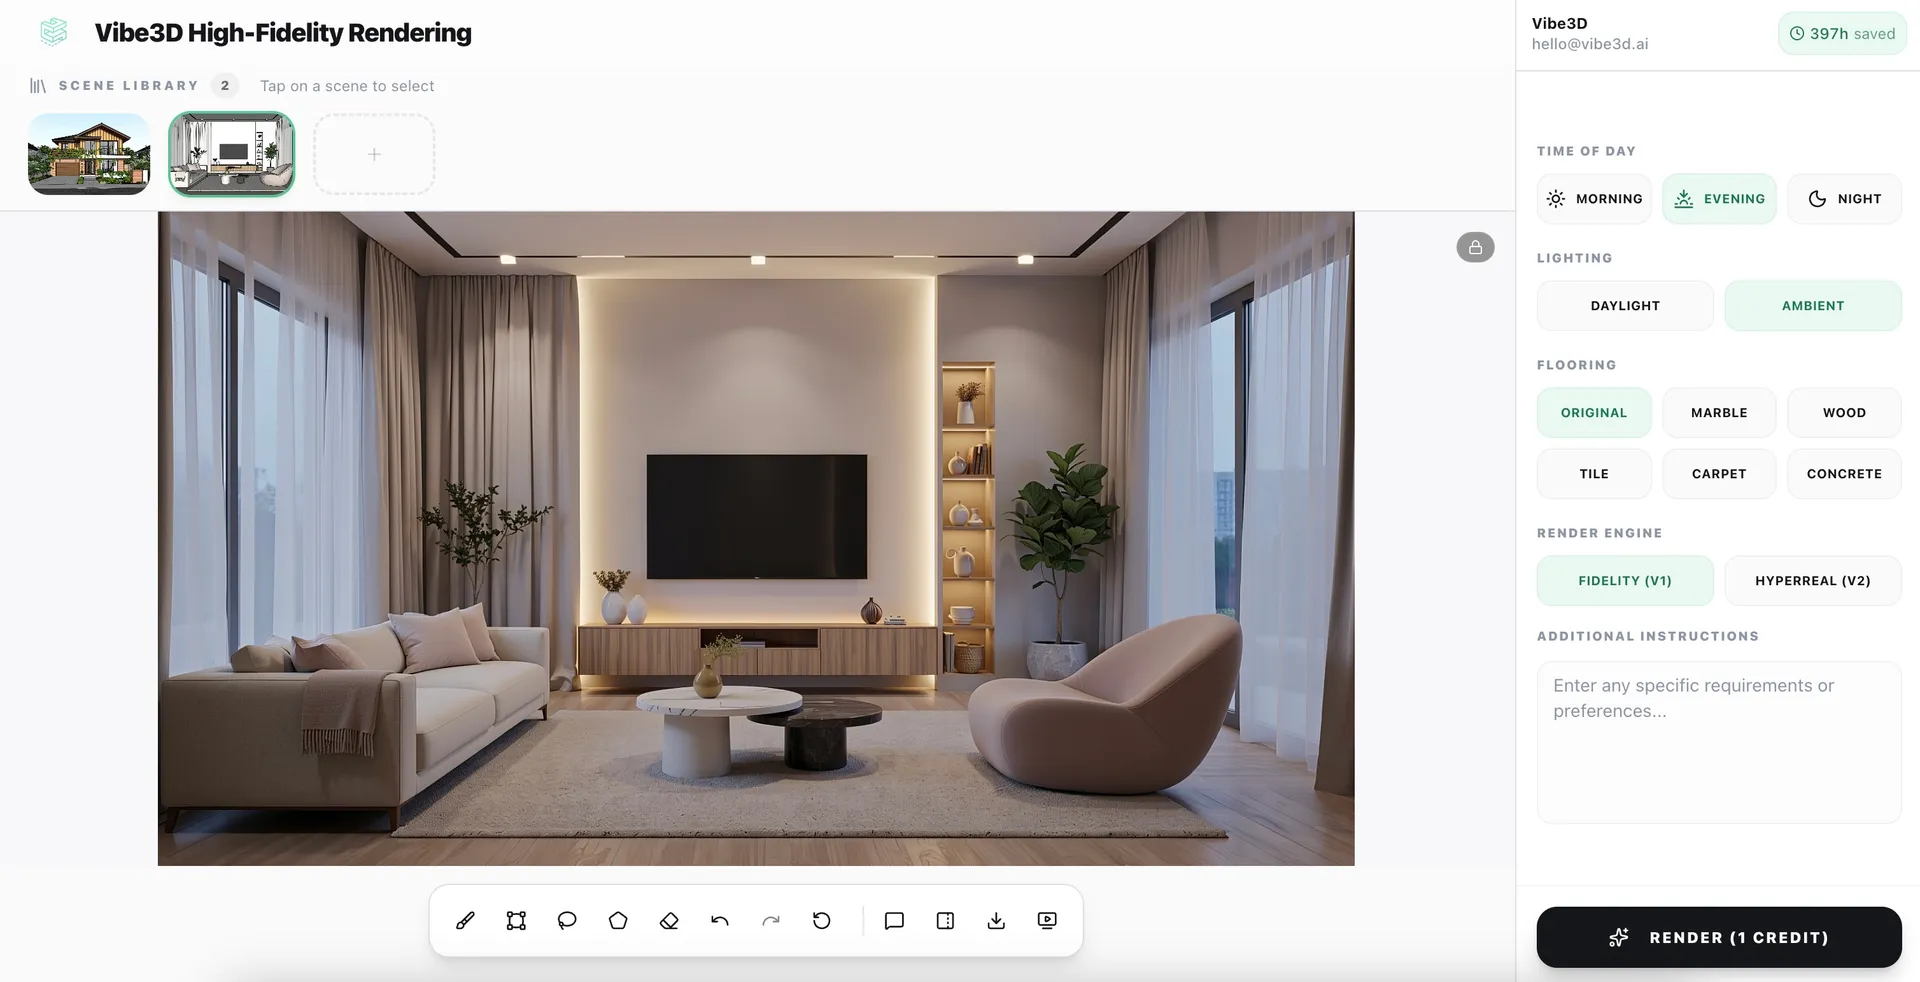
Alright, enough with the theory. The real magic happens when you see this stuff in action. So, let’s get practical and walk through what a typical AI render workflow actually looks like using a tool like Vibe3D. This is where you’ll see just how simple it is to go from a basic idea to a visual that will wow your clients.
It all starts with your concept. This could be a simple 3D block model you’ve knocked up in SketchUp or 3ds Max, or even just a rough sketch. Forget spending hours painstakingly adding textures, setting up lighting, and tweaking camera angles. Instead, you just bring that raw model straight into the Vibe3D environment. Think of it as the skeleton you’ll give the AI to flesh out.
Step 1: Start with Your Base Model
Once your model is in, the real fun begins—it’s time to collaborate with the AI. You don't need to know any complicated commands or code. You just talk to it. Using plain English text prompts, you start giving the AI artistic direction, and this is where your vision truly comes to life.
It's a lot like briefing a junior designer. You might kick things off with a broad prompt like, "a bright, modern Scandinavian living room with oak flooring and afternoon sunlight." The AI will instantly spit out several different takes on that idea, giving you a handful of visual directions to react to.
Step 2: Refine and Iterate with Prompts
Those first images are rarely the final product. They're a starting point. This is where the AI workflow completely blows traditional methods out of the water. Instead of heading back into your 3D software to make big changes, you just refine your results with more specific prompts.
You can start layering in details to nudge the AI closer to what you’re picturing:
-
Swap out materials: "Change the sofa to a dark green velvet fabric."
-
Adjust the mood: "Make the lighting warmer, like a golden hour sunset."
-
Pop in new elements: "Add a large abstract painting on the wall behind the sofa."
Every tweak generates a new set of visuals in a matter of seconds. This lets you explore dozens of creative ideas in the time it would normally take to make a single, minor adjustment. Platforms like Vibe3D are built to make this conversation feel natural, turning it into an intuitive and fluid part of your creative process.
Step 3: Generate and Compare Variations
With every prompt, you can generate multiple options. This is a game-changer for client presentations. You can show off several different moods or material palettes without actually multiplying your workload. Vibe3D lets you line these variations up side-by-side, so you can easily spot what works and make quick, confident decisions.
The real shift here is moving from a slow, linear rendering process to a fast, parallel one. You're no longer stuck on a single track; you're exploring a whole landscape of design possibilities all at once.
As you can see, it boils a complex bit of tech down to three simple steps: you provide the direction, the AI does the heavy lifting, and you get a stunning render.
A Leap in Productivity
The difference in how much you can get done is just staggering. A big reason this is becoming so accessible, especially in growing markets, is the huge expansion of computing power. For instance, initiatives in India are making powerful hardware much more widely available. As of mid-2025, the IndiaAI Mission has already brought over 38,000 GPUs online for AI work, offering them at subsidised rates. This kind of access is what’s fuelling the fire for professional AI rendering workflows.
Let’s put some numbers to what this means for a typical project.
Productivity Leap: AI vs Traditional Rendering
This table breaks down the time and effort for a single architectural visualisation, showing just how much of an advantage an AI-powered approach gives you.
| Metric | Traditional Rendering Workflow | AI Rendering Workflow (Vibe3D) |
|---|---|---|
| Initial Setup Time | 2–5 hours (modelling, texturing, lighting) | 10–20 minutes (model import, initial prompt) |
| Render Time (Per Image) | 4–12 hours | 1–5 minutes |
| Iteration Time (For Changes) | 3–6 hours | 5–15 minutes |
| Total Time (Start to Finish) | 1–3 days | Under 1 hour |
The numbers don't lie. When you switch to an AI render workflow, you’re not just shaving off a few hours. You're completely changing your ability to create, experiment, and deliver. This newfound speed means you can take on more projects, spend more time on the creative thinking that really matters, and ultimately, produce better work for your clients.
AI Render FAQ
Below are the most common questions architects and designers ask about AI render technology and render AI workflows.
What is render AI?
Render AI refers to the specialised AI-powered software tools that generate photorealistic images from 3D models or 2D inputs. Architects and designers use render AI tools like Vibe3D to create presentation-ready visuals in seconds, without traditional rendering software or expensive GPU hardware.
Is AI render the same as AI rendering?
Yes. "AI render" typically refers to the output image, while "AI rendering" describes the process. Both terms describe the same technology — using AI to generate photorealistic architectural visuals from 3D models. Learn more about Vibe3D's AI rendering software →
What is the best AI render software for architects?
Vibe3D is built specifically for architectural AI render workflows. It supports models from SketchUp, Revit, Rhino, Archicad, and 3ds Max, produces photorealistic results in under 60 seconds, and runs entirely in the cloud with no GPU required. You can also use the AI render enhancer to upscale renders from any existing software. Try Vibe3D free →
Does AI render replace V-Ray, Enscape, or Lumion?
AI render tools like Vibe3D don't fully replace traditional renderers — they're best for rapid iteration, early-stage design, and client presentations. Many architects use both: AI render for speed, traditional tools for final production. See how Vibe3D compares to Enscape →
Does using AI render make 3D artists obsolete?
Not a chance. Think of an AI render tool not as a replacement for an artist, but as a seriously powerful creative partner. It's a force multiplier for a skilled designer's talent, not a substitute for it.
The magic of AI really shines in its speed, especially during those early, conceptual stages of a project. It's brilliant at firing off dozens of visual ideas and exploring different moods in minutes, freeing up artists from the more tedious, time-consuming parts of the job. The smartest workflows today blend the lightning-fast iteration of AI render for initial exploration with the seasoned eye of a 3D artist for the final, photorealistic images.
Who actually owns the copyright to an AI render?
Generally, when you use a commercial AI render service, their terms and conditions will grant you ownership of the images you create. This means you can use them for commercial projects — client presentations, marketing brochures, or building out your portfolio. The AI model itself and the software you're using are still the property of the company that built them, so always read the terms and conditions before using AI render output for client work.
How much does AI render cost?
Most AI render platforms offer free trials. Vibe3D uses flexible pay-as-you-go pricing starting from a few dollars per render — dramatically cheaper than GPU hardware or render farms. See Vibe3D pricing →
Can AI render preserve my 3D model geometry?
Yes. Vibe3D's AI render engine preserves your model's geometry, materials, camera views, and scene composition. You upload your model and get a photorealistic render back — with no mesh distortion or geometric hallucination. See AI render examples →
How can I get consistent results with AI render?
Getting predictable, professional-quality results comes down to being deliberate in how you guide the AI. Here are the key techniques:
- Be specific with prompts: Instead of "modern living room," try "A photorealistic, eye-level shot of a minimalist modern living room. Feature a grey fabric sofa, wide-plank oak floors, and soft afternoon light streaming in from a large window on the left."
- Use a base image: Starting with a rough sketch or 3D block-out model gives the AI a solid structural foundation, keeping layout and perspective locked in.
- Iterate, don't just generate: Think of the process as a conversation. Your first result is just the opening line — refine your prompt to steer closer to your vision.
The more details you feed the AI — materials, lighting, camera angles, mood — the more control you'll have over the final AI render.
Ready to see how an AI render workflow can transform your design process? Vibe3D turns your 3D models into stunning, client-ready visuals in seconds. Start rendering for free at Vibe3D.ai.