A stunning Vectorworks rendering doesn't happen by accident. It's the culmination of careful prep work and a rock-solid foundation. The truth is, the quality of your final image is directly tied to the discipline you apply long before you even think about hitting that render button.
Building a Solid Foundation for Your Render
The biggest headache in any rendering workflow? Almost always, it's a messy or poorly optimised 3D model. When you rush this initial stage, you're signing up for unpredictable results, weird visual glitches, and painfully long render times. Taking a structured approach from the get-go is the single best thing you can do for a smooth, predictable process.
Think of it like building a house. You wouldn't start framing walls without a solid foundation, right? In the same way, a well-organised Vectorworks file is the concrete slab your entire visualisation rests on. It creates stability and makes every single step that follows—from applying materials to setting up lights—so much easier.
Organise Your Model with Layers and Classes
Before you even glance at a render style, your first job is to bring order to your model. A chaotic jumble of objects is a recipe for disaster. This is where leaning heavily on layers and classes becomes a renderer's best friend.
-
Design Layers: I use these to separate major architectural components. Think distinct layers for the site model, foundation, shell, interior walls, furniture, and landscaping. This gives you the power to toggle the visibility of huge chunks of your model, which is a lifesaver for quick test renders.
-
Classes: This is where you get granular control over objects and their attributes. I create classes for everything—window frames, glazing, doors, wall finishes, flooring, you name it. This structure is a massive time-saver, letting you apply or change a material on dozens of objects at once just by editing the class texture.
This methodical approach pays off big time. Need a quick exterior shot without all the detailed interior slowing you down? Just turn off the furniture and interior walls layers. This discipline makes your iterative process incredibly fast.
Pro Tip: I always create a dedicated "Render-Elements" class for items like entourage (people), special vegetation, or cars. This lets you quickly hide them for draft renders, saving a surprising amount of processing power when you don't need them.
Clean Up Your 3D Geometry
Even the most meticulously built models can hide issues that will wreak havoc on a render. Overlapping faces, tiny gaps you can't see, and overly complex geometry can confuse the rendering engine, leading to dark spots, light leaks, and bizarre shadows. It's absolutely essential to do a quick audit of your model.
A key part of this is simplifying where you can. While Vectorworks is a beast of a design tool, some imported objects or complex modelling can create geometry that's far more detailed than necessary for a still image. If you're looking for different ways to tackle this, you might find some useful ideas in this guide on the best free 3D modeling software, which discusses how different tools handle geometry.
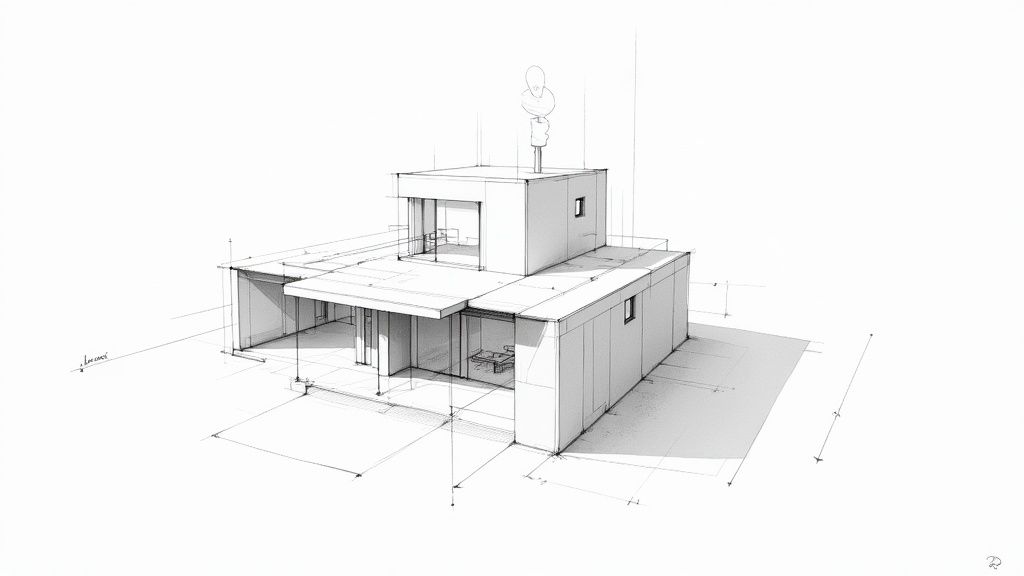
This process flow chart really nails down the core steps to get your model ready for a high-quality render.
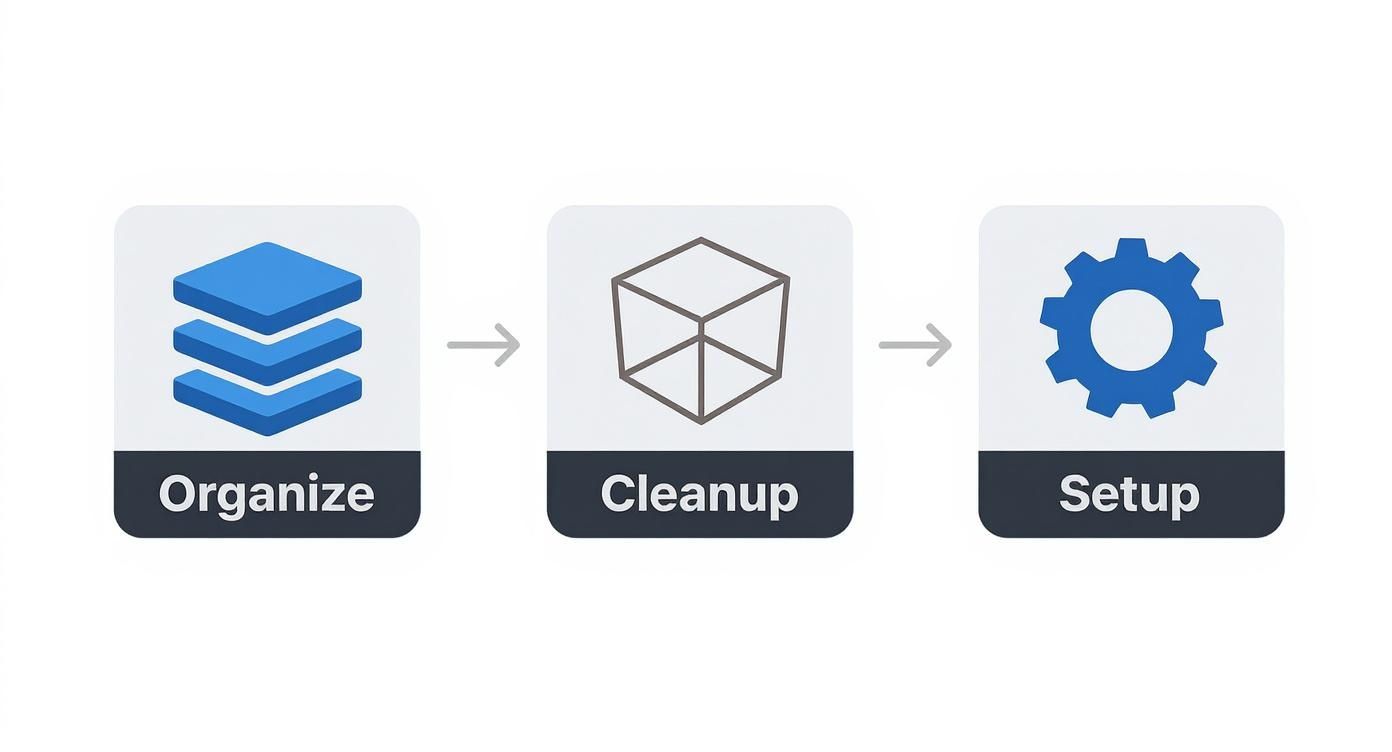
Following this Organise, Cleanup, Setup sequence ensures each step builds logically on the last. It stops you from having to backtrack and saves a ton of valuable time.
Choosing an Initial Render Style
Once your model is clean and organised, it's time to set up your initial Renderworks environment. Vectorworks ships with a bunch of handy default render styles built for different stages of the process.
-
Fast Renderworks: This is my go-to for quick checks on lighting and massing. It sacrifices fine detail for pure speed.
-
Realistic Exterior/Interior: These are fantastic starting points for more polished images. They come with well-balanced settings for light and shadow right out of the box.
-
Custom Renderworks: This is where you get to be the boss. You can start with a preset and then dive in to fine-tune settings for anti-aliasing, indirect lighting, and blurriness to get the exact look your project needs.
For your first pass, always pick a lower-quality style. Trust me, there’s no point waiting 30 minutes for a high-quality render only to realise a wall is in the wrong place. Start fast, iterate, and only crank up the quality settings when you're confident in your composition, lighting, and materials.
Creating Realistic Surfaces with Materials and Textures
The real magic in a render, the thing that separates a good image from a great one, almost always comes down to the materials. You can have the most pristine 3D model, but if the textures are flat and unconvincing, it will always look like a computer graphic. Nail the materials, though, and you can make even simple geometry feel incredibly real.
Mastering materials in Renderworks isn’t about some hidden technical trick; it’s about learning to see. It’s about looking at the world around you and figuring out how to translate those subtle surface details into your digital scene.
Think of every material not as a single setting, but as a recipe. Each ingredient is a "shader," and these shaders define how a surface plays with light. You’re not just slapping a picture onto a surface; you’re building its behaviour from the ground up. This is the whole game when it comes to photorealism in your Vectorworks rendering.
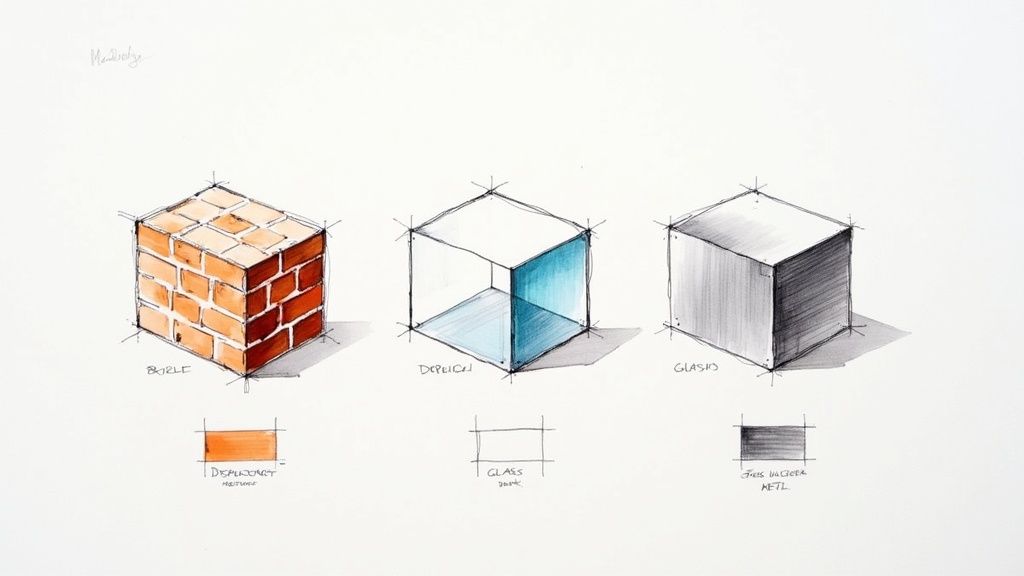
Understanding the Core Shaders
To cook up any material, you need to know your basic ingredients. In Renderworks, just about every surface you’ll ever create is a mix of a few core shaders.
-
Colour: This is the base layer—the underlying pigment of the material. You can pick a solid shade, but more often than not, you'll use an image texture, like a specific wood grain or a concrete pattern.
-
Reflectivity: This is all about how a surface bounces light and its surroundings. It's what makes a polished chrome tap different from a matte black cabinet. You get to control how strong the reflections are and, crucially, how sharp or blurry they appear.
-
Transparency: A must-have for glass, water, or sheer fabrics. This shader controls how much light travels through an object. It also handles refraction—the bending of light that distorts what you see on the other side of the glass.
-
Bump: This is your secret weapon for adding detail without complicating your model. A bump map is a simple greyscale image that tricks the renderer into faking small surface imperfections. Think of the subtle grain in a piece of oak or the rough texture of stucco. It adds incredible depth with almost no performance cost.
These shaders almost never work alone. A believable wooden floor, for instance, needs a Colour shader for the wood grain image, a Reflectivity shader to give it a semi-gloss sheen, and a Bump shader to make you feel the texture of that grain.
Building Custom Materials from Scratch
The built-in library is fine for getting started, but crafting your own materials is what will truly make your work stand out. Let's imagine a common task: creating a brushed metal finish for a kitchen appliance.
First, forget the Colour shader. It seems counter-intuitive, but for something like stainless steel, the "colour" comes almost entirely from reflections. You'd start by setting the base colour to a very dark grey.
Next up, and most importantly, is the Reflectivity shader. You could start with a "Metal" preset, but the key is to dial in a bit of blurriness—maybe just 5-10%. That tiny tweak is what transforms a perfect, mirror-like chrome into a realistic brushed finish.
Finally, to really sell the effect, add a Bump map. Find or create a texture image with fine, parallel lines or scratches. When you apply this, the renderer creates microscopic highlights and shadows along those "scratches," convincing the eye that the metal was physically brushed in a certain direction.
Key Takeaway: Nothing in the real world is perfect. The quickest way to make your renders look less computer-generated is to introduce subtle imperfections. A little blur on your reflections or a gentle bump map goes a long way.
Advanced Techniques for Greater Realism
Once you have the fundamentals down, you can start playing with more powerful tools that add another layer of physical accuracy to your scenes.
Displacement Mapping
While bump mapping fakes surface detail, displacement mapping actually creates it. It takes a greyscale image and uses it to physically push and pull the geometry of your model when you hit render. This is the go-to for surfaces with real, tangible depth.
| Technique | How It Works | Best Use Case |
|---|---|---|
| Bump Mapping | Simulates surface detail using light and shadow tricks. | Fine textures like fabric weaves, wood grain, or sand. |
| Displacement | Physically alters the mesh geometry at render time. | Rough surfaces like cobblestone, brick walls, or coarse stone. |
Using displacement on a brick wall, for instance, will create actual, geometric mortar joints that cast real shadows, giving the wall a genuinely three-dimensional profile that holds up even in close-up shots.
This drive for high-quality visuals is a massive trend. The 3D rendering market in India, for example, is booming, with software products making up around 87.3% of the market's revenue. This just underscores how vital advanced rendering tools have become in any modern design workflow.
If you're focused on creating stunning indoor spaces, our comprehensive guide on producing high-quality interior rendering dives even deeper into how materials and lighting work together.
Applying Decals
What if you just need to add a small detail, like a logo on a product or a label on a wine bottle, without wrestling with complex texture maps? The Decal tool is your answer. It lets you project an image onto any surface as a separate layer. This decal can have its own transparency and bump settings, giving you a quick, efficient way to place intricate graphics exactly where you need them.
Illuminating Your Design With Realistic Lighting
If materials give your scene texture, it's the lighting that gives it life. It’s what injects emotion and atmosphere into the frame. Without a smart lighting strategy, even a model with perfect materials will fall flat, looking sterile and unconvincing.
Good lighting breathes energy into a Vectorworks rendering. It carves out shadows that define form, guides the viewer’s eye, and ultimately tells a story. Think of yourself as the director of photography for your design—every light you place is a creative decision that shapes the mood and highlights what truly matters.
Getting To Grips With the Main Light Objects
Vectorworks gives you a solid set of core lighting tools. Each one has a specific job, and learning how to use them together is the first real step toward creating a believable scene.
-
Directional Light: This is your sun. It casts parallel rays from what is essentially an infinite distance, so its position in the model doesn't matter, only its angle. It's perfect for creating those hard, crisp shadows you see on a bright, clear day.
-
Point Light: Think of a bare lightbulb hanging in a room. It radiates light equally in all directions from a single point. This is your go-to for omnidirectional sources like table lamps or simple ceiling fixtures.
-
Spot Light: When you need to create focus and drama, grab the spotlight. It emits a controllable cone of light, letting you adjust its spread and how softly the edges fall off. Use it to draw attention to a piece of art or a specific architectural detail.
-
Area Light: This is a crucial one. It simulates light coming from a surface, like a large window or a bank of fluorescent lights. It produces wonderfully soft, diffuse shadows that are far more realistic for ambient interior light than a single, harsh point light.
A classic beginner's mistake is trying to light an entire room with one point light. The result is always harsh and unnatural. A much better approach is to layer an Area Light for the overall ambience and then add a few Spot Lights to accent key features.
Nailing Natural Daylight With the Heliodon Tool
For any architectural project, getting the natural light right is non-negotiable. The Heliodon tool in Vectorworks is built specifically for this. It’s not just a sun; it's a complete solar simulation system.
You can plug in a real-world location, a date, and a specific time of day, and the Heliodon will generate geographically and astronomically accurate sunlight. This is more than just for looks—it's a powerful analysis tool. You can run precise shadow studies to see how sunlight will move across your building throughout the day or even across different seasons.
Pro Tip: When you're using the Heliodon, always pair it with a Renderworks background that uses a physical sky. This combination makes sure the ambient colour of the sky realistically tints your shadows, so they don't look like solid black voids.
Advanced Lighting Tricks for That Extra Dose of Realism
Once your basic lighting is in place, a few advanced techniques can push your render from good to great. These are often the secret ingredients in professional-quality visuals.
Image-Based Lighting With HDRI
Image-Based Lighting, or IBL, is a complete game-changer. It uses a High Dynamic Range Image (HDRI) as a background that does more than just look pretty. The renderer actually analyses the light information baked into the image—the bright sun, the soft blue from the sky, the bounce light from clouds—and uses all of it to illuminate your scene.
This method produces incredibly subtle and realistic lighting and reflections that would be nearly impossible to fake manually. Your model will reflect the actual sky and environment, instantly making it feel grounded and real.
Creating Soft Light With Glowing Textures
Sometimes, you don't need a formal light object at all. By creating a material with a "Glow" shader, you can make any object in your scene emit light. This is the perfect trick for things like TV screens, LED strips under kitchen cabinets, or complex neon signs.
The light from a glowing texture is naturally soft and diffuse, adding a beautiful, subtle ambience. It's not usually powerful enough to be a primary light source, but it's an unbeatable technique for adding those small, believable secondary lights that make a scene feel authentic. The principles of layering light are pretty universal, as you can see in our guide on how to render in SketchUp, where similar concepts apply.
Of course, what you see on your screen is just as important. Your real-world environment can affect how you perceive colour and light in your digital work. Having an optimized home office lighting setup can reduce glare and eye strain, helping you make more accurate decisions on your intricate lighting designs.
How to Optimise Render Speed and Quality
Waiting for a render to finish is a creative killer. It can feel like watching paint dry, completely derailing your design momentum. The secret to an efficient Vectorworks rendering workflow isn't just about cranking up the settings; it's about mastering the delicate balance between speed and visual polish.
You don't need a perfect, photorealistic image for every single iteration. The real trick is knowing exactly which levers to pull for the task at hand. More often than not, long render times boil down to a few usual suspects: overly complex lighting, unnecessarily high-resolution textures, or simply using the wrong quality settings for the job. By making strategic choices, you can slash that waiting time and get back to what you do best—designing.

This isn't about mindlessly sliding every quality bar to the maximum. It’s about understanding what those sliders actually do and using them intelligently to get the result you need, fast.
Dissecting Custom Renderworks Styles
The heart of render optimisation in Vectorworks is the Custom Renderworks style settings. Think of this as your command centre, where you tell the rendering engine precisely what to focus its energy on. Getting to grips with these settings is absolutely crucial.
-
Anti-Aliasing: This is what smooths out those jagged, "stair-step" edges you see on diagonal lines. A 'Low' setting is perfectly fine for quick drafts, but for a final presentation image, you'll want to push this to 'High' or even 'Very High' to get beautifully crisp lines.
-
Indirect Lighting: This setting dictates how light bounces around your scene after hitting the first surface. For a quick exterior shot with a bright sun, you can often get away with just 1 or 2 bounces. But for a detailed interior, you might need 4 to 6 bounces to properly illuminate dark corners and ceilings. The quality slider here is a huge factor in render time; keep it low for tests and only increase it for final shots to reduce that grainy look.
-
Blurriness: This one governs the quality of soft shadows and blurry reflections—think brushed metal or frosted glass. Higher settings produce much smoother, more realistic effects, but they can add a significant amount of time to your renders.
A common mistake I see is people using one "uber" render style for everything. I keep several custom styles on hand: a "Draft" style with low anti-aliasing and one light bounce, a "Medium" style for client check-ins, and a "Final" style with all the quality settings dialled up for presentation.
Getting these settings right is key. The table below breaks down how to choose the right quality level for different stages of your project.
Render Quality Settings vs. Use Case
| Quality Setting | Typical Render Time Impact | Best Use Case | Key Features Enabled |
|---|---|---|---|
| Low | Minimal (seconds to mins) | Quick massing studies, initial material blocking | Basic lighting, shadows, and textures |
| Medium | Moderate (minutes) | Internal design reviews, client check-ins | Better anti-aliasing, 2-3 indirect light bounces |
| High | Significant (minutes to an hour) | Client presentation images, marketing materials | High-quality anti-aliasing, multiple light bounces |
| Very High | Very Long (hours) | Final hero shots for portfolios or competitions | Maxed-out settings, caustics, high-quality blurriness |
Ultimately, choosing the right setting is about matching the render's purpose with the time you have available. A "Low" quality render that takes a minute is far more valuable during the concept phase than a perfect image that takes an hour.
Smart Strategies for Faster Iterations
Before you even think about hitting the final render button, there are a few clever techniques you can use to speed up your workflow and make decisions much faster. It's all about rendering only what you need to see.
Render Bitmaps for Rapid Previews
Never underestimate the power of the Render Bitmap tool. Instead of rendering your entire viewport, you can draw a marquee around a small, specific area—maybe a new material you’re testing or a corner where a shadow isn't looking quite right. It renders just that tiny portion, giving you an almost instant preview of how your final settings will look. It's a massive timesaver.
Section Viewports for Focused Renders
Why render an entire building when you only need to see the new lobby design? By creating a Section Viewport, you can completely isolate a specific part of your model. This dramatically cuts down the amount of geometry and lighting calculations the renderer has to deal with, leading to a huge boost in speed.
Weighing Performance Trade-offs
Not all materials are created equal. Some are performance heavyweights that can bring your renders to a crawl if you're not careful.
-
Frosted Glass: The blurriness effect that makes frosted glass look realistic is very computationally expensive. Use it where it really matters, but for distant windows or less important objects, consider using a simple transparent glass instead.
-
Displacement Maps: While they create fantastic 3D detail on surfaces like stone or brickwork, displacement maps add a lot to render times because they generate real geometry at render time. For any objects in the mid-to-background, a simple Bump map often gives you enough perceived detail for a fraction of the performance cost.
If you're interested in exploring a wider range of rendering tools and seeing how they stack up, our guide to the best 3D rendering software offers some great insights.
Offloading Heavy Renders to the Cloud
When you're up against a tight deadline and need maximum quality without tying up your machine for hours on end, cloud rendering is a game-changer. These services let you upload your Vectorworks scene to a massive server farm, which crunches through the heavy processing for you.
This approach is becoming increasingly popular in the Indian design industry. The global cloud rendering market, valued at USD 3.34 billion, is growing fast, giving Indian firms access to high-performance rendering without needing to invest in hugely expensive hardware. As detailed in this comprehensive cloud rendering software market report, this technology allows for much faster project turnarounds. Best of all, it frees up your own computer, so you can keep on designing while the final images cook in the cloud.
Integrating External Real-Time Rendering Engines

While the built-in Renderworks engine is fantastic for creating those final, polished images, adding a real-time rendering engine to your workflow can completely change how you design. When you bring tools like Twinmotion, Lumion, or Enscape into the mix, you get to see high-quality results instantly. Suddenly, the whole iterative process becomes fluid and interactive.
This shift means you can make critical design decisions on the fly, get immediate feedback as you tweak materials and lighting, and even create immersive walkthroughs for clients. It’s not about replacing Renderworks, but rather running a parallel workflow that prioritises speed and live visualisation.
The Power of a Live-Sync Workflow
The real magic here is the "live-sync" feature. Instead of the old, clunky process of exporting and re-importing your model every time you make a change, a direct link plugin creates a live connection between Vectorworks and your rendering engine.
Move a wall, swap a window, or change a material in Vectorworks, and you'll see that update appear in your beautifully rendered scene just moments later. This is a massive time-saver. It gets rid of that tedious cycle of export, import, and re-apply settings that used to eat up hours. You can keep all your core design work right inside Vectorworks—your single source of truth—while the real-time engine acts as a dynamic visualisation window.
So, what typically comes across in the sync?
-
3D Geometry: All your walls, floors, furniture, and custom-modelled pieces will show up.
-
Basic Textures: The colour and image-based textures you’ve set up in Vectorworks transfer over as a solid starting point.
-
Object Hierarchy: Your model's organisation, usually based on your classes or layers, is typically maintained, making it much easier to select and edit groups of objects later.
Keep in mind, you will need to do some fine-tuning inside the rendering engine to get the absolute best results. This usually involves tweaking materials to take advantage of PBR (Physically Based Rendering) properties, setting up the lighting environment, and dropping in high-detail assets like people and plants.
Choosing the Right Real-Time Engine
Every platform has its strengths, and the best one for you really depends on your project needs and how you like to work. There’s no single "best" tool, but there is a "best fit" for different situations.
A key reason for this integration is to play to the strengths of both programs. Vectorworks offers a precise and robust modelling environment that's essential for detailed architectural projects. It's trusted by over 700,000 professionals and has been used on major projects like Singapore's Jewel Changi Airport. Here in India, its knack for handling complex designs and over 20 file formats helps firms streamline collaboration, making it the perfect foundation for a real-time rendering pipeline. You can learn more about its growing role in Indian design at nemetschek.in.
Expert Insight: The biggest win from a live-sync workflow is how it transforms client communication. Walking a client through a live, rendered model and making adjustments in real time builds a level of understanding and buy-in that a stack of static images just can't compete with.
A Quick Comparison of Popular Platforms
Let's break down the core strengths of the most common real-time rendering engines you’ll see used with Vectorworks.
| Engine | Key Strengths | Ideal For |
|---|---|---|
| Twinmotion | Very easy to get started with, fantastic foliage and weather systems, and a powerful real-time ray tracer (Path Tracer) for incredible quality. | Architects who need to produce high-quality environmental scenes and animations quickly, with minimal fuss. |
| Lumion | A huge library of high-quality assets, an intuitive material editor, and some of the fastest animation tools available. | Designers who want to create lush, populated scenes and fly-through videos without a steep learning curve. |
| Enscape | The tightest integration with CAD/BIM software, a super simple interface, and one-click VR capabilities. | Firms that need a rendering tool that feels like a natural extension of their design software. |
While Enscape offers a seamless experience, it’s always smart to see what else is out there. If you're exploring your options, have a look at our detailed guide on a powerful Enscape alternative to see how other platforms stack up. Ultimately, bringing an external real-time engine into your process is about adding another powerful tool to your belt, helping you create better designs and communicate your vision more effectively.
Of course. Here is the rewritten section with a more natural, human-expert tone.
Tackling Common Vectorworks Rendering Headaches
No matter how smooth your workflow is, you're going to hit a few snags. It just comes with the territory. Getting past these common rendering roadblocks quickly is what keeps a project moving. Let's dig into some of the most frequent issues I see and how to fix them without pulling your hair out.
Most of the time, the solution is simpler than you think. A little tweak to a material shader or bumping up a quality setting is often all it takes to go from a frustrating render to a fantastic one.
Why is My Render So Grainy? (And Other Texture Woes)
"Why is my render so noisy?" That's easily the number one question I get. Nine times out of ten, the culprit is your quality settings, especially when it comes to lighting.
Inside your Custom Renderworks Style, the first thing to check is Anti-Aliasing – push that to 'High'. But the real game-changer, particularly for interior scenes, is your indirect lighting. You need to give the renderer more light information to play with. Try increasing the number of Bounces to at least 4-6 and slide up the Indirect Lighting quality. This single change can often clear up most of that distracting grain.
Another classic problem is seeing textures look warped or stretched out. That’s a mapping issue, plain and simple. Select the object, head over to the Object Info Palette, and find the 'Render' tab. The default 'Plane' mapping only works for perfectly flat surfaces. For anything with curves or multiple faces, you need to switch it up. Experiment with 'Auto-Align Plane', 'Cylinder', or 'Sphere' mapping to find one that fits your object’s shape.
Getting Glass Right and Exporting Without the Fuss
Making glass look real is about more than just transparency. You’re chasing realism, and that comes down to getting a few specific material settings just right.
-
Transparency: Don't just make it clear. Set the colour to a very light grey and—this is crucial—give it a Refraction Index of around 1.52.
-
Reflectivity: Use the 'Glass' or 'Dielectric' shader. It’s built to handle reflections the way real glass does.
-
Geometry: Your glass object must have thickness. A flat 2D plane can't bend light, so it will never look right. Model it as a solid.
My Two Cents: People constantly forget that glass in the real world has thickness. Modelling your windows and glass objects as solids is the single biggest step you can take toward getting believable refractions and highlights.
When it's time to send your model to an external engine like Twinmotion or Lumion, you want to be efficient. Your best bet is to use a direct link plugin. The Datasmith Exporter for Twinmotion or LiveSync for Lumion are fantastic because they create a live connection. This means any changes you make in Vectorworks show up in the render engine almost instantly. Before you do anything, though, make sure your model is organised neatly by classes. They usually translate directly into material groups, which will save you a ton of rework later.
Ready to transform your models into stunning visuals without the long wait times? At Vibe3D, we offer an AI-powered platform that delivers photorealistic renders in seconds, not hours. Streamline your client reviews and bring your designs to life effortlessly. Explore Vibe3D and start rendering faster today.