Ever wondered how stunning modern homes get that picture-perfect look? It all starts with the elevation – the 'face' of the building that sets the entire design tone. A well-executed modern house elevation combines form, function, and materials into a single, cohesive statement. But moving from a 2D concept to a tangible 3D vision requires powerful tools, especially when precision is key.
This guide is here to bridge that gap. We're not just showcasing beautiful designs; we're breaking them down. We will explore eight distinct modern house elevation styles and show you how to model these designs using Autodesk Revit, the industry-standard software for architects. More importantly, we'll show you how to take your finished Revit models and transform them into breathtaking photorealistic renders.
Our goal is simple: to equip you with both the design inspiration and the technical know-how to build your own impressive 3D models. By the end, you'll understand how to construct these elevations in Revit and even learn how to transform them into photorealistic renders using Vibe3D, turning your digital blueprints into stunning visualisations. Let’s get started.
1. Minimalist Box Design Elevation
The minimalist box design is a cornerstone of the modern house elevation, championing the principle of 'less is more'. This architectural approach strips away ornamentation to focus on form, function, and material honesty. Characterised by clean geometric lines, flat roofs, and a distinct cubic shape, it creates a powerful statement through simplicity. The design often employs a restrained colour palette and expansive glass panels, blurring the lines between indoor and outdoor spaces. It’s a sophisticated look that relies on precision in your Revit model to achieve its refined aesthetic.
Strategic Breakdown
This elevation style’s success hinges on flawless execution. The lack of decorative elements means every joint, surface, and material choice is exposed. Architects like the legendary Mies van der Rohe mastered this style because it challenges the designer to create beauty through pure form and proportion, something that can be meticulously planned in a 3D model.
Key Insight: The power of the minimalist box elevation isn’t in what you add, but in what you thoughtfully remove. The design forces a focus on material quality and structural clarity, making it a true test of architectural skill.
How to Model This in Revit
Modelling a minimalist box design in Revit is an exercise in precision. You'll primarily use the Wall, Floor, Roof, and Curtain Wall tools.
-
Massing: Start with simple In-Place Mass forms to establish the primary cubic volumes. This helps you refine proportions before committing to detailed elements.
-
Walls & Roofs: Use Basic Wall and Flat Roof types. The key is in the details; ensure your wall layers (structure, insulation, cladding) are accurately defined for a realistic model.
-
Glazing: The Curtain Wall tool is your best friend here. Create custom curtain wall types with minimal mullions to achieve that floor-to-ceiling glass look. Pay close attention to corner joins for a seamless appearance.
Actionable Takeaways
-
Material Variation: To avoid a flat look in your renders, introduce texture in your Revit materials. Combine smooth stucco with rough-cut stone or warm timber cladding.
-
Integrate Landscaping: Use topography and site components in Revit to soften the structure's hard geometric edges with softscaping.
-
Master the Details: Use Revit families for hidden gutters and recessed lighting to maintain the clean lines central to this modern house elevation.
-
Transform in Vibe3D: Once your Revit model is complete, you can easily transform it into a stunning, photorealistic render with Vibe3D. This final step allows you to showcase the material textures and lighting that truly make a minimalist design come alive.
2. Mixed Material Facade Elevation
A mixed material facade elevation moves beyond a single finish, artfully combining diverse textures like wood, stone, and metal to create a visually dynamic exterior. This architectural strategy adds depth and character, using material changes to define different volumes or highlight features. By balancing warm, natural elements with sleek, industrial ones, this modern house elevation achieves a rich, tactile quality that feels both contemporary and grounded. Modelling these transitions accurately in Revit is key to a convincing final design.
Strategic Breakdown
The core principle behind a successful mixed material facade is balance and intention. Rather than simply applying different finishes, the design uses materials to tell a story—stone grounds the base, while wood adds warmth. The transitions between materials become critical design moments that require precise detailing in Revit to look deliberate and clean. This technique is highly effective for breaking down the scale of a larger home.
Key Insight: The magic of a mixed material facade isn't just in the materials themselves, but in their purposeful interplay. Effective design uses material shifts to guide the eye and articulate the home’s form, turning the facade into a cohesive architectural composition.
How to Model This in Revit
Modelling a mixed material facade in Revit requires careful wall assembly management and precise detailing at material intersections.
-
Stacked Walls: For horizontal material changes, the Stacked Wall tool is invaluable. Create separate basic wall types for each material (e.g., stone base, wood cladding) and then combine them into a single stacked wall assembly.
-
Splitting Faces: For more complex patterns, use the Split Face tool on a basic wall. This allows you to "paint" different material finishes onto specific regions of a single wall surface without altering its core structure.
-
Reveal & Sweep Profiles: Add depth and create clean transitions by applying Wall Sweeps for elements like metal trim or projecting bands, and Wall Reveals for creating control joints or shadow lines where materials meet.
Actionable Takeaways
-
Follow the 60/30/10 Rule: To avoid a chaotic look, limit your material palette in Revit. Use a dominant material for about 60% of the facade, a secondary for 30%, and an accent for 10%.
-
Harmonise Tones: Ensure all chosen materials share a common colour undertone (warm or cool) to maintain a cohesive aesthetic in your renders.
-
Detail the Junctions: The points where materials meet are crucial. Use Revit's detail components to model flashing or shadow gaps for crisp, intentional transitions.
-
Render with Realism: After modelling in Revit, bring your design into Vibe3D. This is where your material choices truly shine, allowing you to create photorealistic renders that accurately capture the texture of stone, the grain of wood, and the reflection of metal, making your modern house elevation compelling.
3. Glass and Steel Modern Elevation
The glass and steel modern elevation is a celebration of transparency, structure, and light. This style uses an exposed structural framework, typically steel, to support vast expanses of glass. The result is a building that feels weightless and open, erasing the boundary between the interior and the landscape. It’s an architectural statement that prioritises views and natural light. Creating a convincing model of this style in Revit relies on the accurate representation of the structural grid and curtain wall systems.
Strategic Breakdown
This elevation style transforms a home into a viewing gallery. Its success depends entirely on the elegant integration of structure and glazing. Iconic examples like Pierre Koenig’s Stahl House demonstrate how this approach can create breathtaking living experiences. The design’s honesty is its greatest strength, as the structural grid is not hidden but celebrated as a key aesthetic element of the modern house elevation.
Key Insight: The dialogue between solid and void is paramount. The slender steel frame provides the necessary strength and rhythm, allowing the glass to dissolve the walls and create a powerful sense of connection with nature or the urban environment.
How to Model This in Revit
Modelling a glass and steel elevation in Revit requires a focus on structural and curtain wall systems.
-
Structural Grid: Use the Beam and Column tools to create the primary steel framework first. This grid will dictate the placement of your walls and glazing.
-
Expansive Glazing: The Curtain Wall tool is essential. Create a custom curtain wall system with thin mullion profiles to replicate the sleek steel or aluminium frames. Use large, uninterrupted panels for maximum transparency.
-
Detailing: Pay close attention to the connection details between the steel frame and the curtain wall. Use Detail Components to accurately model these junctions, as they are a defining feature of the style.
Actionable Takeaways
-
Prioritise Performance: In your Revit model, specify high-performance, low-E, double or triple-paned glass to manage thermal comfort and energy efficiency.
-
Integrate Shading: Model deep roof overhangs or use Revit families for automated blinds to control solar gain.
-
Balance Privacy: Use strategic landscaping or apply materials with a frosted glass appearance in your Revit model for sensitive areas.
-
Visualise with Vibe3D: This style's impact is all about light and reflection. Transforming your Revit model using the best architectural rendering software like Vibe3D is crucial to accurately portray the interplay of light, the reflectivity of the glass, and the texture of the steel, bringing your transparent vision to life.
4. Horizontal Linear Elevation
The horizontal linear elevation is a style that draws the eye outward, creating a sense of stability and a strong connection to the landscape. It emphasises strong horizontal lines through elements like extended, low-pitched rooflines and continuous bands of windows. This modern house elevation takes cues from Prairie School masters like Frank Lloyd Wright, adapting their principles to create a look that feels both grounded and sleek. The key to modelling this in Revit is reinforcing this horizontal emphasis in every element.
Strategic Breakdown
This elevation style is a masterclass in composition, using layered horizontal planes to create depth and shadow. It’s particularly effective on wider plots where the building can fully express its linear form. Architects use this approach to anchor a structure to its site, using continuous material selections and deep overhangs to frame panoramic views. The result is an architecture that feels both expansive and intimately tied to the earth.
Key Insight: The success of a horizontal linear elevation lies in its rhythm and repetition. Every element, from the siding pattern to the window mullions, must reinforce the dominant horizontal axis to create a cohesive and powerful design.
How to Model This in Revit
Modelling a horizontal linear design in Revit requires a focus on planes and continuity. You will heavily rely on the Roof, Wall, and Curtain Wall tools, with special attention to their profiles and joins.
-
Roof Forms: Use the Roof by Footprint or Roof by Extrusion tools to create dramatic, low-slope roofs with deep overhangs. Edit the roof’s profile to extend well beyond the exterior walls.
-
Ribbon Windows: The Curtain Wall tool is perfect for creating continuous bands of glass. Define a custom curtain wall with a strong horizontal grid pattern and minimal vertical mullions to accentuate the linear effect.
-
Horizontal Cladding: When creating your walls, use a Stacked Wall or edit the wall assembly's material properties to include a surface pattern that mimics horizontal siding. This ensures your elevations and 3D views accurately reflect the design intent.
Actionable Takeaways
-
Emphasise with Materials: Use materials that naturally come in linear formats, such as long-format bricks, timber slats, or metal siding panels.
-
Layer the Planes: In Revit, create visual depth by layering different horizontal elements, such as a low garden wall in front of a porch, which sits below a deep roof eave.
-
Mind the Shadows: Use Revit's sun and shadow settings to study how the deep overhangs cast shadows, adding dynamism to the elevation.
-
Visualise with Vibe3D: After detailing your horizontal design in Revit, bring it into Vibe3D to create photorealistic renders. This step is crucial for showcasing how light interacts with the deep overhangs and textured materials, bringing your modern house elevation to life.
5. Vertical Slat Screen Elevation
The vertical slat screen is a dynamic and functional element in modern house elevation design, bringing texture, rhythm, and a sophisticated layering effect. This technique uses a series of vertical wooden or metal slats to create a screen or cladding system that offers privacy while allowing filtered light and air to pass through. The resulting play of light and shadow creates a constantly changing facade that is both visually striking and practical. Modelling this screen efficiently in Revit is key to managing project performance.
Strategic Breakdown
The beauty of the vertical slat screen lies in its duality as both a decorative and a high-performance feature. The orientation and spacing of the slats can be precisely calculated to block harsh summer sun while permitting winter sunlight, making it a key component of passive design strategies. This approach adds depth and character, transforming a simple building form into an intricate, responsive skin.
Key Insight: The vertical slat screen elevation is a masterclass in functional aesthetics. It’s not just a facade treatment; it’s an architectural tool that mediates privacy, light, and thermal comfort while adding immense visual appeal.
How to Model This in Revit
Modelling a vertical slat screen in Revit requires a component-based approach for flexibility and performance. Using the Railing tool is a surprisingly powerful method.
-
Create a Slat Profile: Start by creating a new Profile family for your slat shape (e.g., a simple rectangle).
-
Build a Baluster Family: Create a new Baluster family and load your slat profile into it. This will represent a single vertical slat.
-
Use the Railing Tool: The Railing tool is perfect for this. Create a new railing type, turn off the top rail and handrails, and set your new slat baluster family as the main pattern. You can control the spacing precisely in the baluster placement settings. This method allows you to easily apply the screen to any line or host element.
Actionable Takeaways
-
Material Matters: Choose climate-appropriate, durable materials like thermally treated timber or aluminium, and represent them accurately with high-quality textures in your Revit materials.
-
Balance Privacy and Light: Adjust the baluster spacing in your railing type to find the perfect balance for privacy and sunlight.
-
Structural Integrity: Ensure your Revit model includes adequate structural support for the screen, paying attention to connection details.
-
Render with Vibe3D: After modelling in Revit, bring your design into Vibe3D. This is crucial for accurately visualising the complex interplay of light and shadow created by the slats, which will give your client a true-to-life representation of this modern house elevation.
6. Monochromatic Black Modern Elevation
The monochromatic black modern house elevation is a bold and sophisticated architectural statement. It leverages deep, dark colours to create a dramatic silhouette that contrasts sharply with its natural surroundings. This style uses materials like black metal cladding, dark-stained wood, or charred timber (shou sugi ban) to achieve a unified, elegant facade. The challenge in Revit is to model this in a way that captures subtle textures and avoids looking like a flat, black void.
Strategic Breakdown
This elevation style is more than just a colour choice; it's a deliberate strategy to emphasise form and volume. By neutralising the exterior with a single dark hue, architectural shapes and shadows become the primary visual elements. It’s a high-impact choice that requires exceptional material quality and precise detailing to succeed.
Key Insight: A black elevation transforms a house into a canvas. It amplifies the impact of natural light, the changing seasons, and the surrounding greenery, making the architecture itself a dynamic backdrop for nature.
How to Model This in Revit
Modelling a dark, monochromatic elevation in Revit is about mastering materials and lighting.
-
Material Creation: Go beyond default colours. Use the Material Browser to create custom materials. For charred wood, use a high-resolution, seamless texture map with a corresponding bump or normal map to simulate its unique texture. For metal panels, adjust the Reflectivity and Finish (e.g., matte, satin).
-
Wall Assemblies: Use Stacked Walls or Edit Profile on basic walls to create reveals and shadow gaps between panels. This detail is crucial for adding depth and realism to a monolithic design.
-
Lighting & Fenestration: Position large windows strategically using the Curtain Wall tool. A well-lit interior will glow warmly through the windows at night, creating a beautiful contrast with the dark facade.
Actionable Takeaways
-
Texture is Everything: Combine different black materials in your Revit model to add depth. Mix matte black metal panels with the organic texture of charred timber.
-
Embrace Contrast: Use warm-toned wood materials for soffits, decks, or window frames to break the monotony and add a welcoming touch.
-
Consider the Climate: Specify proper ventilation and insulation in your Revit model's wall assemblies, especially in hot climates.
-
Transform in Vibe3D: After detailing your model in Revit, use Vibe3D to bring it to life. Vibe3D's advanced rendering capabilities will accurately portray how light plays off the matte and textured black surfaces, showcasing the subtle sophistication of this modern house elevation.
7. Cantilever and Floating Volume Elevation
The cantilever and floating volume elevation is one of the most dramatic and gravity-defying expressions in modern architecture. This design features sections of the house that project outwards, seemingly unsupported, creating a powerful sense of tension and lightness. These floating forms create functional covered outdoor spaces and result in a truly iconic modern house elevation. Modelling this style in Revit requires a strong focus on the underlying structure that makes it possible.
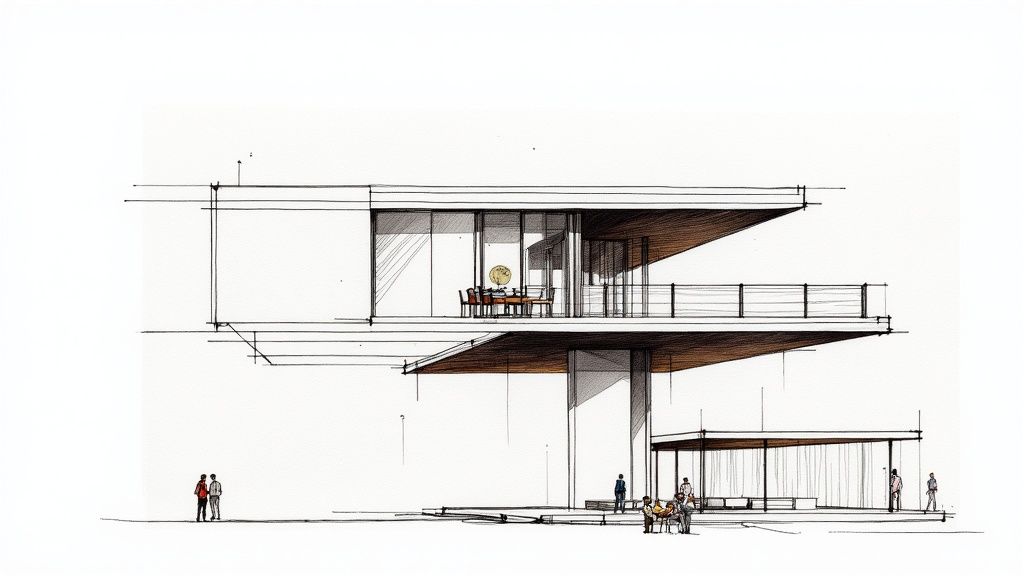
Strategic Breakdown
This elevation style is a testament to advanced engineering. The success of a cantilever relies on a hidden internal structure, typically a robust steel or reinforced concrete frame, that counter-balances the projecting mass. The key is to make these complex structural feats look effortless, resulting in a clean, minimalist aesthetic that belies the engineering complexity within.
Key Insight: A successful cantilevered design isn't just about the overhang itself; it's about the visual balance with the rest of the structure. The "floating" element should feel intentional and integrated, either contrasting with or emerging from a solid, anchored base.
How to Model This in Revit
Modelling cantilevers in Revit requires a focus on structural accuracy from the outset. You’ll be using core tools but with an emphasis on how they connect and support each other.
-
Structural Grid: Begin by setting up a precise Structural Grid. This will be the backbone for aligning your load-bearing walls, columns, and cantilevered beams.
-
Floor and Beam Systems: Use the Floor tool to create the cantilevered slab, ensuring it extends beyond the support wall or columns below. Model the underlying support with the Beam System tool, placing steel or concrete beams that tie back deep into the main structure.
-
Visualisation: Use section views and 3D views constantly to check the connections. Ensure your wall layers and floor assemblies accurately represent the thermal breaks and waterproofing critical for a real-world cantilever.

Actionable Takeaways
-
Engineer from Day One: While you can model the concept in Revit, a structural engineer's input is crucial to determine feasible spans and structural strategies.
-
Purposeful Projections: Use cantilevers to serve a function, such as sheltering a patio, framing a view, or providing shade for large windows.
-
Material Honesty: Clad the underside of the cantilever in your model with a high-quality material like timber or metal panelling, as it is a highly visible surface.
-
Render to Reality: Once modelled, bringing your design into a rendering engine is vital to truly appreciate its impact. You can learn more about how Vibe3D helps in creating realistic 3D drawings that showcase the dramatic shadows and material textures of your floating volumes.
8. Parametric and Geometric Pattern Elevation
At the forefront of architectural innovation, the parametric and geometric pattern elevation uses computational design to create complex, dynamic facades. This cutting-edge modern house elevation approach moves beyond traditional tools, employing algorithms to generate intricate patterns and responsive forms. The result is a visually stunning building skin that interacts with light and shadow. To achieve this, Revit must be used in conjunction with computational design plugins like Dynamo.
Strategic Breakdown
This elevation style is a collaboration between architect and algorithm. Its success relies on integrating design intent with computational logic. Unlike conventional methods, parametric design allows for endless iteration and optimisation, enabling facades to be fine-tuned for environmental performance or aesthetic expression. This complexity demands a deep understanding of digital tools and fabrication techniques.
Key Insight: Parametric design elevates a facade from a simple enclosure to an intelligent system. The pattern is not just decoration; it's data-driven, capable of responding to sunlight, views, and privacy needs, making the architecture both beautiful and highly functional.
How to Model This in Revit
Modelling a parametric facade in Revit requires moving beyond standard tools and embracing its computational design capabilities, primarily through the Dynamo plugin.
-
Conceptual Massing: Begin in the Conceptual Massing environment. Create the basic form of your building, which will serve as the host for your parametric pattern.
-
Dynamo Scripting: Open Dynamo and build a script to generate your pattern. You will typically divide the mass surface into a grid (using nodes like Surface.PointAtParameter) and then place adaptive components onto those points. The script allows you to control parameters like the opening size or rotation of each component based on rules.
-
Adaptive Components: Create a custom Adaptive Component family. This is the individual panel or element that will be repeated across your facade. The "adaptive" points will attach to the nodes generated by your Dynamo script, allowing the component to flex and change according to the logic you've built.
Actionable Takeaways
-
Balance Complexity and Budget: A fully parametric facade can be costly. Consider applying it strategically to key areas rather than the entire building.
-
Function Over Form: Use your Dynamo script to optimise the pattern for a purpose, like solar gain, privacy, or natural ventilation.
-
Plan for Fabrication: Involve fabricators early. The choice of material and fabrication method will heavily influence your design parameters in Revit and Dynamo.
-
Visualise with Vibe3D: Once your complex Revit model is ready, use Vibe3D to create breathtaking, photorealistic renders. This is crucial for visualising how the intricate patterns interact with light and shadow, bringing your sophisticated modern house elevation to life.
Modern House Elevation Styles Comparison
| Elevation Style | Implementation Complexity 🔄 | Resource Requirements ⚡ | Expected Outcomes 📊 | Ideal Use Cases 💡 | Key Advantages ⭐ |
|---|---|---|---|---|---|
| Minimalist Box Design Elevation | Medium - needs precision in construction | High - quality materials, skilled labor | Timeless, spacious, energy efficient | Urban/suburban contemporary homes | Easy maintenance, maximizes natural light |
| Mixed Material Facade Elevation | High - complex material integration | Medium to High - multiple materials | Warm, textured, personalized facades | Homes wanting visual interest and material contrast | Flexible budget, high curb appeal |
| Glass and Steel Modern Elevation | Very High - requires advanced engineering | Very High - premium glass and steel systems | Open, light-filled spaces, strong indoor-outdoor flow | High-end contemporary residences | Maximizes light and views, iconic aesthetic |
| Horizontal Linear Elevation | Medium - requires structural support | Medium - materials for horizontal elements | Stable, low-profile, cohesive horizontal emphasis | Prairie-style, ranch homes, flat terrain | Sun shading, natural eye flow, unified appearance |
| Vertical Slat Screen Elevation | Medium - precision in slat installation | Medium - durable wood or metal slats | Privacy, sun control, dynamic textures | Tropical or modern homes needing shading/privacy | Ventilation, security, adaptable aesthetics |
| Monochromatic Black Modern Elevation | Medium - quality finishes essential | Medium to High - specialized dark materials | Bold, dramatic, sophisticated appearance | Homes wanting standout, minimalist statement | Hides dirt, enhances form, timeless elegance |
| Cantilever and Floating Volume Elevation | Very High - expert structural engineering | High to Very High - steel/engineered lumber | Iconic, dramatic, creates covered outdoor spaces | Sites with limited space, signature architectural design | Maximizes space, sun shading, architectural drama |
| Parametric and Geometric Pattern Elevation | Very High - specialized software & fabrication | Very High - custom fabrication, advanced tech | Unique, cutting-edge, complex light/shadow effects | High-budget, avant-garde or signature projects | Functional customization, visual impact |
From Revit Model to Photorealistic Renders with Vibe3D
You have learned how to approach creating a detailed 3D model of a modern house elevation in Revit, from minimalist forms to complex parametric facades. Your Revit model is the digital blueprint where crucial decisions about form, material, and light are made. It's the technical foundation of your design. But a technical model, no matter how precise, often struggles to convey the feeling and atmosphere of a finished space. Presenting a flat, lifeless render can undermine even the most brilliant architectural concept.
This is the critical final step where design intent becomes a compelling visual story that clients can connect with. This is where tools like Vibe3D revolutionise the workflow. Instead of spending hours wrestling with complex rendering settings, you can breathe life into your Revit models in seconds. Vibe3D is designed to take your detailed geometry and instantly elevate it using AI to apply hyper-realistic lighting, atmospheric effects, and rich textures. It transforms your technical file into a stunning, evocative image that truly sells your vision.
Imagine effortlessly iterating through design options with simple text prompts. You could take your cantilevered volume elevation and instantly see it at 'golden hour' or surround your mixed-material facade with 'lush, tropical landscaping'. This rapid visualisation process doesn't just save time; it empowers you to explore creative possibilities without limits and present your modern house elevation in its most persuasive form. By bridging the gap between a precise Revit model and a photorealistic final render, you ensure your hard work gets the green light it deserves.
Ready to transform your Revit models into breathtaking, client-winning visuals in seconds? Experience the power of AI-driven rendering with Vibe3D and see how easily you can bring your modern house elevation designs to life. Visit Vibe3D to start creating stunning renders today.